
No products in the cart.
Content Marketing
Google Forms: Be taught step-by-step learn how to create a kind utilizing the software

16
Feb
Feb
As a way to support education, businesses, and digital marketing, Google consistently provides high-quality products that are completely free. Google Forms is a great example of this.
Of course, when compared to major paid platforms, it may fall short. However, for basic forms and surveys, it gets the job done smoothly and is the most practical way to do so.
In this article, you’ll learn how to use it step by step and discover more about this tool that helps students, professionals, and companies worldwide. Let’s dive in!
Download this post by entering your email below
How does Google Forms work, and who can use it?
Google Forms is an application for creating and managing forms, officially introduced in 2012. Its platform is online (SaaS) and free to all Google users.
While there’s an option to enhance the service by subscribing to a Google Workspace plan (formerly G Suite), no extra functionality is added.
What you receive are some bonuses for businesses, including increased storage in Google Drive, new security options, administrative control over accounts, and 24/7 support.
Download this post by entering your email below
What can it do?
Google Forms offers various templates and features. With it, you can create:
- Surveys;
- Polls;
- Contact forms;
- Assessments (including multiple-choice, open-ended, or quantitative questions).
And that’s not all. With some creativity, you can give even more functions to forms. It is possible to create basic registration systems for sales, present consent terms intuitively, and much more. You can even develop small narrative games!
How to Create a Form in Google Forms?
Creating your Google Form is much simpler than you might think. Just follow the step-by-step guide below!
1. Access the Google Forms Website
To start the process, visit the official Google Forms website. You’ll arrive at the service’s homepage, which offers both the Personal option and the one included in Google Workspace. For now, let’s choose the second option: “Go to Forms.”
To access it, you need to be logged into a Google account. Make sure you are using an account of your preference, or create a new one.
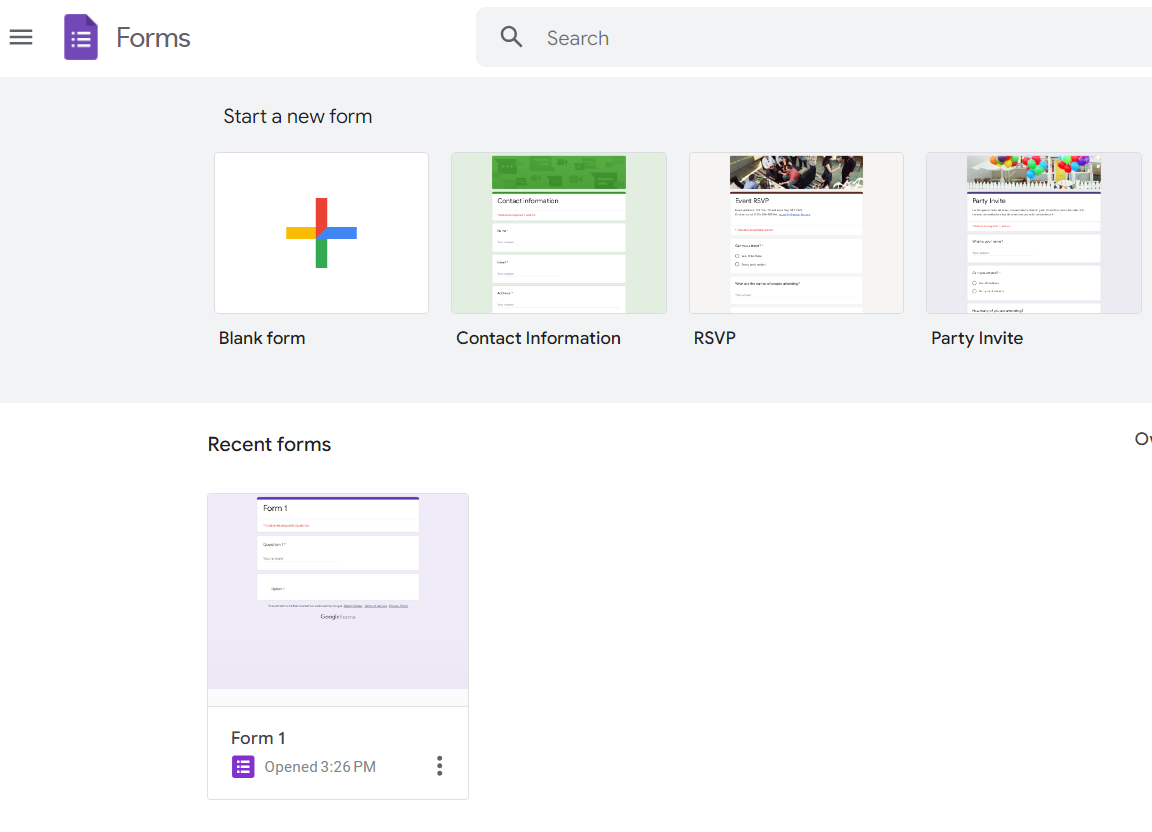
2. Choose a template or start a new form
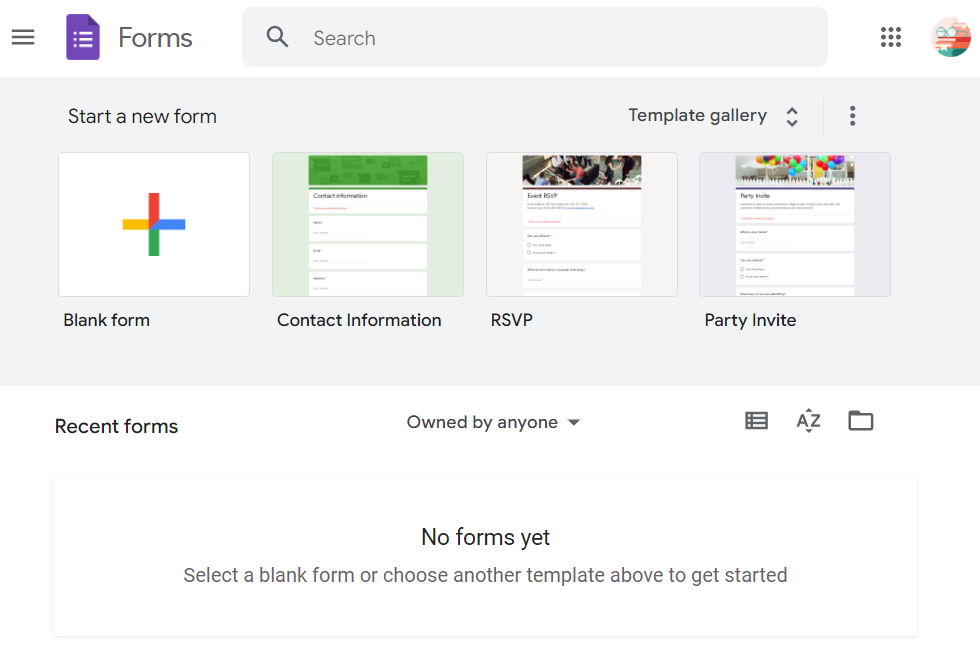
On the next page, Google will present some pre-made form templates for you to use, and, below that, the most recent forms you have created. To make our tutorial more intuitive, we will create a form from scratch by clicking on the first option: “Blank form”.
3. Write the form content
You are now in the form editor, where titles, descriptions, questions, and answers are created and edited.
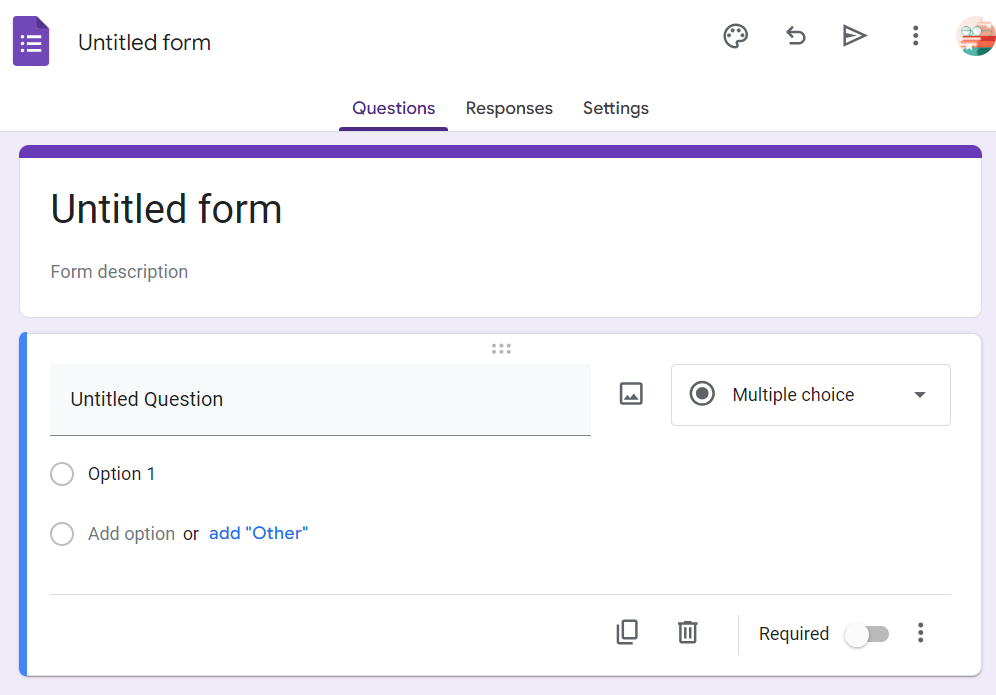
In the first block, you can write the title and description of your form, which should provide a concise explanation of its purpose and instructions. In the sidebar, you have access to the following tools:
- Add Question: Creates a new question block;
- Import Questions: Allows you to use questions already created in other forms;
- Add Title and Description: Includes a new title and description block;
- Add Image: Allows you to include an image from your computer camera, web (URL), or your Google account;
- Add Video: This lets you search for and add YouTube videos;
- Add Section: Includes a new section with a title and description for creating multi-step forms.
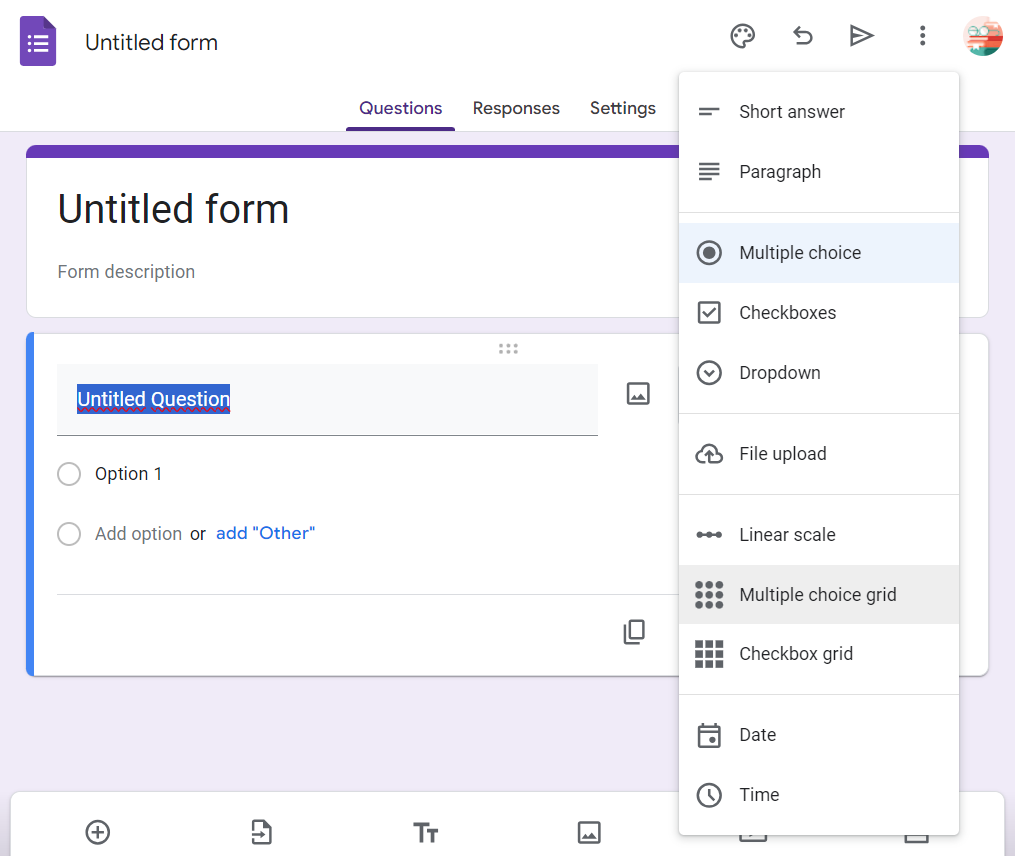
When adding a question block, a variety of options will be available, such as short answer, multiple choice, checkbox, and more.
You can also choose whether the response will be mandatory or not, as well as arrange your questions by clicking and dragging them to the desired position.
4. Customize the appearance
While still in the editor, click on the paint palette icon in the top left corner (Customize Theme) to access style options.
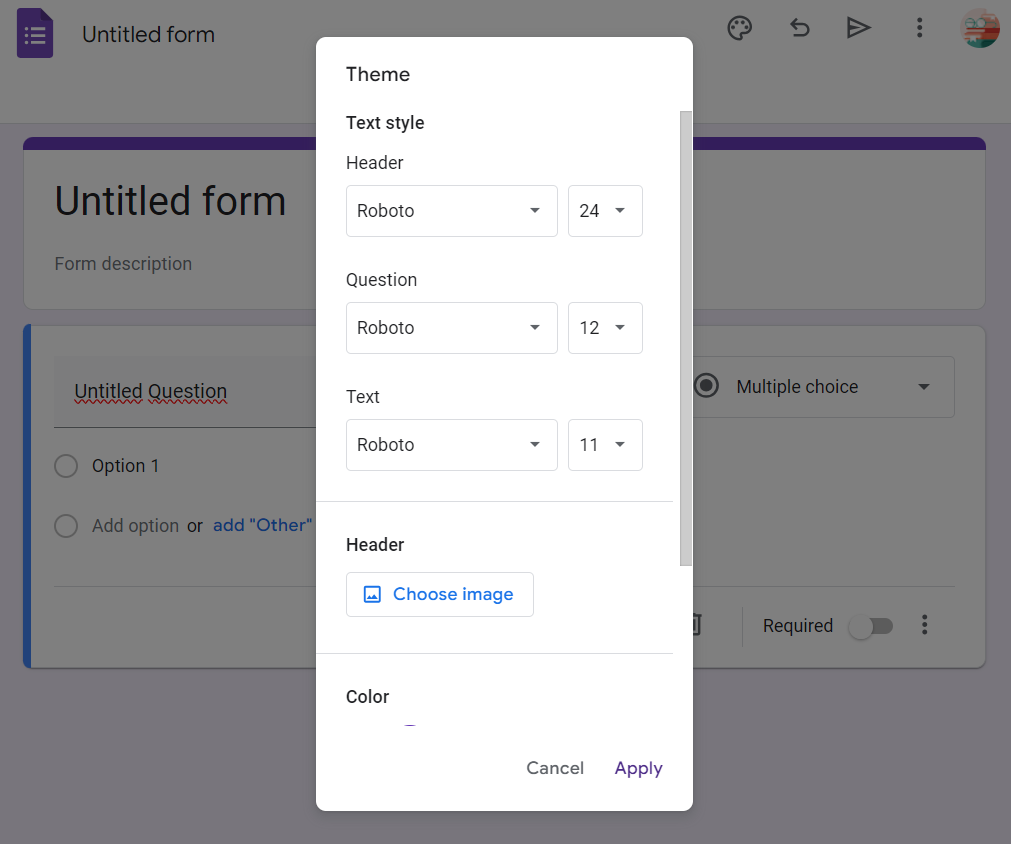
Google Forms allows you to add a header image, choose the theme color (borders and buttons), and adjust the background shade, which also follows the theme color. Additionally, there are font options available for the text.
5. Preview it
To ensure that your form looks the way you want, you can preview it by clicking the eye icon in the editor’s header.
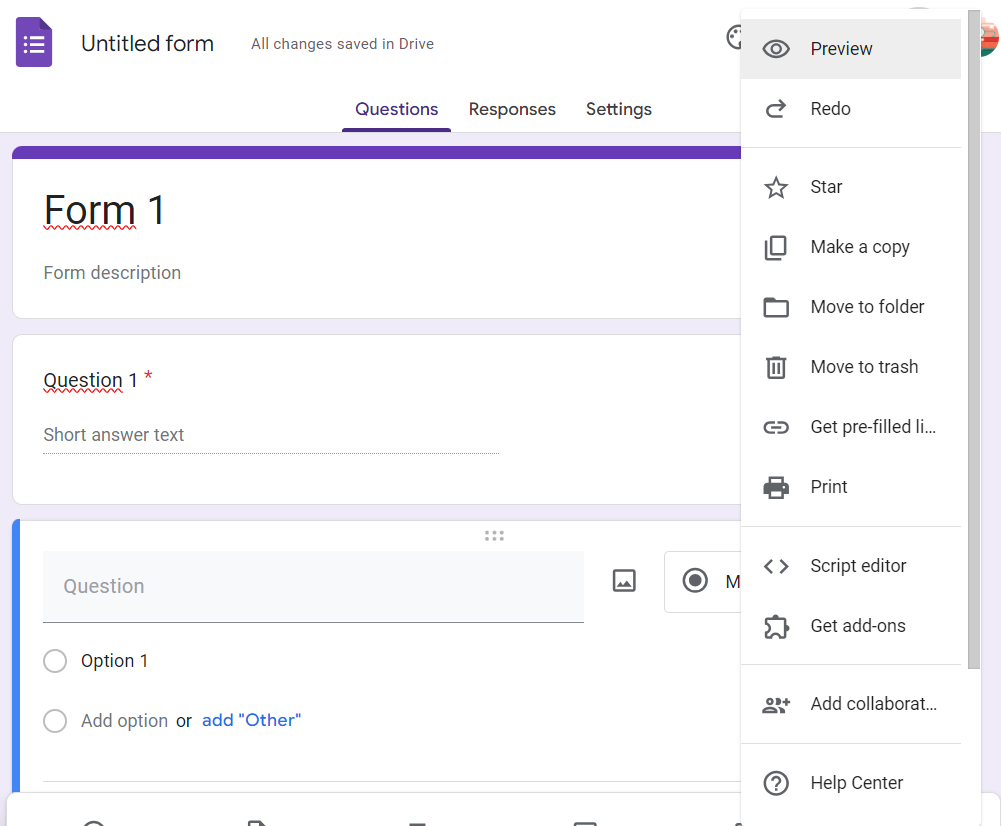
A new tab will open, displaying your form exactly as respondents will see it. If any adjustments are necessary, simply return to the editor tab and make the updates.
6. Set-up the form operation
By clicking on the settings tab on the header, the settings panel will appear on the screen.
In the General tab, you have the following options:
- Collect emails: Respondents’ e-mails are saved;
- Answer receipts: A copy of the responses is sent to the respondents.
- Limit to 1 response: Respondents will need to log in to Google and can only submit the form once.
- Edit after submission: Allow respondents to edit their answers after submitting the form.
- View summary charts and text responses: Respondents can view their answers later.
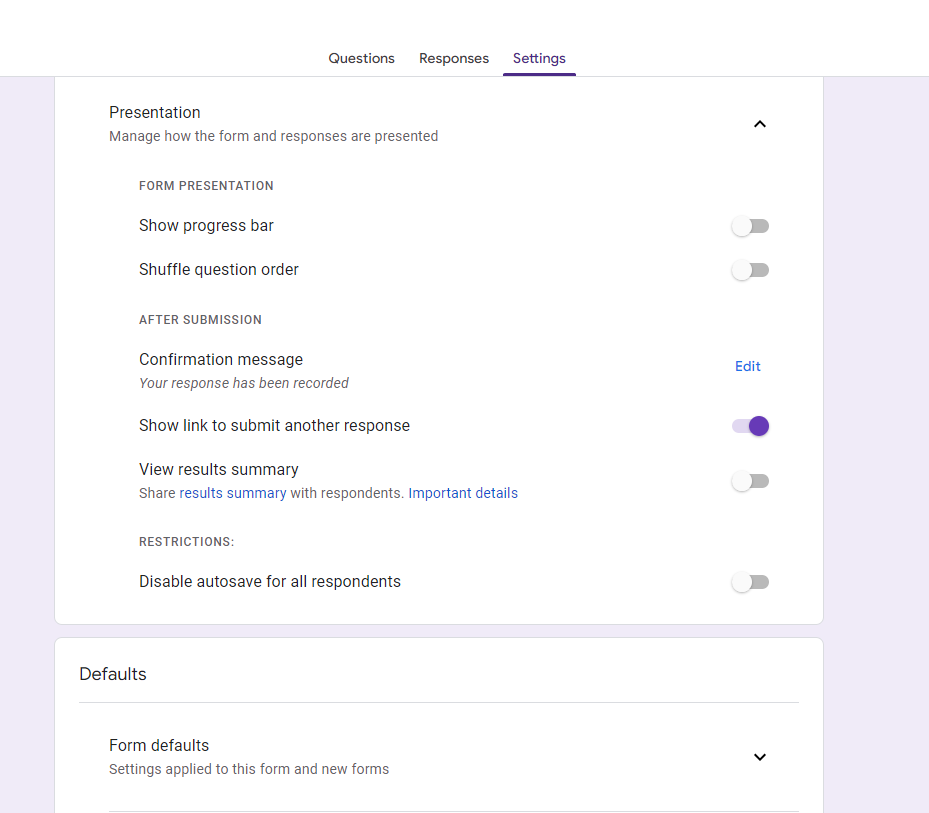
In the Presentation tab, the options are:
- Show progress bar: A bar is displayed indicating the section of the form where the respondent is.
- Shuffle question order: Questions are displayed randomly.
- Show link to submit another response: When this option is checked, a link is displayed at the end of the form, allowing for another response submission.
After choosing the options, you can also create a confirmation message that will be displayed immediately after participants submit their answers.
In the last tab, Tests, by enabling the “Create test” option, your form will start counting correct and incorrect answers. Within this feature, you have the following options:
- Display score immediately after submission: Showed to the respondent right after submitting the answers.
- Display score later, after manual review: The result is sent later, by your direct command (this option activates e-mail collection).
- Allow respondents to see incorrect questions: Only incorrectly answered questions are displayed to respondents.
- Allow respondents to see correct answers: Only correctly answered questions are displayed to respondents.
- Allow respondents to see scores: The total points obtained are displayed to users.
After adjusting the options as you see fit, just click “Save”.
7. Share Your Form
After completing the editing and configuration of your form, simply click the “Send” button in the editor’s upper right corner. By doing so, a new dialog box will appear with some final options.
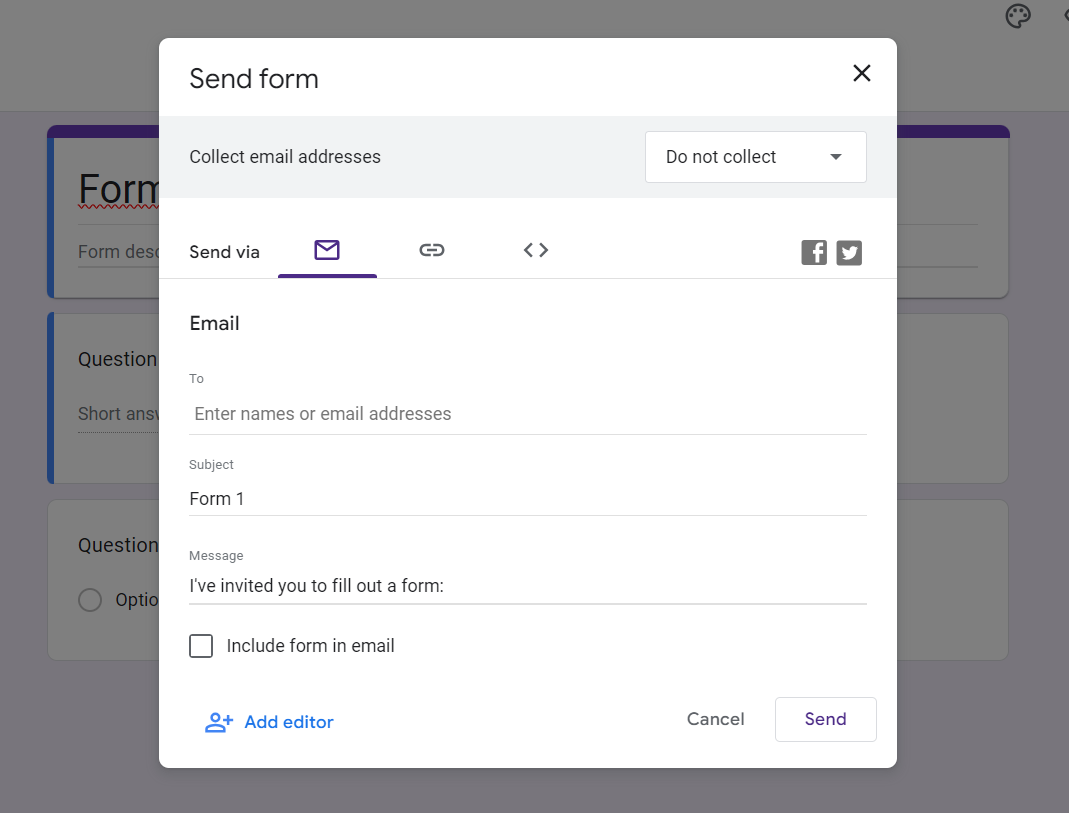
Selecting the option “Collect e-mails” will automatically gather the e-mail addresses you provide in advance. Just below that, you can see the “Send via” section, where Google Forms offers three ways to share your form:
- E-mail: You’ll need to specify the recipient(s) (which can be multiple), the subject (or e-mail title), and a message.
- Link: A link is generated for you to share your form in custom posts on social media, chats, messages, or other content.
- Embed HTML: An HTML code is generated for you to embed your form on your website or online platform.
- Share on Facebook: A Facebook post is generated.
- Share on Twitter: A Twitter post is generated.
Feel free to use any or all of these methods. At the end of the dialog box, there’s also an option to “Add collaborators” to allow other users to edit your form.
How to track your Google Form’s results
After some time, you’ll want to check the progress of your Google Form answers. To do this, simply revisit the Google Forms homepage and click on your form, which will be listed under “Recent forms”.
You’ll be taken back to the editor, but this time, click on the “Responses” tab. There, you’ll find gathered results for each question in your form, presented as charts.
To the right of the tab title, the number of respondents is displayed, and just below it, you can disable the “Accepting responses” option to stop submissions. By doing this, a message will appear indicating that the form has been closed.
In the same area, you can also click on the menu (three dots) to receive e-mail notifications, download responses, print, or delete data (if you want to redo the survey, registration, or test).
Finally, by clicking on the Google Sheets icon to the left of the menu, you can export all the data to a spreadsheet.
How to make my forms more secure?
Google doesn’t currently provide native CAPTCHA services for its forms, but we can improvise by creating something similar.
What we’ll do here is generate a section before the questions with a basic test to ensure that your respondents are indeed human. The solution is straightforward, and you can learn how to do it below:
1. Create a new section in your form
Access your form and, in the editor, select the last question. Then, add a new section by clicking on the last option in the side menu.

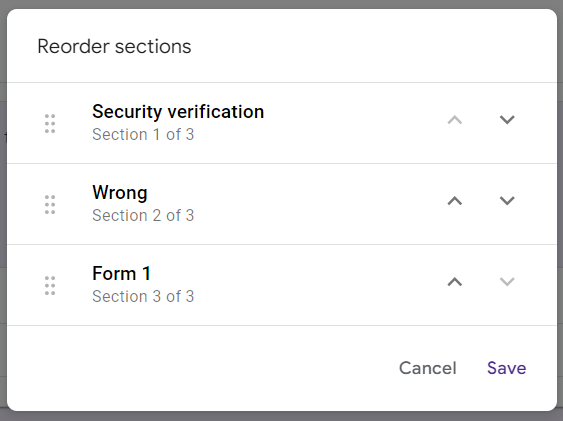
This new section (usually named “Untitled Section”) should come before the questions. To reorder it, click on the menu in the newly created section and select “Move section”.
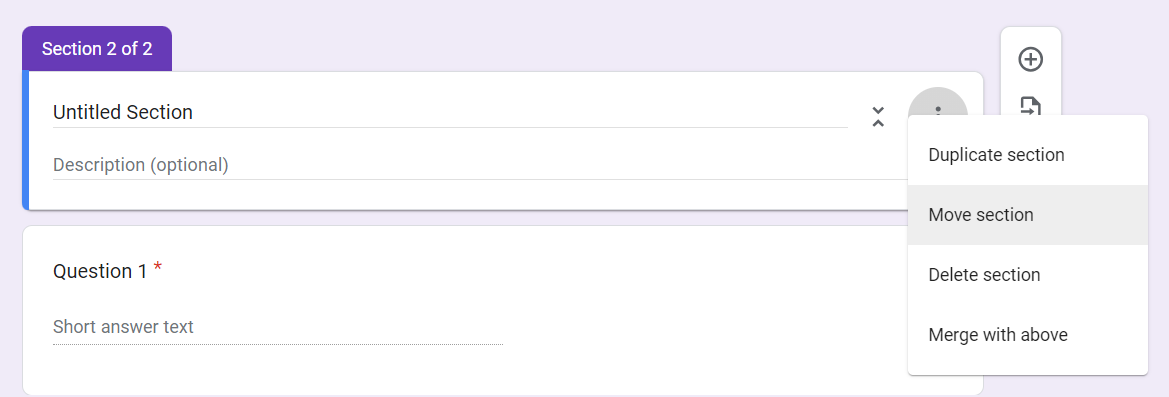
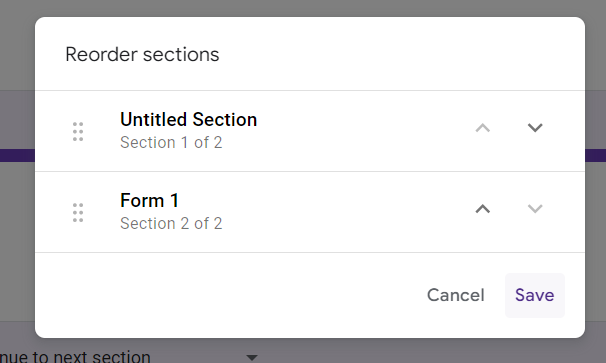
On the next screen, drag the new section to the top and click “Save”.
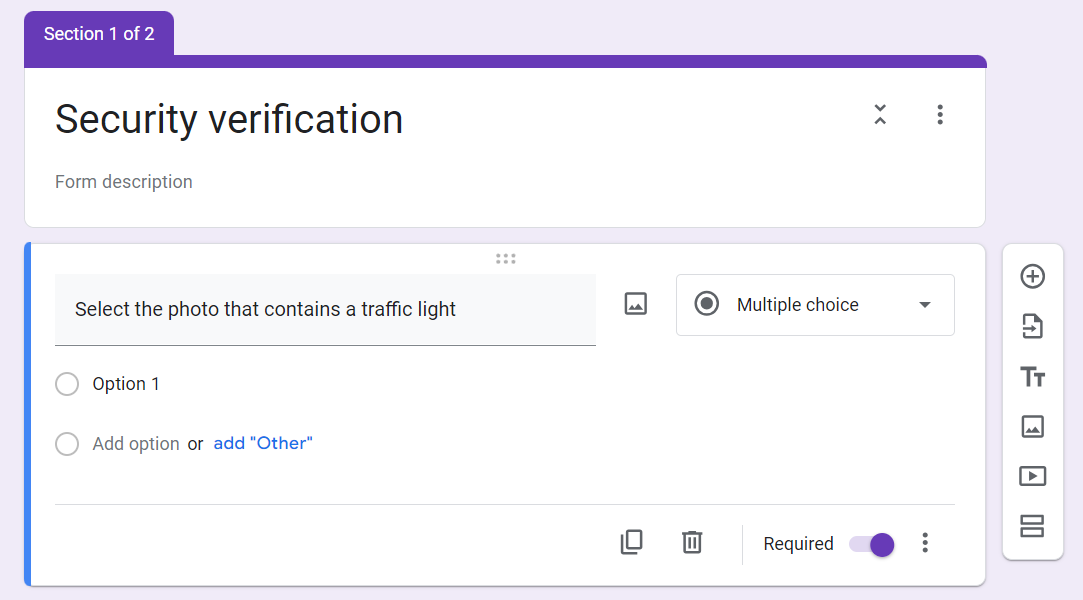
Next, take the opportunity to create a name of your preference for the new initial section. Here, we opted for “Security Verification”.
2. Create a multiple-choice question with images
In your new security section, create a question by clicking on “Add question” in the side menu and selecting the “Multiple choice” option. Make sure the mandatory answer option is enabled.
Here, we’ll manually create a kind of CAPTCHA form where users will need to choose the single image that corresponds to the request.
As an example, we’ll use the text “Select the photo that contains a traffic light,” but you can choose any text you like, keeping in mind that you’ll need to search for related images afterward.
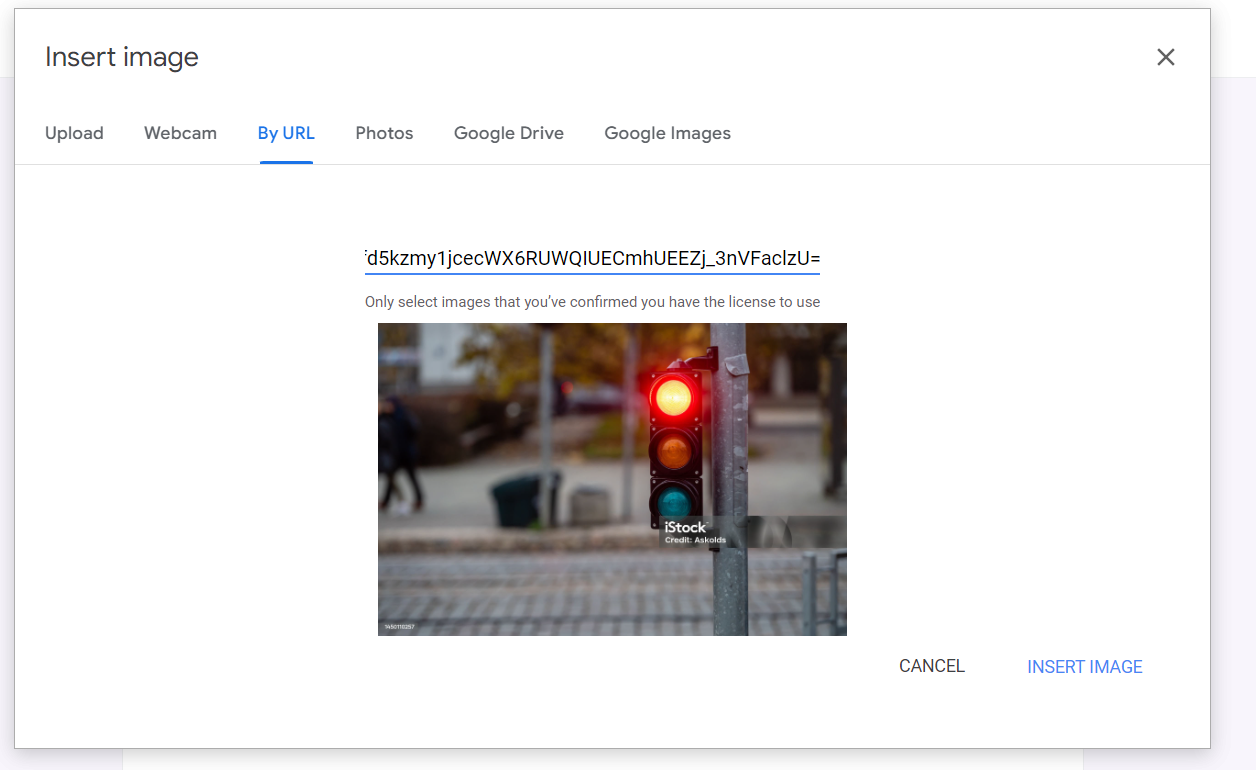
In the options, click on “Add images” (image icon) to choose the photos, following the logic used.
You can find photos on a free image bank, such as pixabay.com, and add them via URL (right-click on the photo and copy the image address).
Add at least three more images similar to the correct one (be careful not to confuse people) and organize them in the way you see fit.
Avoid placing the correct answer in the first option, and, if you reorder the images, remember to rename the options, always keeping them 1, 2, 3, and 4.
3. Create a section for the wrong answer page
Just as we did before, select the last question block and create a new section. This will be our wrong answer page. You can simply name it “Wrong”.
Move the section and position it between the other two. Don’t forget to save!
4. Create two paths for the security section
Go back to your security section block, click on the menu (three dots next to the “Required” option), and select “Go to section based on the answer”.
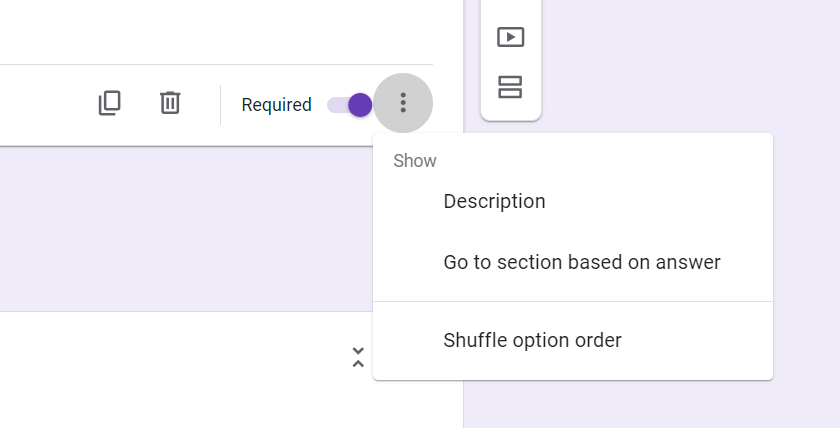
For the correct answer, select to go to section 3, where your form (which in our example is titled “Form 1”) is located. For other responses, mark go to section 2 (Wrong).
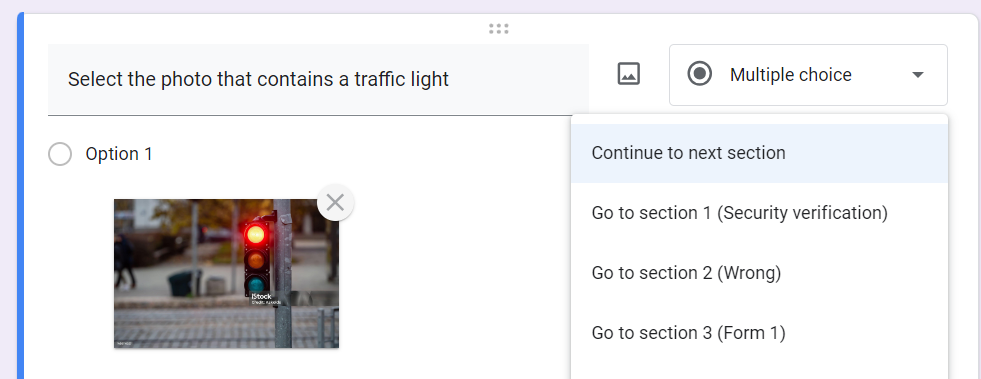
Now, anyone who clicks the wrong answer will be directed to the designated page. Those who click the correct answer will proceed to the form. Access the preview to test it out.
That is just an example. You can use other features to create different protection strategies. The limit is your creativity.
What are the advantages and disadvantages of Google Forms?
Google Forms is not perfect. Its customization options, for instance, are quite limited, which means that forms rarely deviate from the tool’s somewhat formal identity.
Additionally, the application has restrictions on text and image sizes, potentially making it unsuitable for large-scale projects.
In summary, Google Forms is a powerful tool, especially considering it’s free. It serves well for users needing quick surveys, polls, or simple registrations. Undoubtedly, it’s the go-to choice for creating online forms.
And speaking of forms, how to make them reach larger audiences organically? Read our new and updated SEO Guide for Beginners!