
No products in the cart.
Email Marketing
How To Monitor Visitors on WordPress

16
Apr
Apr
Whether you just created a website on WordPress or have had one for years, one of the most important parts of running your website is tracking the metrics.
You’ve invested time marketing yourself and your brand by creating content, setting up site functionality, and promoting your brand on other channels like social media platforms or through influencer marketing. To an extent, some of these things are out of your control. However, you do have ownership of your WordPress visitor metrics, which serve as the anchor point for your brand’s success.
Tracking your visitors on WordPress is crucial if you want to understand where your audience is coming from and what they’re doing on your site. Each visitor is an opportunity to convert another customer, turn them into a brand advocate, increase site traffic, build your email list, and ultimately sell more products and services.
In this article, we’ll show you how to track visitors on WordPress step-by-step so you can use the data to understand what pages work and which ones may need optimization.
FYI: This blog is part of our WordPress 101 series that will cover the basics of marketing with WordPress from start to finish. We’ll share tips and best practices as you set up your website and begin thinking big picture about how you want to market your brand. Stay tuned for a comprehensive walkthrough of one of the most popular CMS platforms in the world.
Why you need to track your site visitors on WordPress
Tracking your site visitors on WordPress is one of the most obvious indicators of your site’s overall performance. The more visitors you see every month, the more opportunity you have to convert those people into customers. You can also see additional insights that you may miss at first glance.
Example: When you look at your site visitors, you can see where they’re from, giving you the chance to personalize the content and messaging you serve them. It also gives you an indication of what languages you may need to translate your website into.
You’re also able to see where your visitors come from (a Google search, another blog, etc.) and which site pages are getting the most traffic. These things are helpful when drawing a rough map of your customer’s journey and getting a better idea of the content (blogs, ebook landing pages, product pages, etc.) that resonates the most with your audience.
These insights are incredibly valuable to you. They help you focus your efforts on optimizing content while also creating new content that you already know will attract your target audience.
How to see site traffic on WordPress
The simplest way to see your site traffic on WordPress is to navigate to your WordPress admin dashboard and click Stats on the left sidebar (or Jetpack, then Stats if using WP-Admin).
Keep in mind: Self-hosted WordPress doesn’t have a built-in way to track traffic, it’s all done with third-party plugins and services.
The Traffic tab will be selected by default. You can choose tabs like Subscribers, Ads, and Insights for an array of other stats.
Keep in mind: Traffic stats will be limited on sites using the Starter plan. For full access to all site stats, upgrade your WordPress plan.
How is traffic quantified on WordPress?
The Traffic tab highlights data about your website visitor’s behavior and activity. This is tracked by a pixel that loads in the visitor’s browser and records your site traffic.
If you choose to use other analytics tools like Google Analytics or Jetpack Stats, both work on a sampling basis and show a broader trend of user traffic rather than an exact head count.
There are certain types of traffic that will not reflect in your stats:
- Site visits from Googlebot and search engine crawlers
- Site visits from browsers that don’t execute JavaScript, load images, or are blocking the stats pixel
- Site visits you and other team members make to your own publicly available site while logged into WordPress (internal staging traffic)
- FYI: If your site is set to private, site views by you and other members of your site will be counted
It’s important to understand upfront that it’s difficult for any tool, regardless of price or reputation, to be 100% accurate down to the last individual site visitor. This is due to factors like cookie and ad blockers by users, zones that don’t permit data collection, time zone differences, and more.
How are views and visitors different?
You may come across two units of traffic measurement as you navigate through your WordPress Stats dashboard: views and visitors.
✅ Visitor: One individual looking at your website. Their visit is counted once when their browser is recognized in a selected time frame. This is also often referred to as a unique view.
✅ View: Counted when a visitor loads or reloads any page on your website.
Because a visitor can view different pages across your website multiple times, your views will usually be higher than your visitors. And if you see that your visitor count is lagging, WordPress tracks the two traffic measurements on different pages. A view is reported within five minutes, while a visitor may take up to two hours to show up in your stats.
Our choice to track site visitors on WordPress
Using a third-party tool or WordPress plugin is also a common option when tracking site visitors, and it is usually more accurate. Analytics tools are popular among website owners and can help you check the number of page views and visitors your site gets, as well as their behavior on your site (E.g., links they’ve clicked on).
There are many different website analytics tools to choose from. Our suggestion is the MonsterInsights WordPress plugin because of its ease of use for beginners and quick setup. Setting up MonsterInsights requires you to set up a Google Analytics account as well, but it will be the quickest and easiest way to see your site’s metrics.
Not to mention, they have a bunch of great reports right inside the WordPress dashboard that you can monitor on a weekly or monthly basis.
Using Monster Insights and Google Analytics
Google Analytics is subjectively the best website visitor tracking software available to you, but it requires editing code snippets, which can be tricky for even a seasoned website owner. This is why we suggest the MonsterInsights plugin for WordPress, which is the best option to connect Google Analytics to your site without editing any code at all.
Set up a Google Analytics account
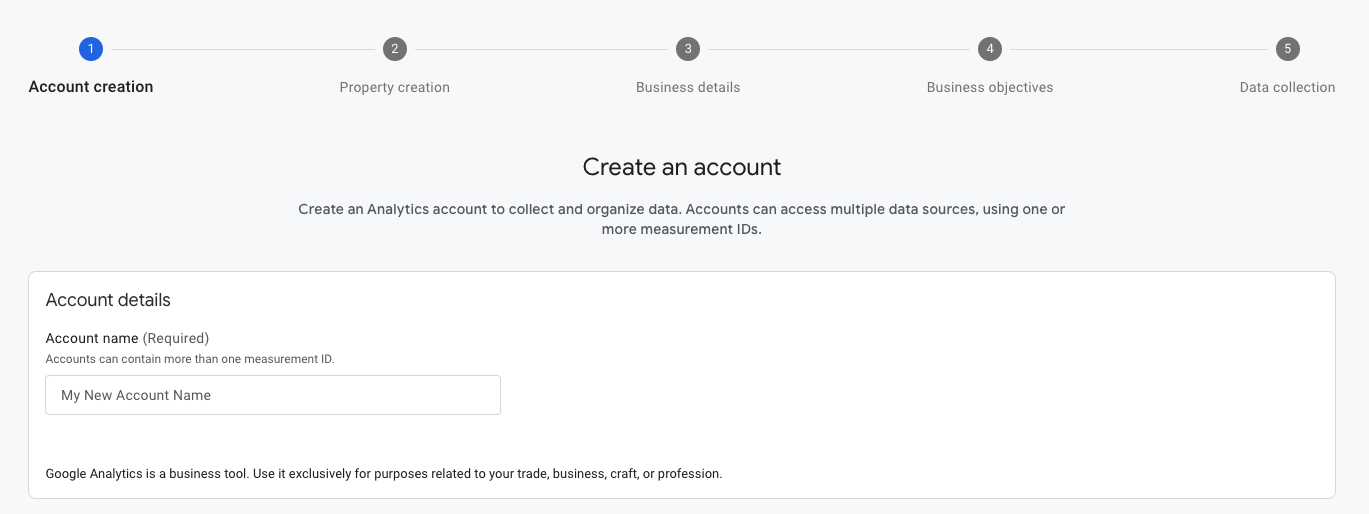
To begin measuring site visitors on WordPress, you’ll need a Google Analytics account. To sign up, go to Google Analytics and click Start measuring.
Follow the steps onscreen to set up the tracking mechanism and data collection.
Installing the MonsterInsights plugin on WordPress
Once this is done, it’s time to install the MonsterInsights plugin (this tutorial will walk through how to install the free plugin and choose a MonsterInsights plan to connect to Google Analytics inside WordPress).
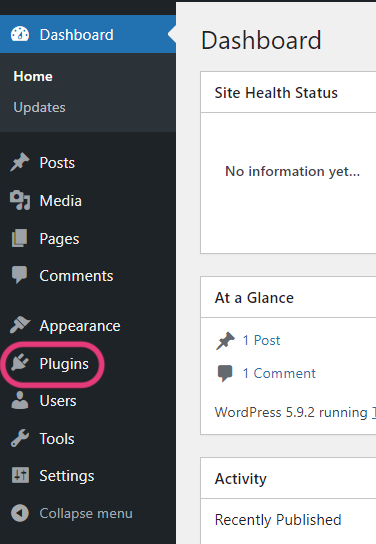
To install the free plugin, navigate to your WordPress dashboard and click the Plugins tab on the left sidebar.
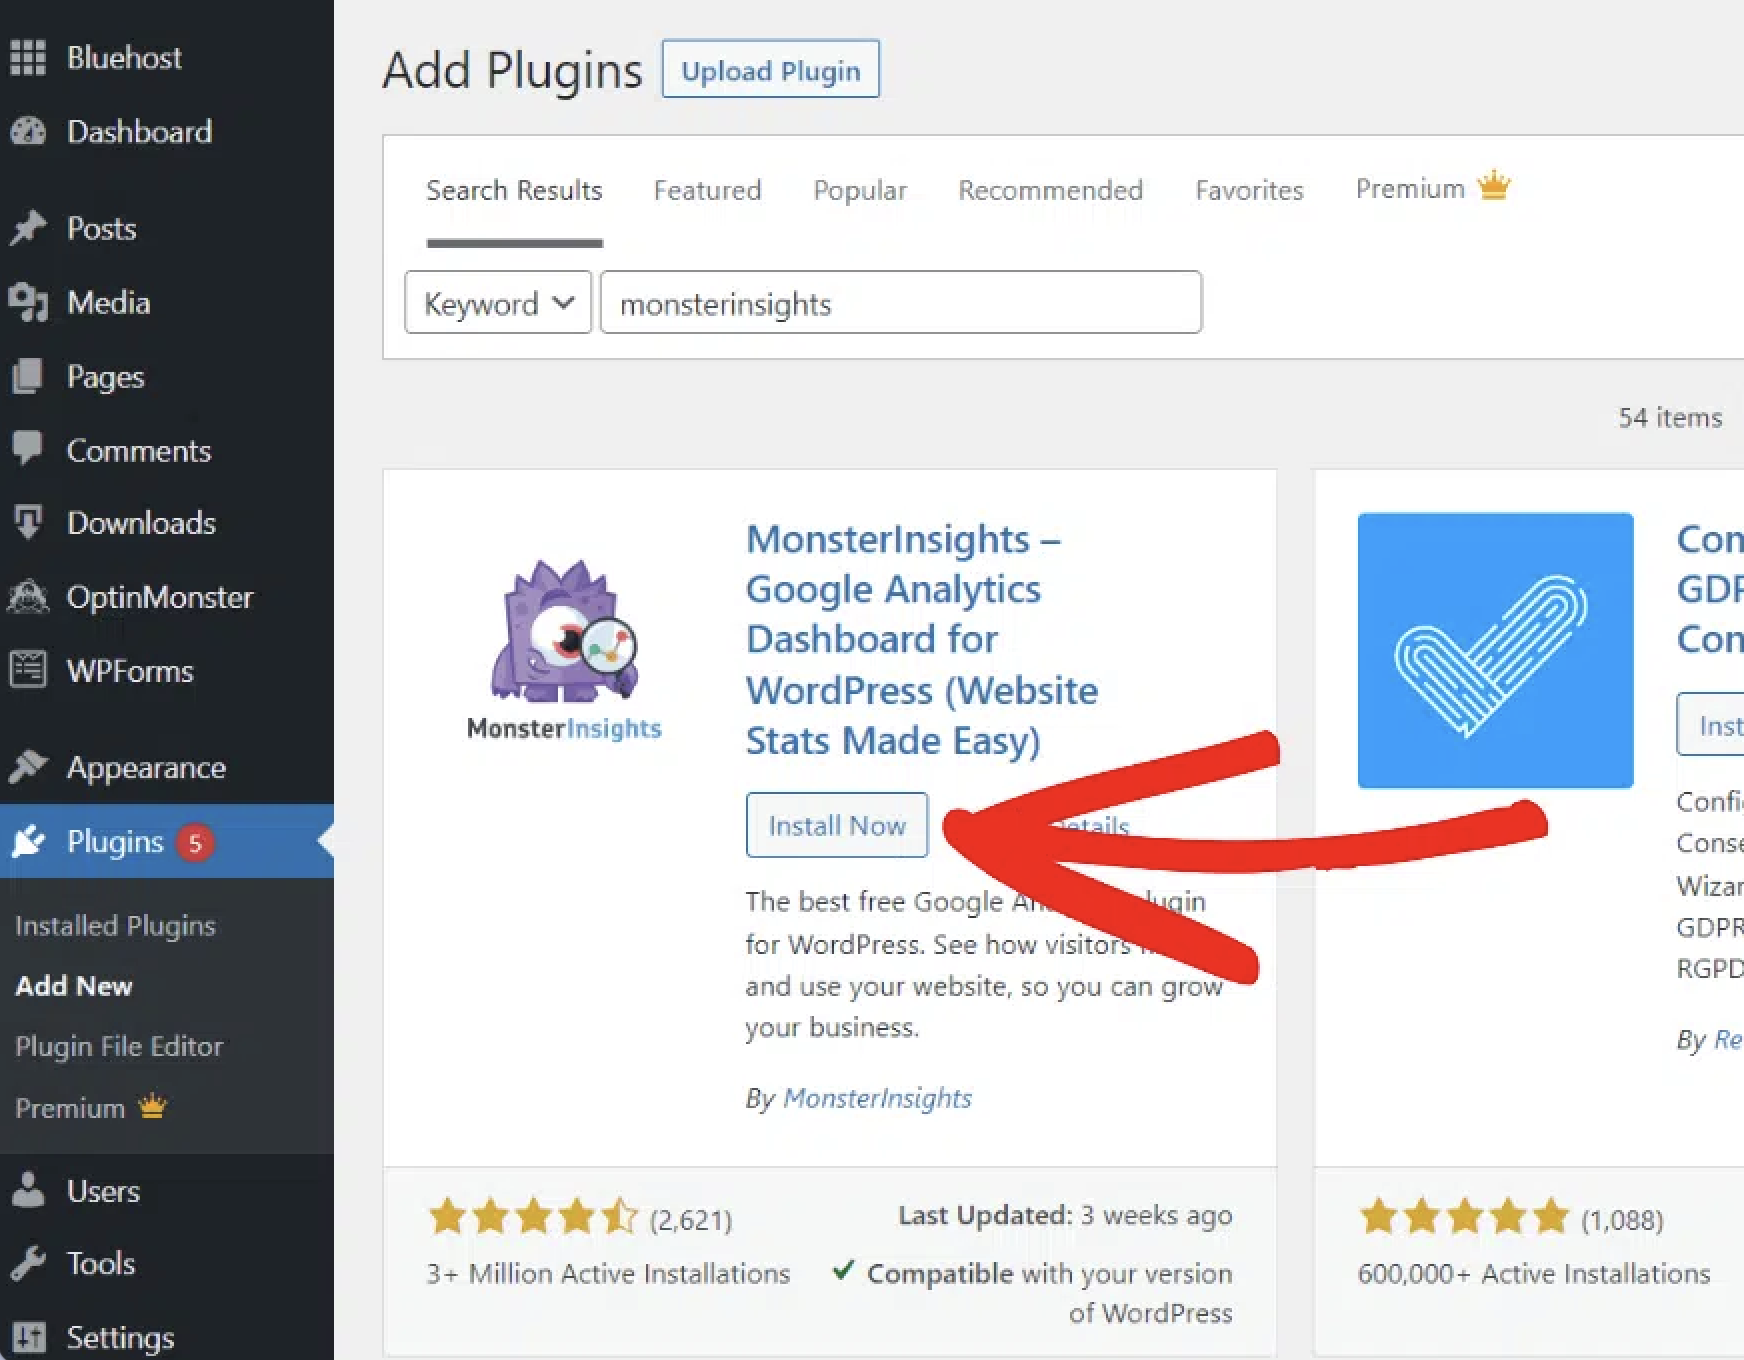
Search for the MonsterInsights plugin and click Install Now, then Activate.
Once the plugin is activated, the plugin setup wizard will pop up and guide you through the setup process. This is the last step of setting up the free version of MonsterInsights.
Note: To have complete access to all reports inside WordPress, you’ll need to sign up for a Monsterinsights Pro plan. Click here and decide on the plan that suits your budget before proceeding further.
After you’ve completed the plugin setup process, the Setup Wizard will pop up again and walk you through the next steps. You’ll see “Welcome to MonsterInsights!” followed by a list of categories for your website. Choose the option that makes the most sense for your site. The three options are Business Website, Publisher (Blog), and E-commerce.
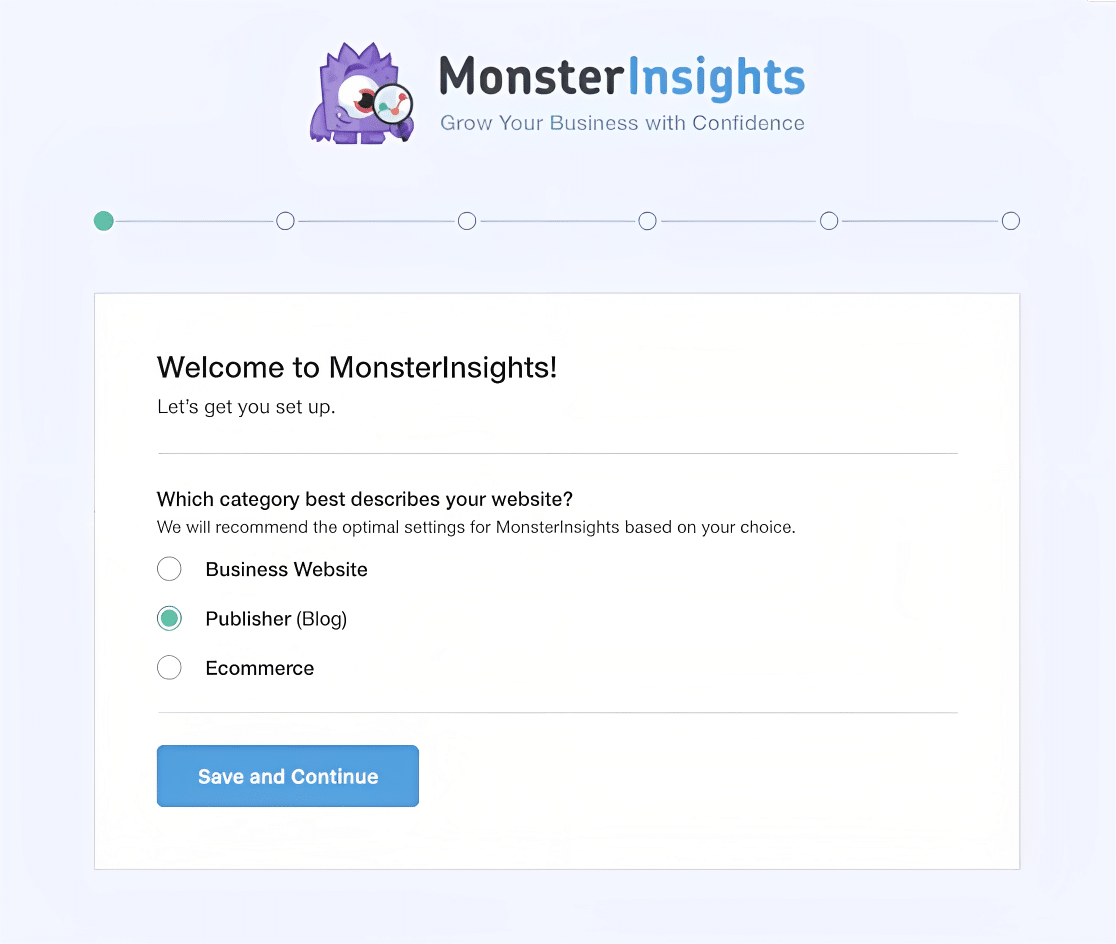
Click the Save and Continue button.
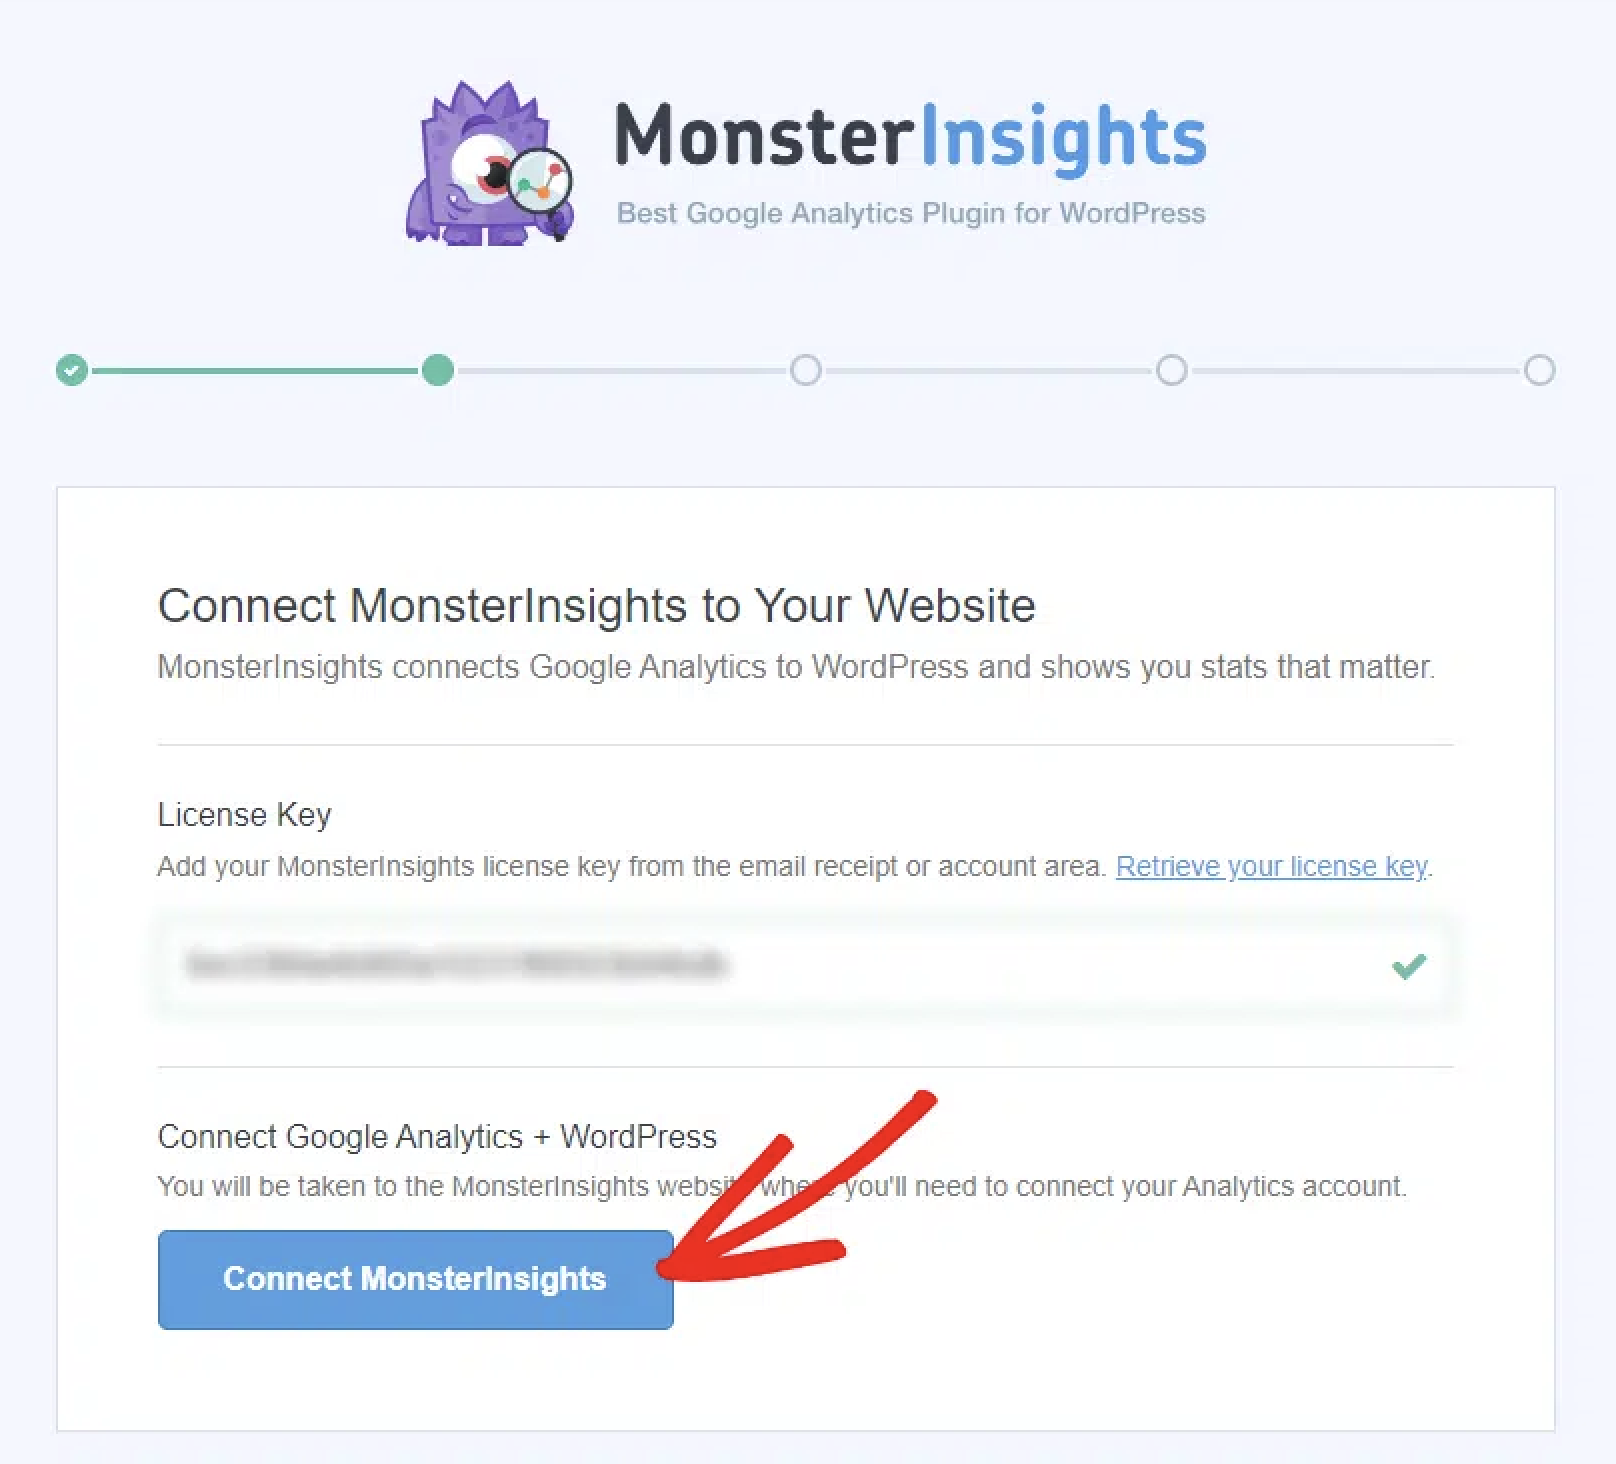
Simply copy the key from the MonsterInsights account dashboard and paste it into the License Key field, then hit the Connect MonsterInsights button.
On the next screen, you will be prompted to connect the MonsterInsights plugin to your website by inputting your license key. This will only apply to users who purchase a plan from MonsterInsights.

Copy the key from your MonsterInsights account dashboard and paste it into the License Key box. Click Connect MonsterInsights.
Connecting MonsterInsights to Google Analytics
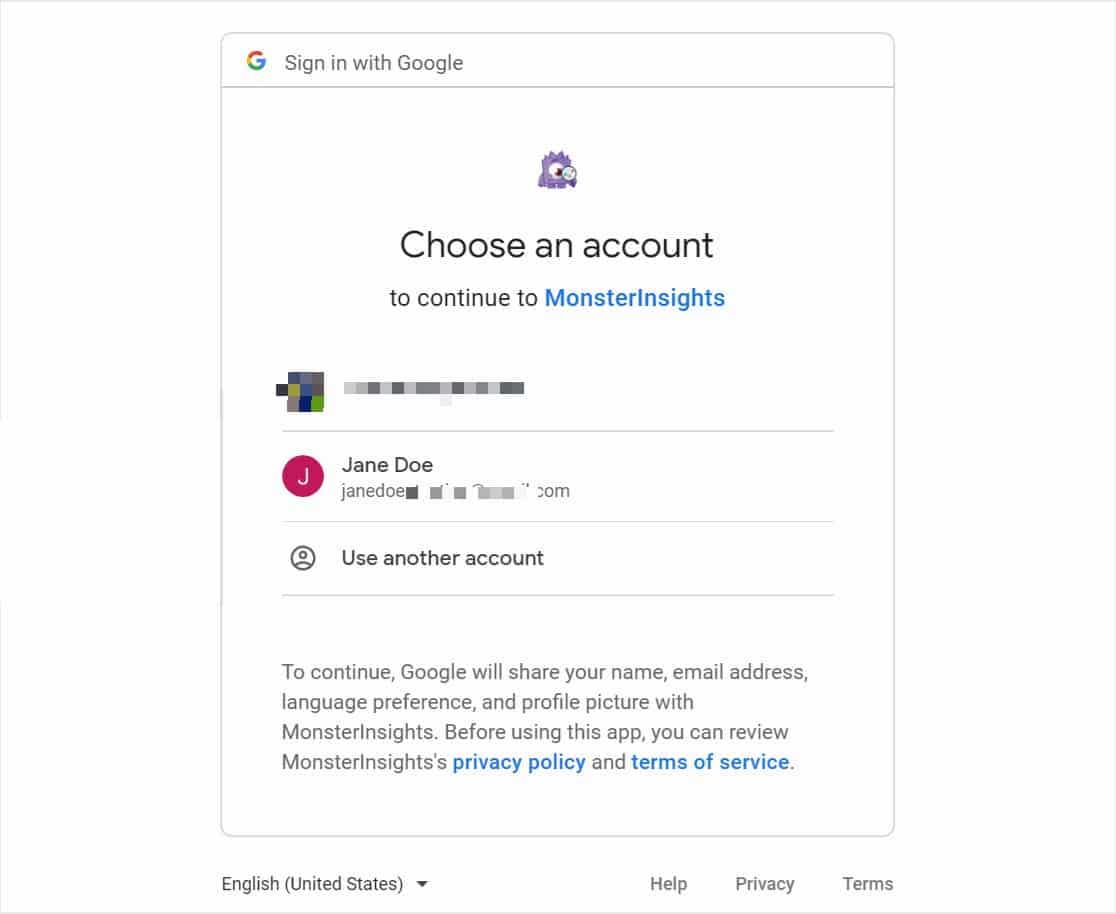
After you’ve pasted your license key, go back to WordPress and click the Connect MonsterInsights button.
Once clicked, you’ll see the option to connect your MonsterInsights account to your Google Analytics account you made earlier. Select the account and continue.
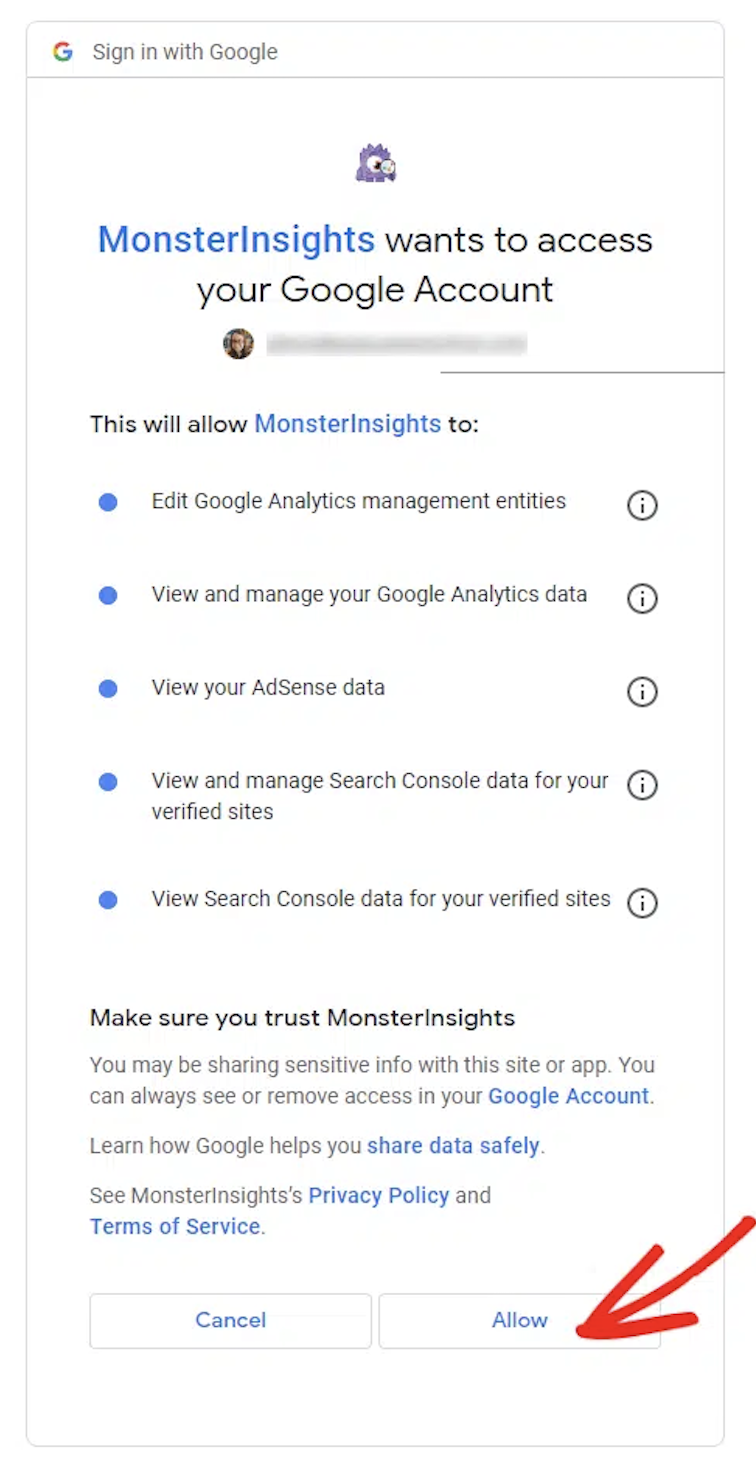
After this, you’ll allow MonsterInsights the proper permissions. To do so, click the Allow button.
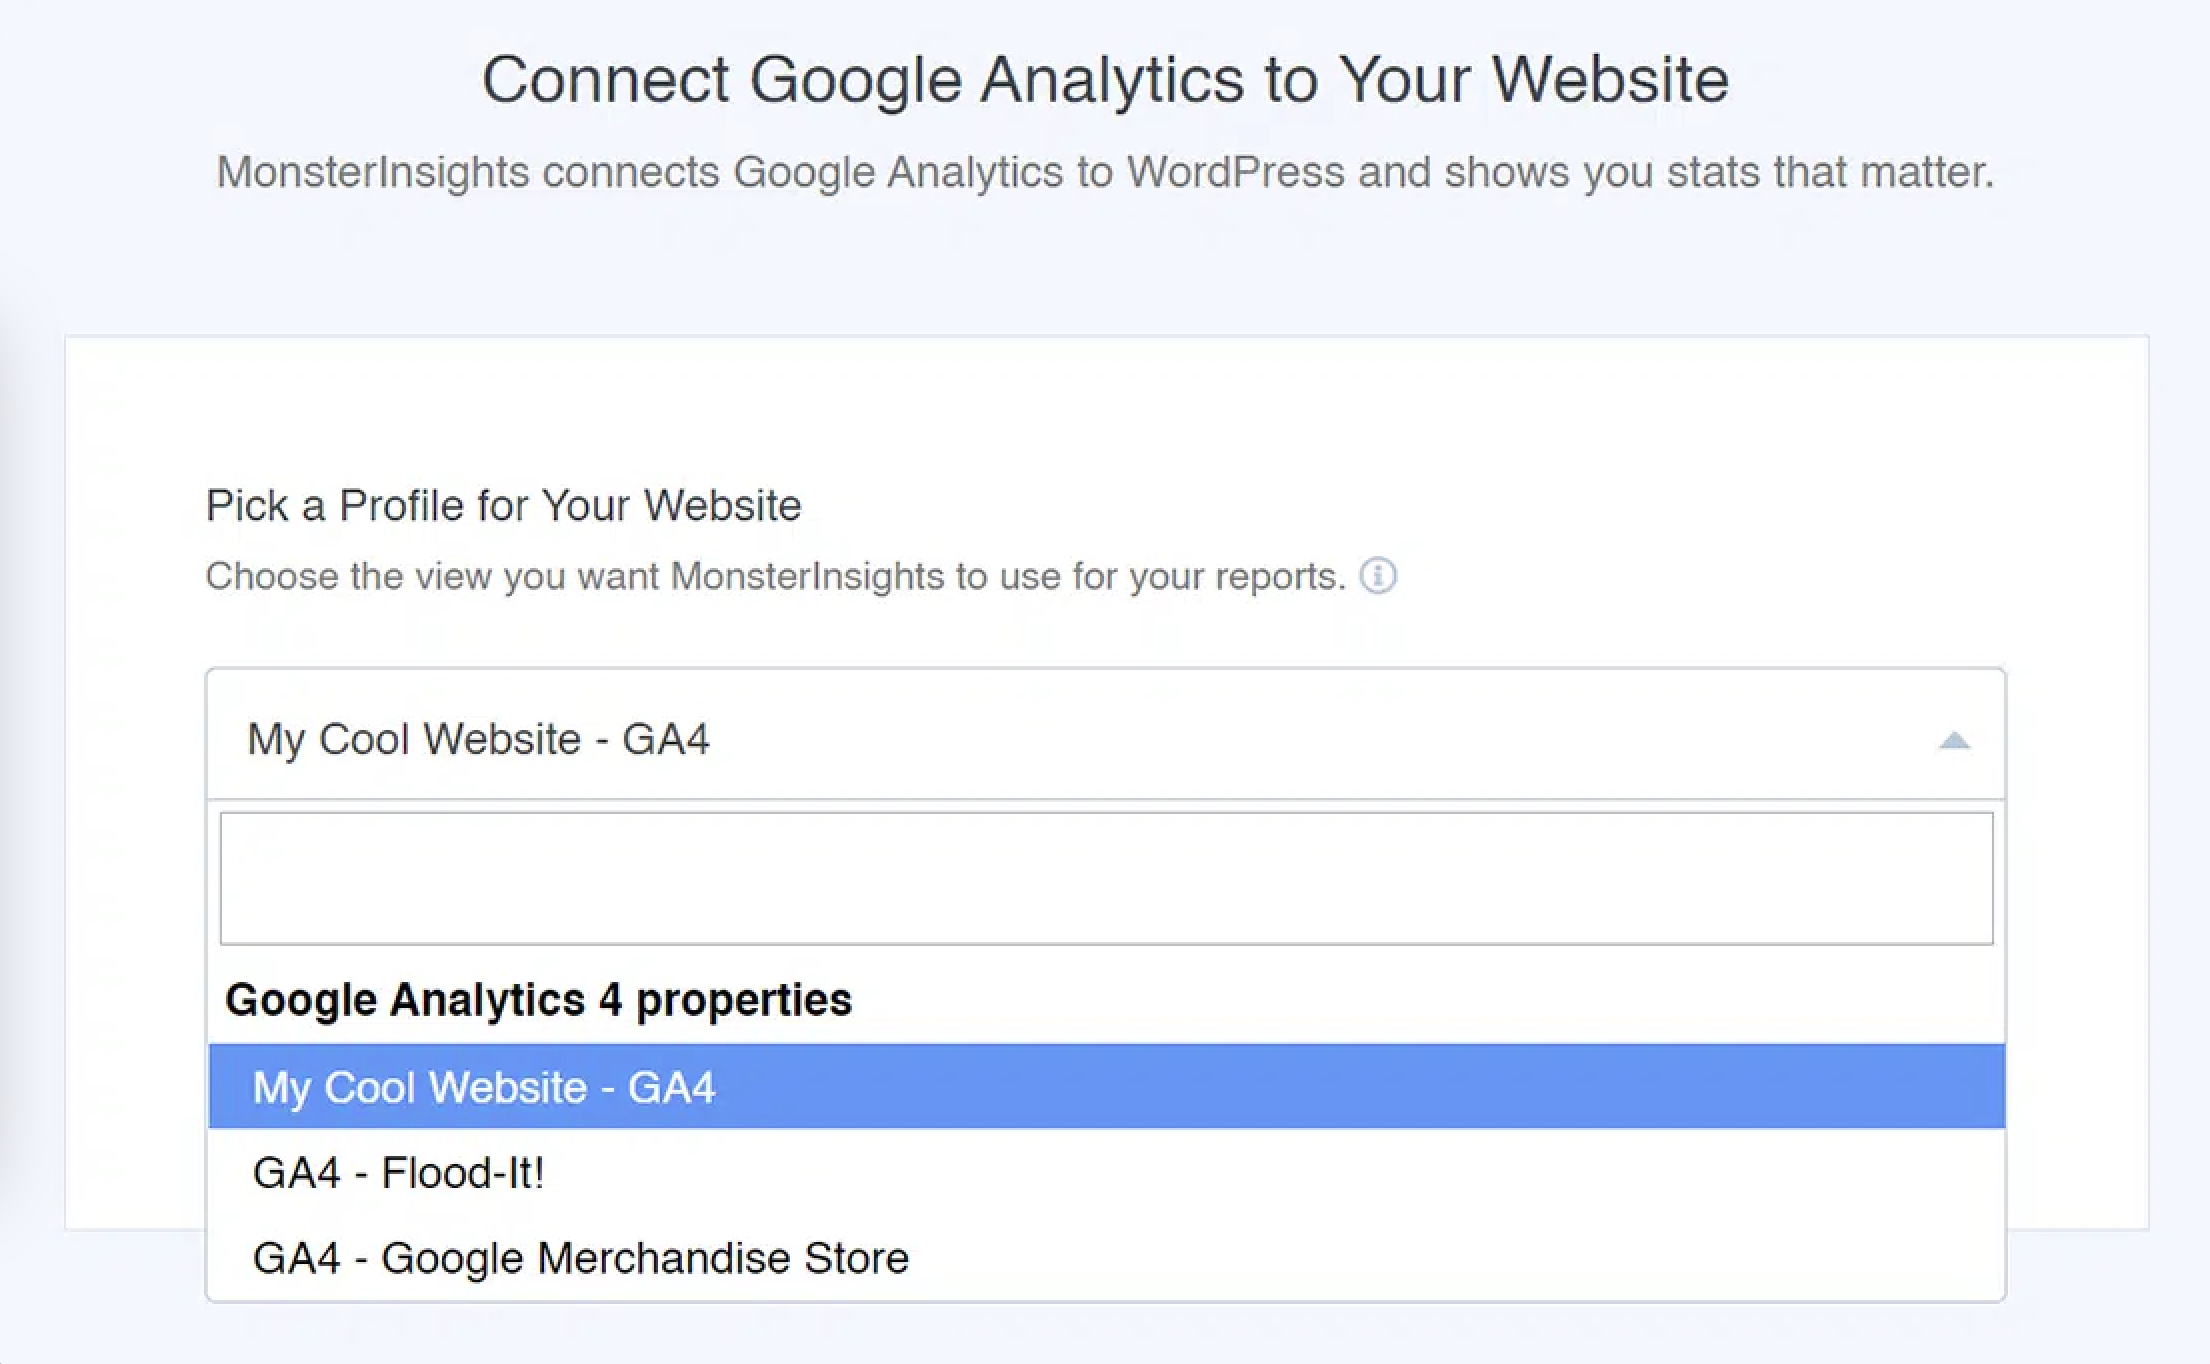
Then, you’ll choose a profile to complete the connection. If you have multiple sites connected to your Google Analytics account, you’ll have to choose the right website property. Click the Complete Connection button.
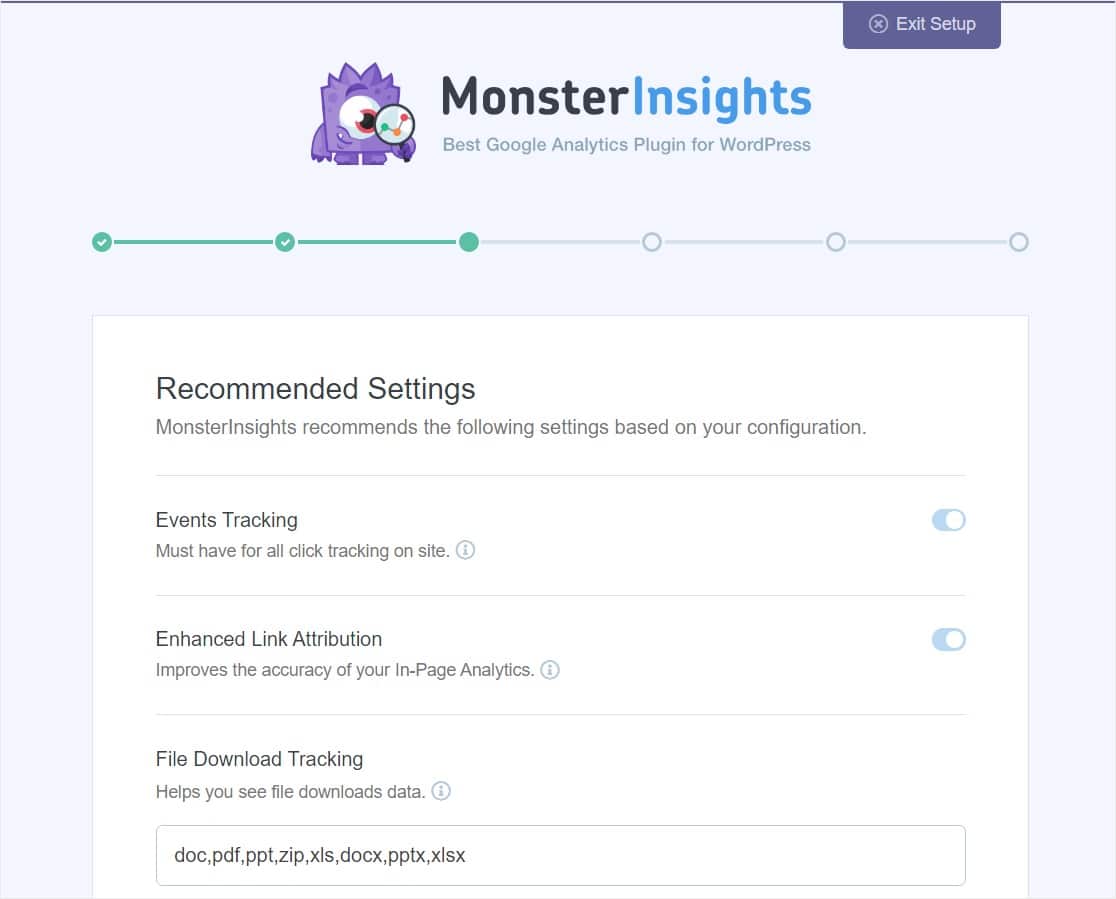
This will finalize the authentication process and take you back to the MonsterInsights setup page. You’ll see the recommended settings for the Google Analytics plugin, including some very important settings like:
- Events Tracking (enabled by default)
- Enhanced Link Attribution (enabled by default)
- File Download Tracking (most used file types (doc, exe, js, pdf, ppt, tgz, zip, xls) added by default)
When you scroll down, you’ll see more configuration settings.
- Affiliate Link Tracking: Two affiliate link paths will be added by default. This is where you can set up WordPress link tracking.
- Access to MonsterInsights Reports: Here, you can choose which users are able to see your MonsterInsights reports.
- Automatic Plugin Updates: You can enable or disable this option to automatically install updates to your plugin.
- Show MonsterInsights Badge: This option dictates whether or not to include a MonsterInsights badge in the footer of your website.
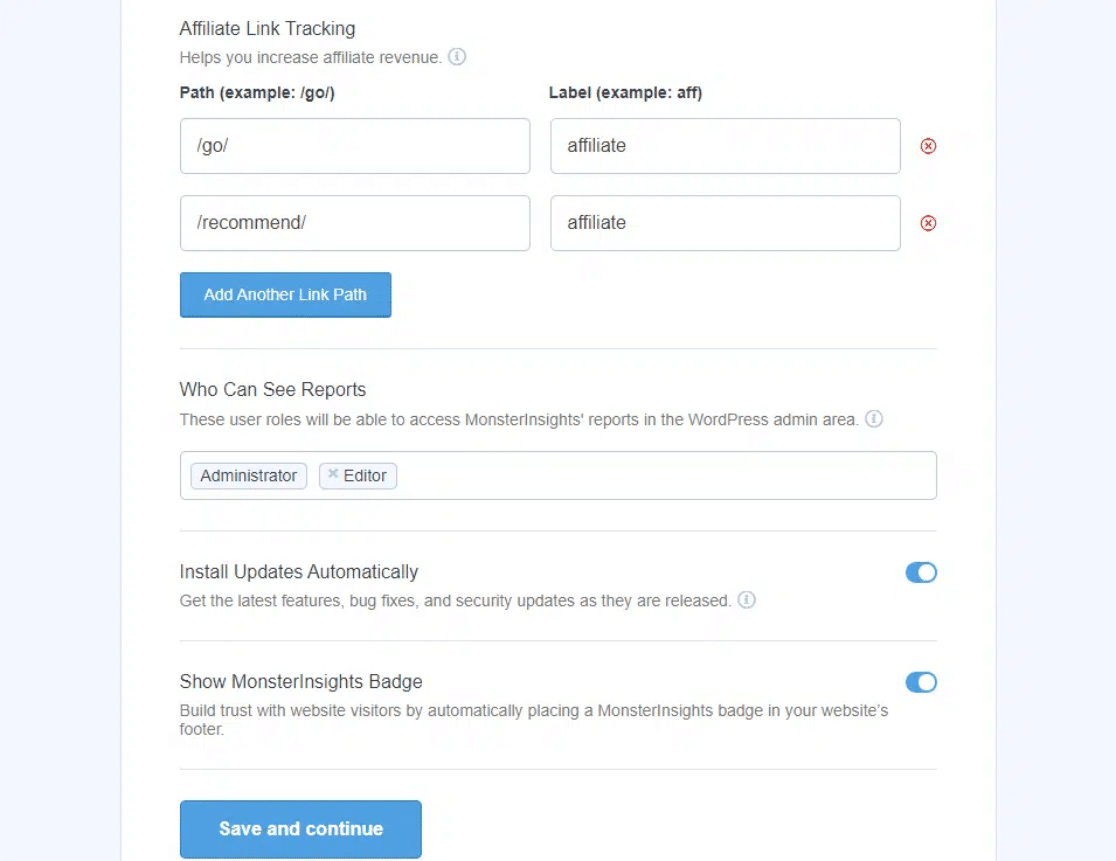
Configure your settings as you see fit, then click the Save and continue button at the bottom. The next screen will have more tracking options, add-ons, and helpful plugins.
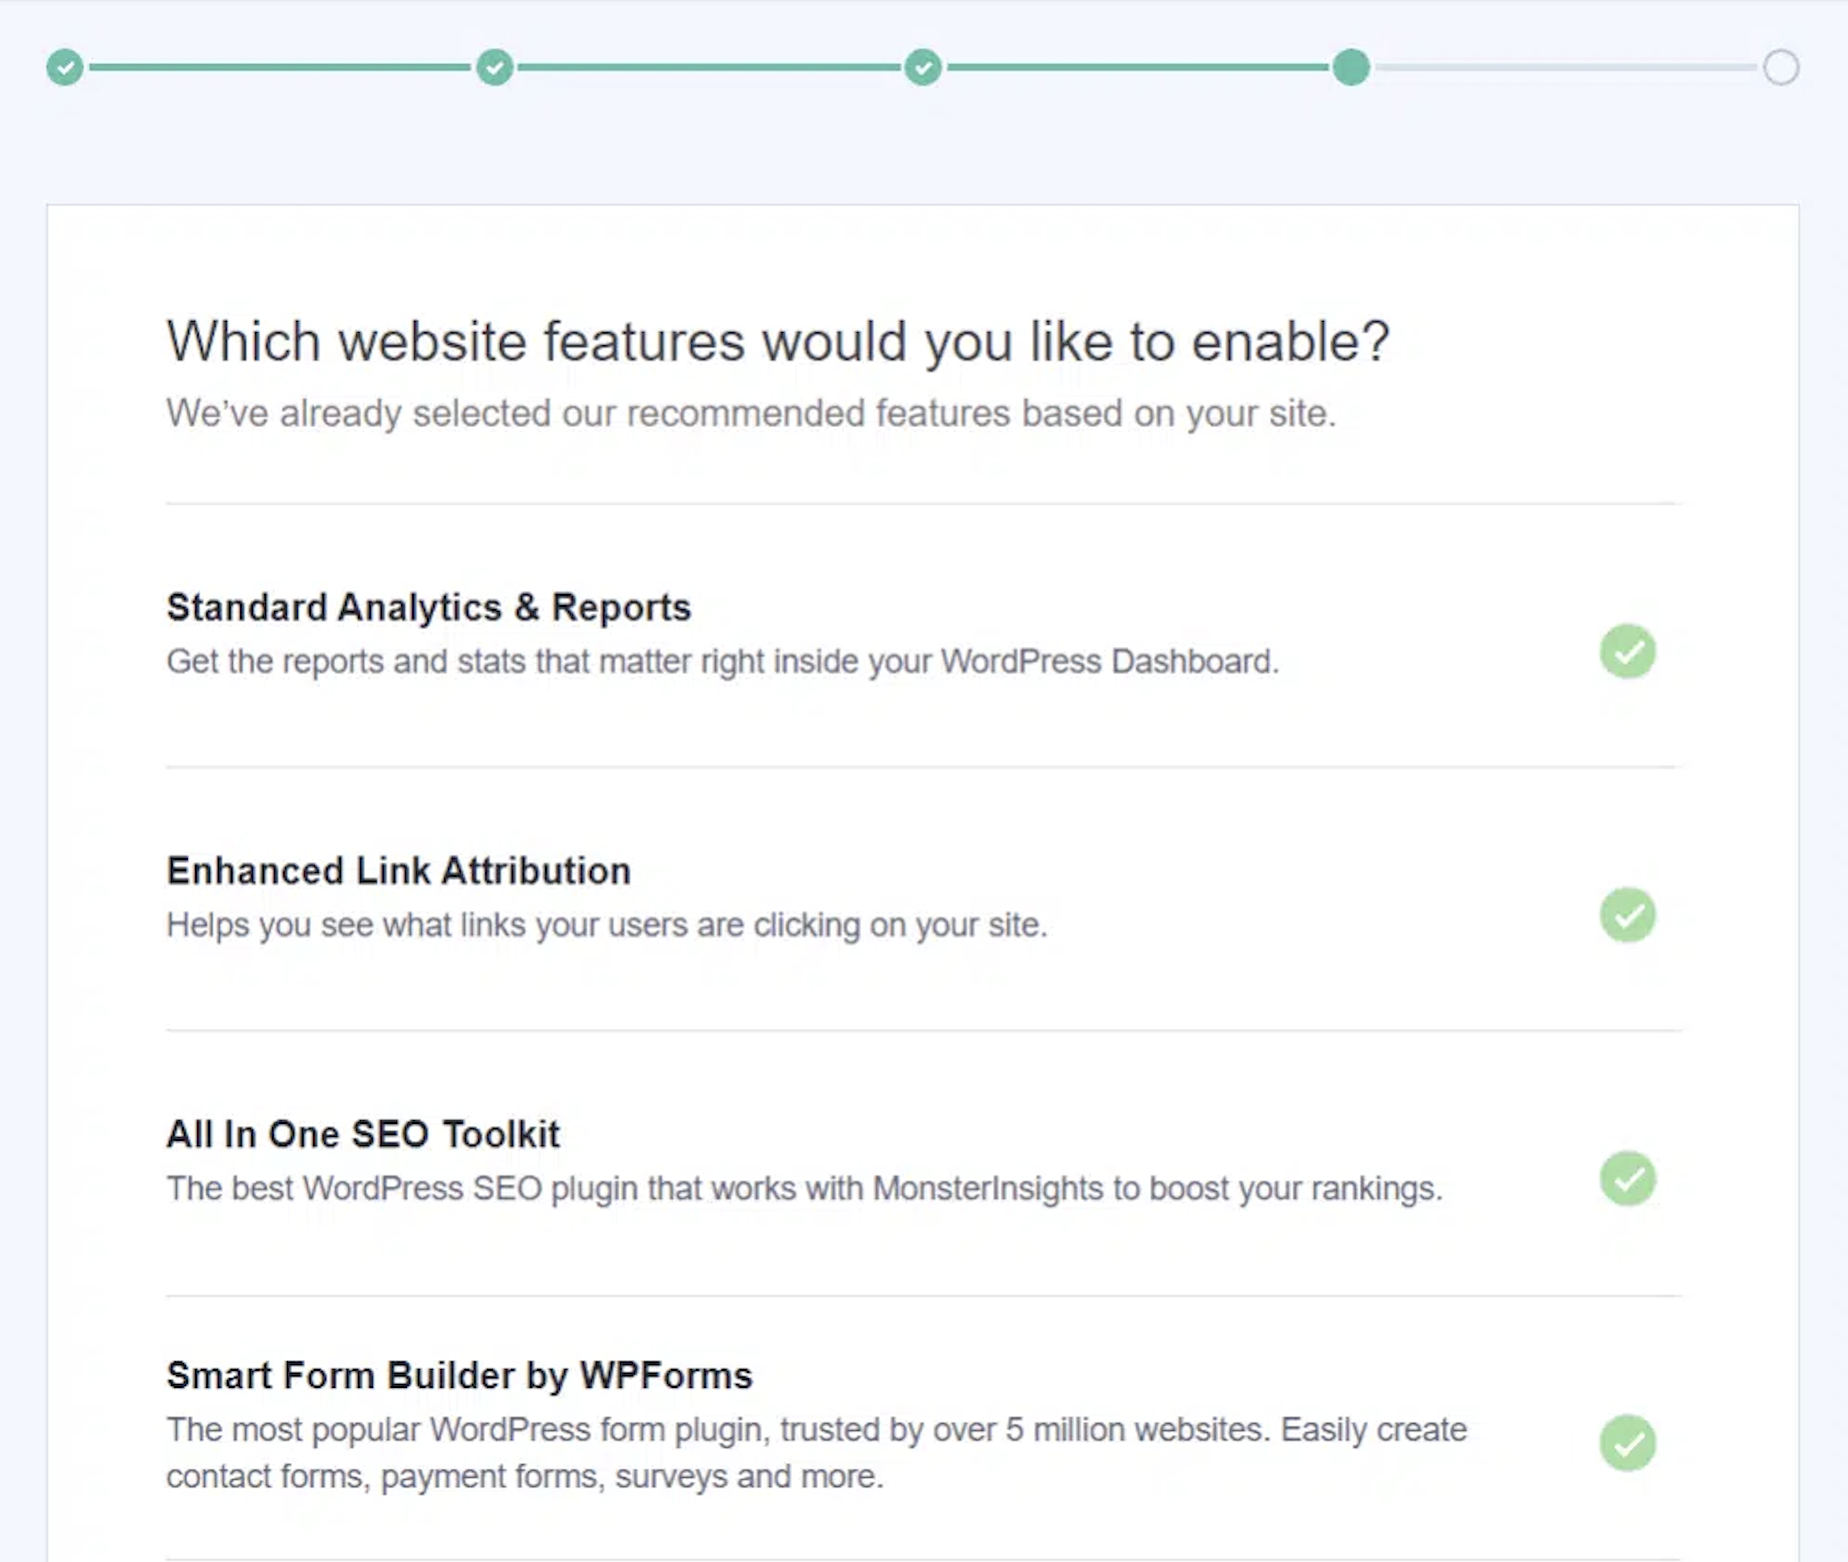
Again, select the options that make the most sense for your site and cater to the data you’d like to capture from Google Analytics. Click the Save and continue button. The setup process is complete, and you’ve successfully installed Google Analytics on your WordPress site!
Note: You’ll also be notified about when you can start seeing your website reports. Depending on the size of your website, it can take between a few hours to 24 hours. Don’t forget to click on the Finish Setup & Exit Wizard button.
Types of website visitor reports in WordPress
We’ve arrived at the MonsterInsights dashboard reports, which will save you time navigating through Google Analytics and searching for data that might matter to your site. These reports will help you track site visitors on your WordPress website, the reason you clicked on this article!
Google will typically take a few hours to gather your site information and data, so you may not find any data immediately after the setup process.
Keep in mind: Dashboard reports will vary based on the MonsterInsights plan you use. If you upgrade to the MonsterInsights Pro license, you can view more reports inside your WordPress admin panel.
We’ll go over seven different reports available to you. These reports are:
- Overview report
- Traffic report
- Search Console report
- E-commerce report
- Dimensions report
- Real-time report
- Publishers report
To get to the reports, go to Insights and then click Reports.
Overview report
The first report you’ll see in the dashboard will be the Overview report. This report allows you to select a date range and view your website’s total number of sessions and pageviews, as well as the average session duration and bounce rate.
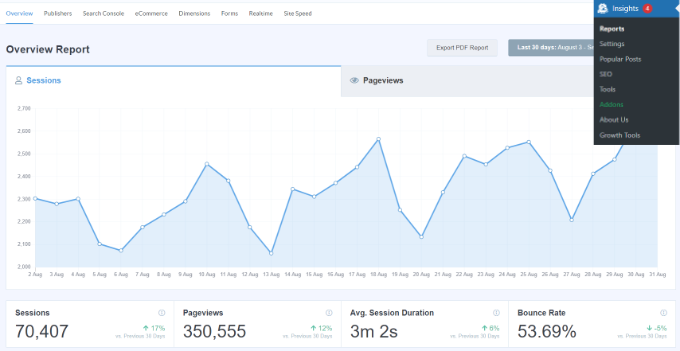
In this instance, a session is one user’s visit to your site, and a pageview is the number of pages/posts a user lands on during their session. These metrics help you understand the traffic coming into your site and how long they stay on and engage with your content.
The Overview report also shows you a breakdown of the devices your visitors are using to access your site. With this information, you can optimize the highest-trafficked pages to cater to different screen dimensions and create an exceptional experience no matter if a visitor comes by desktop or mobile device.
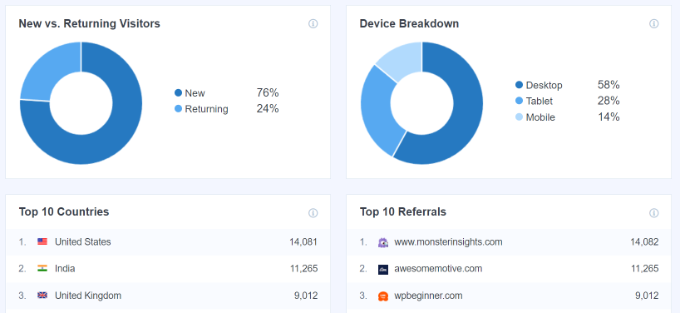
If you keep scrolling, you can also see a list of the top 10 countries where your visitors are located, as well as your top referral sources.
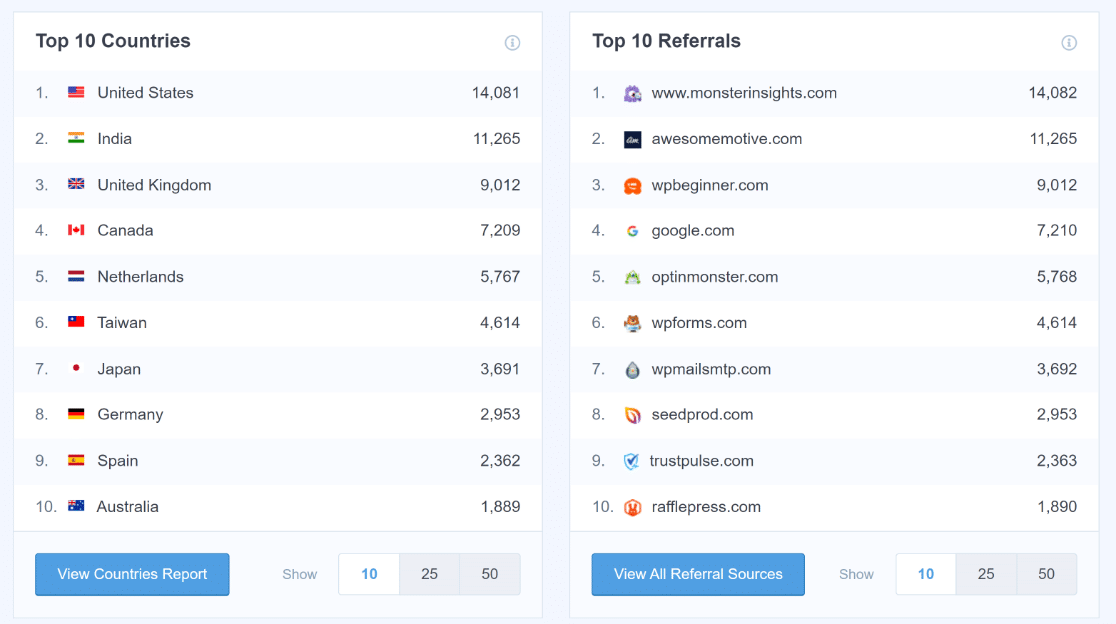
With this data, you can:
• Target your top geographical demographics with specific messaging.
• Reach out to the top referral sources to brainstorm collaboration opportunities with similar websites.
Traffic report
The next report available is the Traffic report. Hover over the Traffic tab and click Overview (confusing, we know).
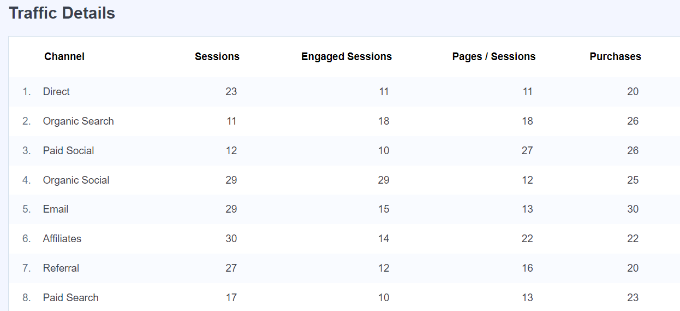
The Traffic report shows you your WordPress traffic data, laying out how people found your website, the number of sessions in the last 30 days, and a breakdown of the channels (organic search, paid social, email, etc.) that drive the most traffic to your site.
Search Console report
By clicking the Search Console Report tab, you’ll see the top 50 Google search terms your site ranks for, their number of clicks, impressions, CTR (click-through rate), and average position.
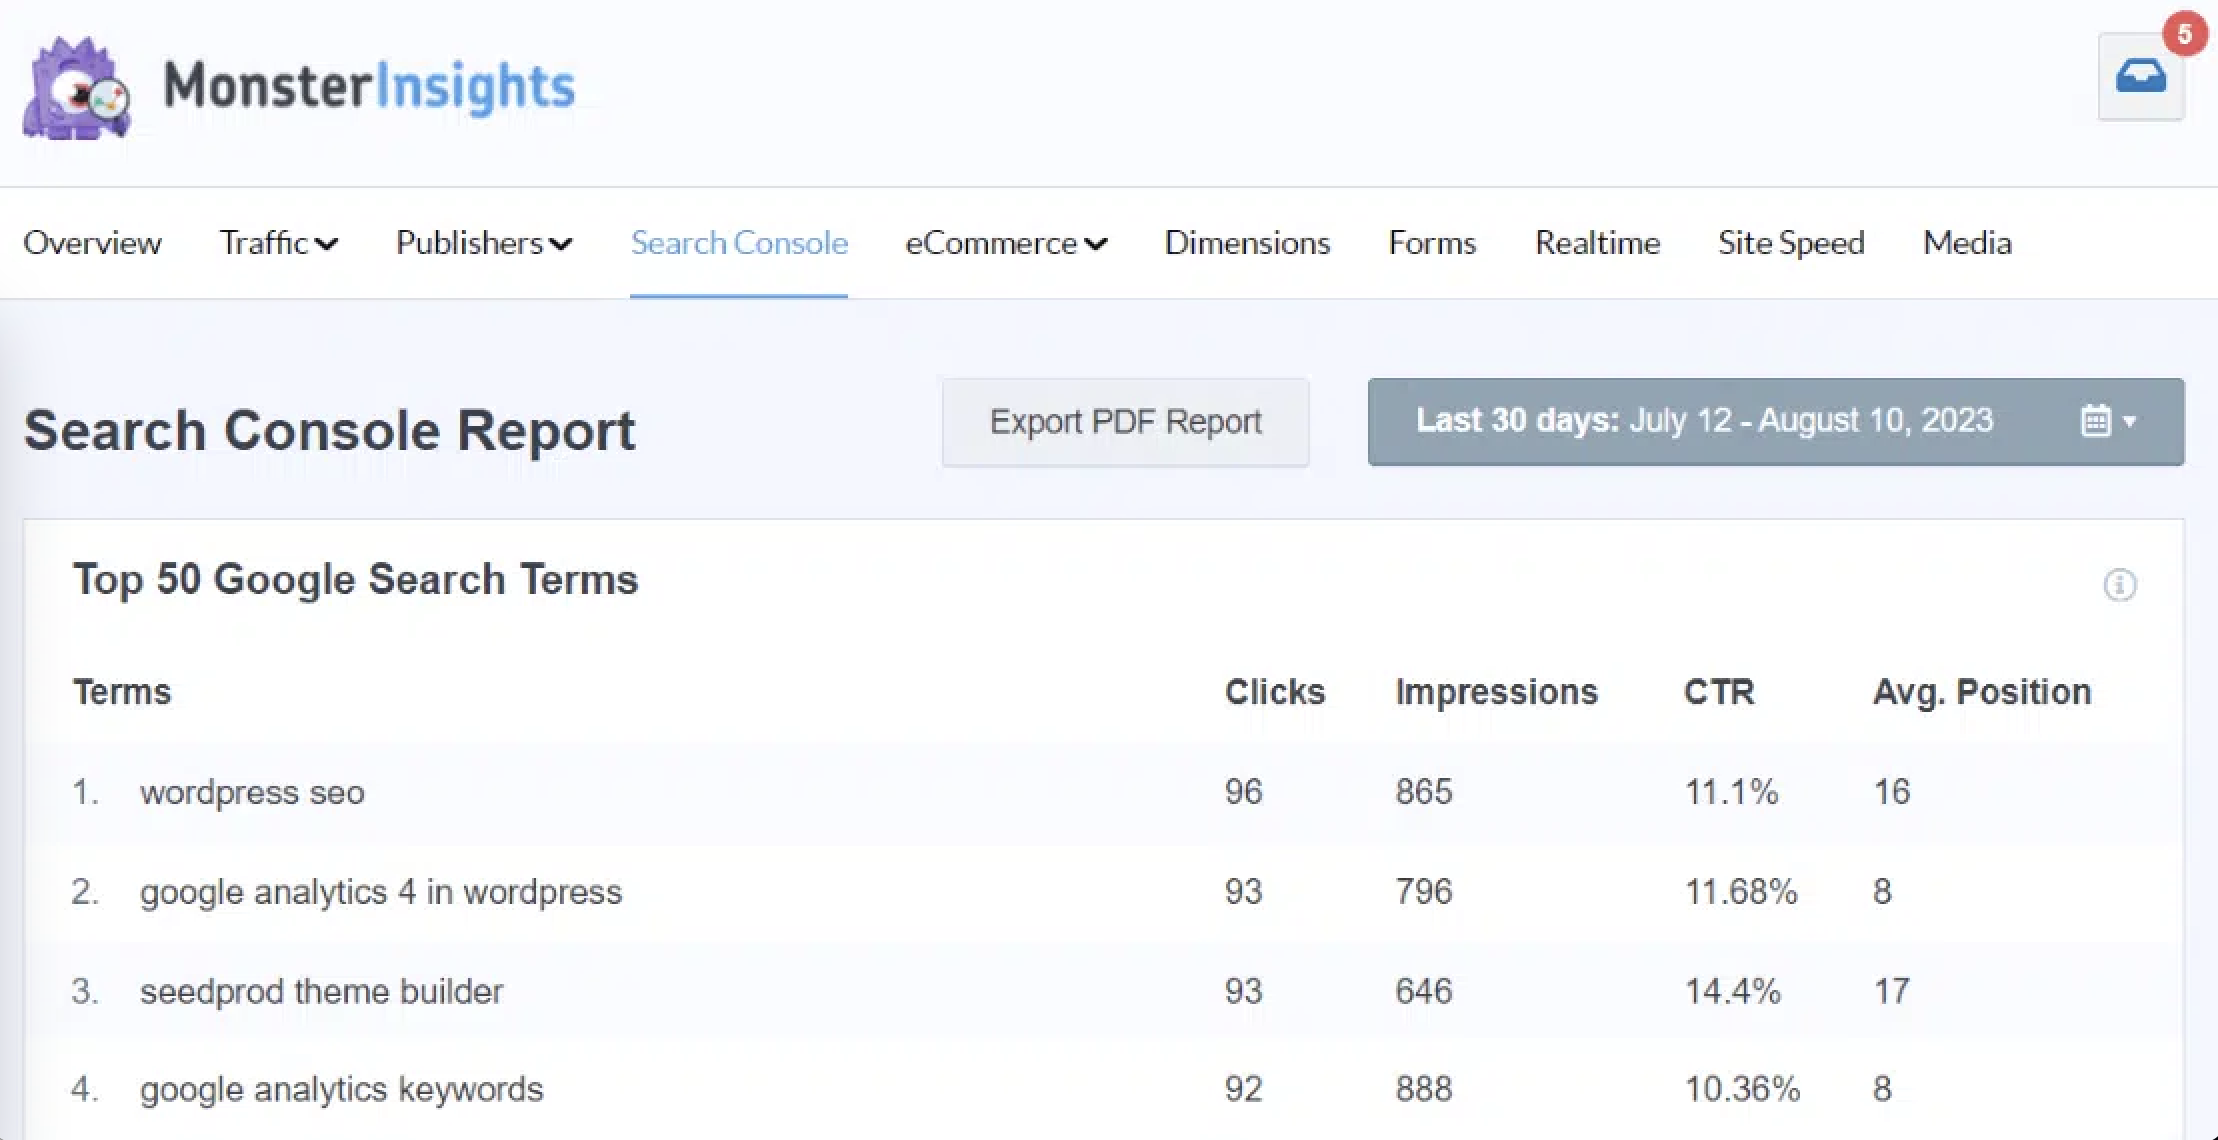
For any content marketers out there, this is a great report to reference to understand the keywords driving the most traffic to your site (and how effective your SEO strategy is).
With this report data, you can boost your site’s traffic by optimizing it for similar keywords and improving the rank of search terms that aren’t in the top 10 search results on Google.
E=commerce report
To access the E-commerce report, click the E-commerce Report tab. Here, you’ll see the number of visitors visiting your online shop and the details related to e-commerce transactions, like conversion rate, number of transactions, total revenue won, and average order value.
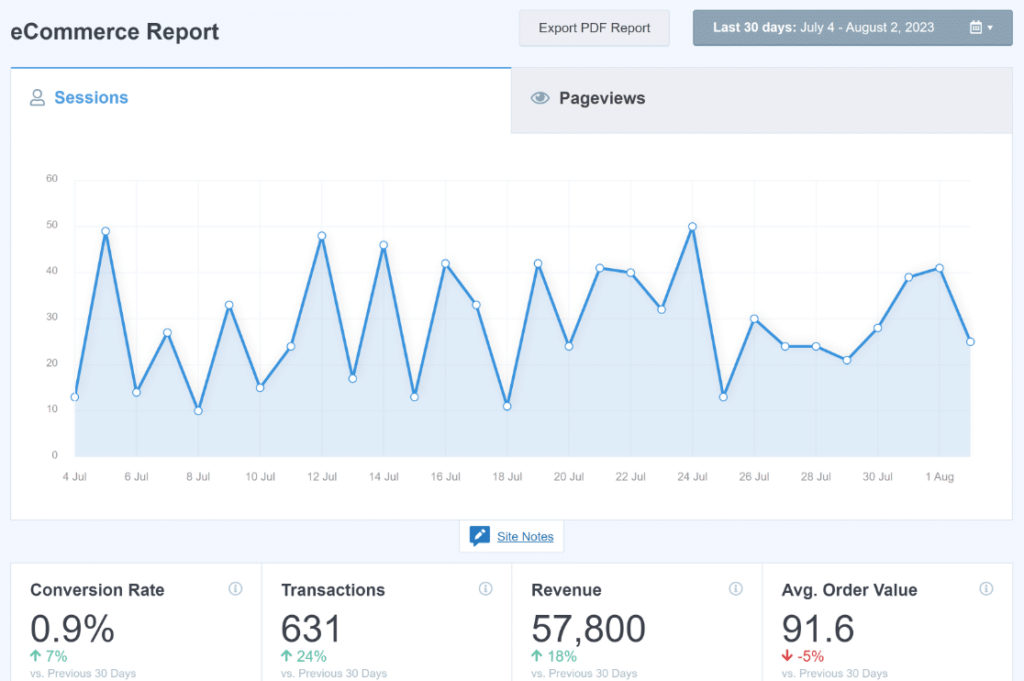
Not only can you track this data, but you can also identify the products or services you offer on your online shop that are the most popular among visitors so you can continue to advertise them and boost sales. Alternatively, you can also test new products and keep track of their metrics to determine if your customers are interested in them.
Dimensions report
Click the Dimensions tab to access this report.
This report keeps track of customer data, such as most popular post types, most popular authors, most popular tags, most popular categories, and best SEO score.
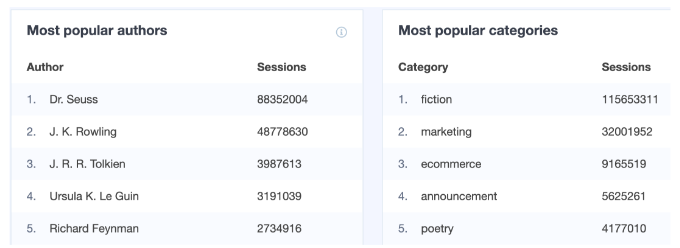
With this data, track the types of content your audience is interested in and iterate on them. If your audience really enjoys reading your data reports, don’t spend too much time and energy writing long-form articles. You’ll see the best engagement when you listen to the data.
Realtime report
Click on the Realtime Report.
This report shows you the number of active users on your site as well as the real-time pageviews per minute. If you’re hosting an event, webinar, or promotional campaign, this report will help you track the performance.
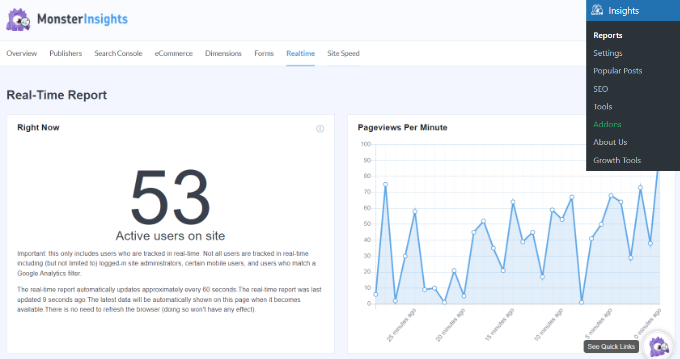
Plus, the Realtime report gives you a look at the pages, locations, and top referral traffic sources bringing in visitors to your WordPress site at any given moment.
Publishers report
Finally, the Publishers report is available in, you guessed it, the Publishers tab.
Here, you’ll find metrics on your popular landing pages, including the number of visits, the average duration, and the bounce rate. It also shows you which affiliate links and outbound links are getting the most clicks and which pieces of downloadable content are getting downloaded the most.
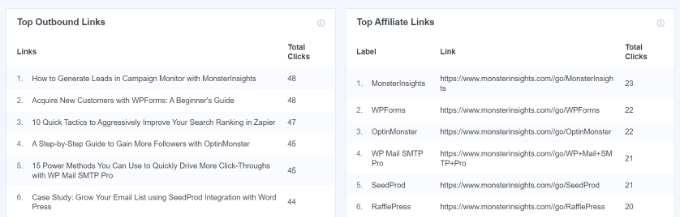
With this data, you get a better picture of the content driving the most engagement and find new opportunities to create similar pieces of content in the future.
The Publishers report also shows the gender, age, and interests of your site visitors.
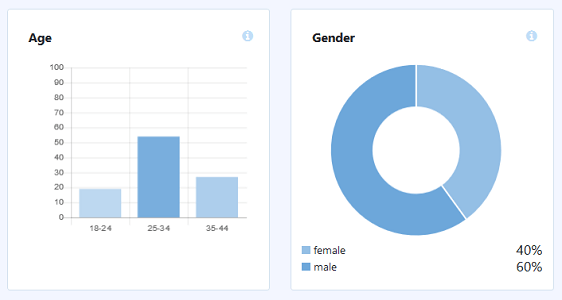
This is a granular look at your audience and gives you insight into the types of content they may enjoy most. If your audience skews younger, do a bit of market research and brainstorm different techniques to cater to a younger crowd. Adversely, this report is great if you’d like to attract a different age range or demographic.
Understanding your audience is the first step in building a rock-solid relationship with them.
Wrapping up
We hope this article answers your question about how to track visitors on WordPress. As we mentioned at the beginning, this post is part of a WordPress 101 series that will dive into different facets of hosting a site, creating content, and creating a marketing strategy to increase engagement.
There is no shortage of questions when it comes to running your own website, and we hope to help you out along the way. If you’re also considering building an email strategy alongside your website, we’ve got you covered.
You can use the ActiveCampaign plugin to host forms on your WordPress site to help identify customers ready to buy while firing automated emails to customers who still need a little warming up. Marketing automation, email marketing, and website go together beautifully, and it’s a smart decision to have all three working together to see the most impact as you continue to build your brand reputation.
But for now, you can sign up for a free trial and start seeing the benefits of investing in marketing automation today.