No products in the cart.
Social Media Marketing
A Step by Step Information
08
Nov
Nov
Getting verified on Facebook can be a daunting process, but you don’t have to go into it blindly.
These tips for verifying a Facebook business page, personal page, or profile will help you do your best as you apply for the blue verification badge.
What is Facebook Verification?
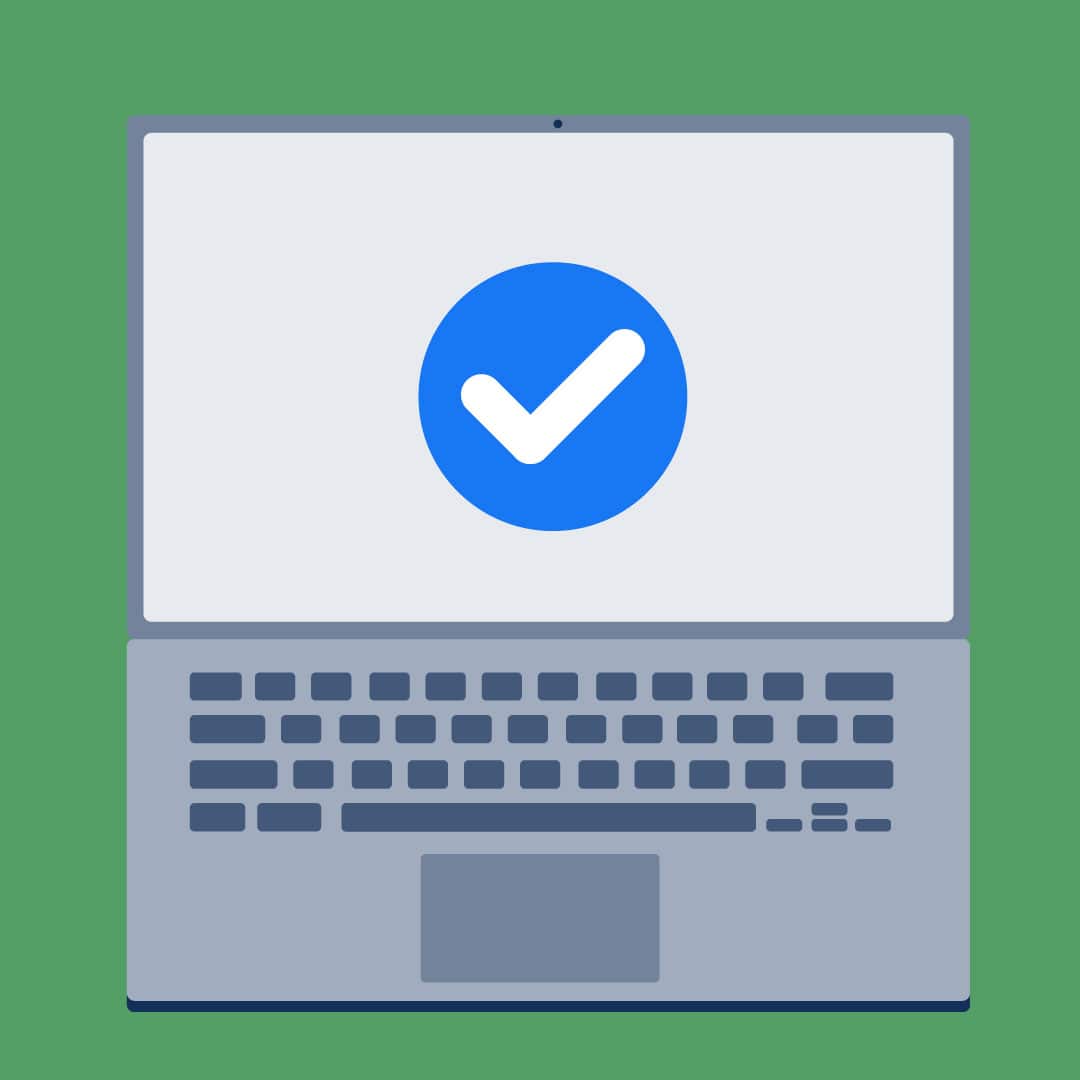
Facebook verification is the process of verifying an account or a page to show other users that it represents your authentic presence on the platform. A blue check mark appears next to the name of a verified account:
Source: New Yorker on Facebook
Verification of social media accounts started Twitter in 2009 as a way to flag real accounts from public figures or notable organizations. Facebook has followed suit with its own blue verification tick in 2013. The practice was then introduced Instagram in 2014.
Facebook verification is usually voluntary, but some types of accounts require verification. Verification for large audience sites has been required since 2018. Currently, people’s profiles are also checked when their audience reaches a certain size.
What Facebook verification isn’t
Facebook has simplified its verification process over the past few years. You may have heard of gray check marks or Facebook Marketplace verification. However, both programs have been discontinued.
A verification badge is different from other badges available on Facebook, such as: Top fan badge or Seller badge.
Why verify your Facebook page?
Getting verified on Facebook is a great way to establish a brand’s credibility online. Both large brands and local companies can be verified on the platform.
The verified badge shows your audience that you are authentic. It also helps to make your Facebook page appear higher in search results. This makes it easier for potential customers to find your company.
This is how you get verified on Facebook
Verifying on Facebook is as easy as filling out one Single shape. But it pays to be prepared before taking this step.
Step 1: Choose what type of account you want to verify
You can request confirmation for a Facebook profile or a Facebook page.
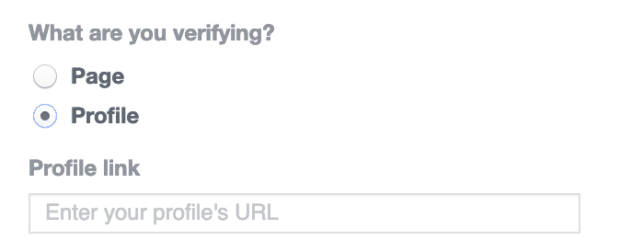
Source: Facebook
As long as you are logged in to verify your Facebook account, the form will automatically display the pages for which you can submit an application.
To apply for profile verification, you only need the URL of the profile at first.
step 2: Confirm your authenticity
When you apply for verification, you’ll need some form of ID to prove you are who you say you are. This makes it impossible for fake accounts and scammers to get verified.
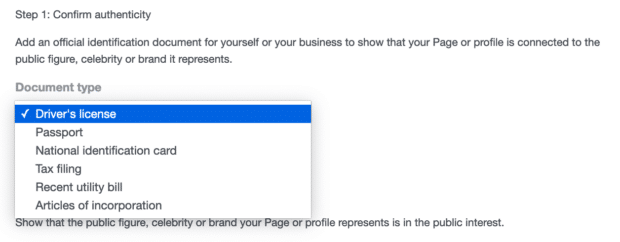
Source: Facebook
The accepted IDs are:
- driver’s license
- passport
- National identity card
- tax declaration
- Current electricity bill
- Articles of Association
The rules as to which specific badges are accepted depend on who issued them. When in doubt, see the full list of Rules for ID pieces.
Whichever document you use, you need a digitized version of your proof of identity, which you attach to the form, e.g. a scan.
Step 3: Confirm you are known
In the second part of your profile or page verification application, you will be asked to indicate that your account is prominent enough for the blue check mark. Facebook wants to know that there is a public interest in verifying your account.
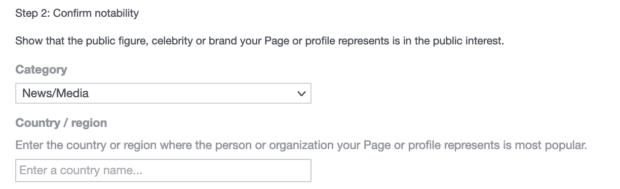
Source: Facebook
In this section you provide basic information. This includes the category Your account falls under and the Country or region where your account is most popular.
There are also several optional fields. Being as complete as possible will increase your chances of getting verified.
Source: Facebook
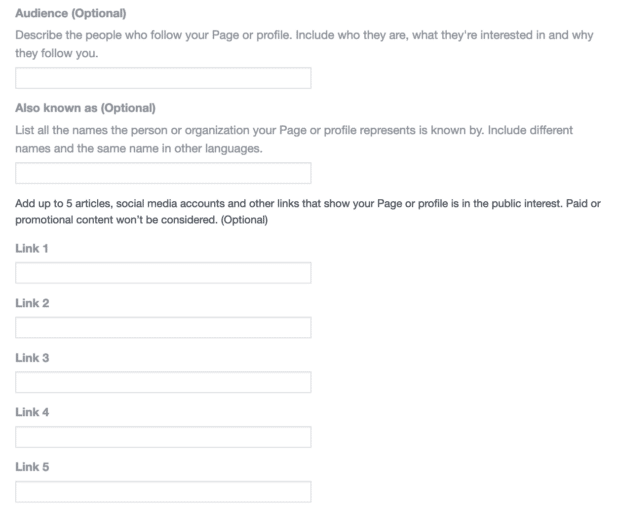
the audience In this section, you tell Facebook what types of people are following you, what their interests are, and why they are following you.
Completing the Also known as Field is not always necessary. It helps Facebook recognize your reach if you or your organization have different names. This can happen if your brand uses different names in different markets.
Finally, you can provide up to five links to articles or social media accounts that showcase your awareness. These links must be independent. Paid content or advertising content will not be taken into account.
Step 4: wait
As soon as Facebook has received your application, it will review your request and either confirm or reject it. This process can take anywhere from 48 hours to 45 days.
6 ways to increase your chances of getting verified on Facebook
When Facebook decides to verify a profile or page, it looks for four properties:
- authenticity. Does the profile or page really represent who it is supposed to represent?
- uniqueness. Is it the only presence of the person or organization on Facebook?
- completeness. Does it provide all the necessary information about the person or organization it represents?
- Notoriety. Is the person or organization well known that it is in the public interest to review?
In this section, we’re looking at ways to make sure your account meets all of the requirements for a blue check mark.
1. Stay professional
The image your Facebook page is presenting should match the image your brand is presenting elsewhere. This helps Facebook see the connection between your page and your business.
Make sure you only share branded content on your page. And don’t forget to remove anything that negatively affects your credibility, such as:
- Off-brand logos, personal posts, or poor quality images
- Posts with incorrect grammar, spelling, capitalization, or other unprofessional looking copies
- Anything that doesn’t match your brand voice
See the side of your business through a prospect’s eyes and edit or remove anything that doesn’t look professional.
2. Make sure your company information is up to date
If your information isn’t kept up to date, it doesn’t matter how professional your Facebook Page looks. Facebook will review and validate your information before granting you the verification badge, so you need to make sure that it is correct.
You need to check that the following are up to date:
- Your website
- Email-address
- description
- Bio
3. Provide details
The more details you can give about your company, the better. Make sure you have completed all of the applicable details on your page Above Section. This information includes:
- Address or addresses (if you have multiple locations)
- Phone numbers
- Your mission statement
- Your other social channel deals
- A company overview
4. Link to official properties
The right links are important if you want to get verified on Facebook. In order for Facebook to approve your verification request, you need an up-to-date link to your company’s official website. You also need to link to your Facebook page from your website.
5. Create a Facebook business page
When you approve a page for a company, make sure that you created a Facebook business page. The process of verifying a Facebook business page is the same as any other, and it’s free to create.
Source: Facebook
The information you provide on your Facebook business page makes you appear more authentic, unique, and remarkable.
6. Cultivate your community
The best way to demonstrate your popularity on Facebook is to have a large and active community of followers.
There are many opportunities, Increase your Facebook engagement. These can include anything from Curate content Created by your followers to use Facebook analytics tools to know what your audience is reacting to.
This is how you stay verified on Facebook
Getting verified status on Facebook is not like win a Nobel Prize; it can still be taken when you have it.
The following tips will help you keep your Facebook verification status.
Respect community standards
Once verified, it is important that you familiarize yourself with the Facebook community standards.
In theory, once you’re verified, you’ll have to follow the same rules as everyone else. In reality, accounts with large followers are often shielded from strict or automated moderation. But the last Exposing Facebook’s “cross-checking” practices means having a large following may not protect you as well as it used to be.
Harassment and illegal content standards are relevant to all Facebook accounts. Others are more applicable to a verified company or brand.
For example, if you curate content from other users (and you should; reposting user-generated content is a great way to build community engagement) make sure you respect that on Facebook intellectual property and Data protection standards.
Use two-factor authentication
Verification on Facebook can add value to your brand. Protect your account with Two-factor authentication.
Two-factor authentication means that in addition to the login screen, you have a second option to prove who you are entering when accessing your account. This second proof can be:
- Sent a text message to your phone number
- A third party authentication app
- A physical one Security key
The two-factor authentication makes it much more difficult for others to gain access to your verified Facebook account.
Develop and maintain a Facebook marketing strategy
A verified presence on Facebook is recognition of your popularity. It is not a guarantee that you will stay that way. Stay relevant on the platform by adopting savvy Facebook marketing practices that will help you connect with your audience.
Facebook marketing can encompass anything from traditional ad purchases for the strategic use of boosted posts.
Anything that adds extra credibility to your brand is worth tracking. Follow the steps above to get verified on Facebook – and see your business grow.
Manage your Facebook presence along with your other social media channels with Hootsuite. From a single dashboard, you can schedule posts, share videos, engage your audience, and measure the impact of your efforts. Try it for free today.
Easily manage your Facebook page (+ other social media accounts) and Save time with Hootsuite. Plan, engage, analyze, execute.