
No products in the cart.
Social Media Marketing
All Of Instagram’s New Features and How to Use Them
18
Oct
Oct
Instagram is one social media platform that is evolving at a rate of knots. Remember when all you could do on Instagram was share oversaturated images of your food? (Love you, Lo-Fi filter.)
Now the social network lets you do everything from broadcasting to your followers to creating your own stickers with AI, with a host of new features only hitting the Meta-owned app in the last few months.
If you’re happy with tried-and-tested photo and video sharing, that’s all well and good, but I’d encourage you to step out of your comfort zone. The Instagram algorithm loves early adopters of its new features.
Making the most of them will help you reach previously untapped corners of your audience or reengage followers. A great example of this is how Notes updates will appear at the top of your followers’ inboxes (but more on this below).
In this article, I’ll unpack everything you need to know about Instagram’s latest features and give you a step-by-step guide to using them all. Here’s what you can expect to learn about:
- Broadcast Channels
- Collab posts with more friends
- Insights on desktop
- Meta Verified
- Music on carousels
- Notes
- Reels templates
- AI stickers
- Photo stickers
Broadcast Channels
This is one of Instagram’s most popular new features among creators and brand accounts — with good reason. Broadcast Channels, which hit apps in February 2023, offer you a chance to send mass updates to followers who have opted in.
Creating a Broadcast Channel (only available to those with an Instagram Creator account) will allow you to send text, photos, videos, voice notes, and even polls to your followers who have joined the channel. Broadcast Channels offer a unique way of sharing launches, big announcements, and company news, or just fostering a deeper sense of connection between you and your followers.
A great example of this is how the trainers behind the Sweat app helped users stay accountable in their 12-week challenge by creating a Broadcast Channel for each program and trainer. The trainers sent encouraging messages, voice notes, and videos, and included polls to make the channels more interactive.
Below are examples from @kelseywells and @kayla_itsines.
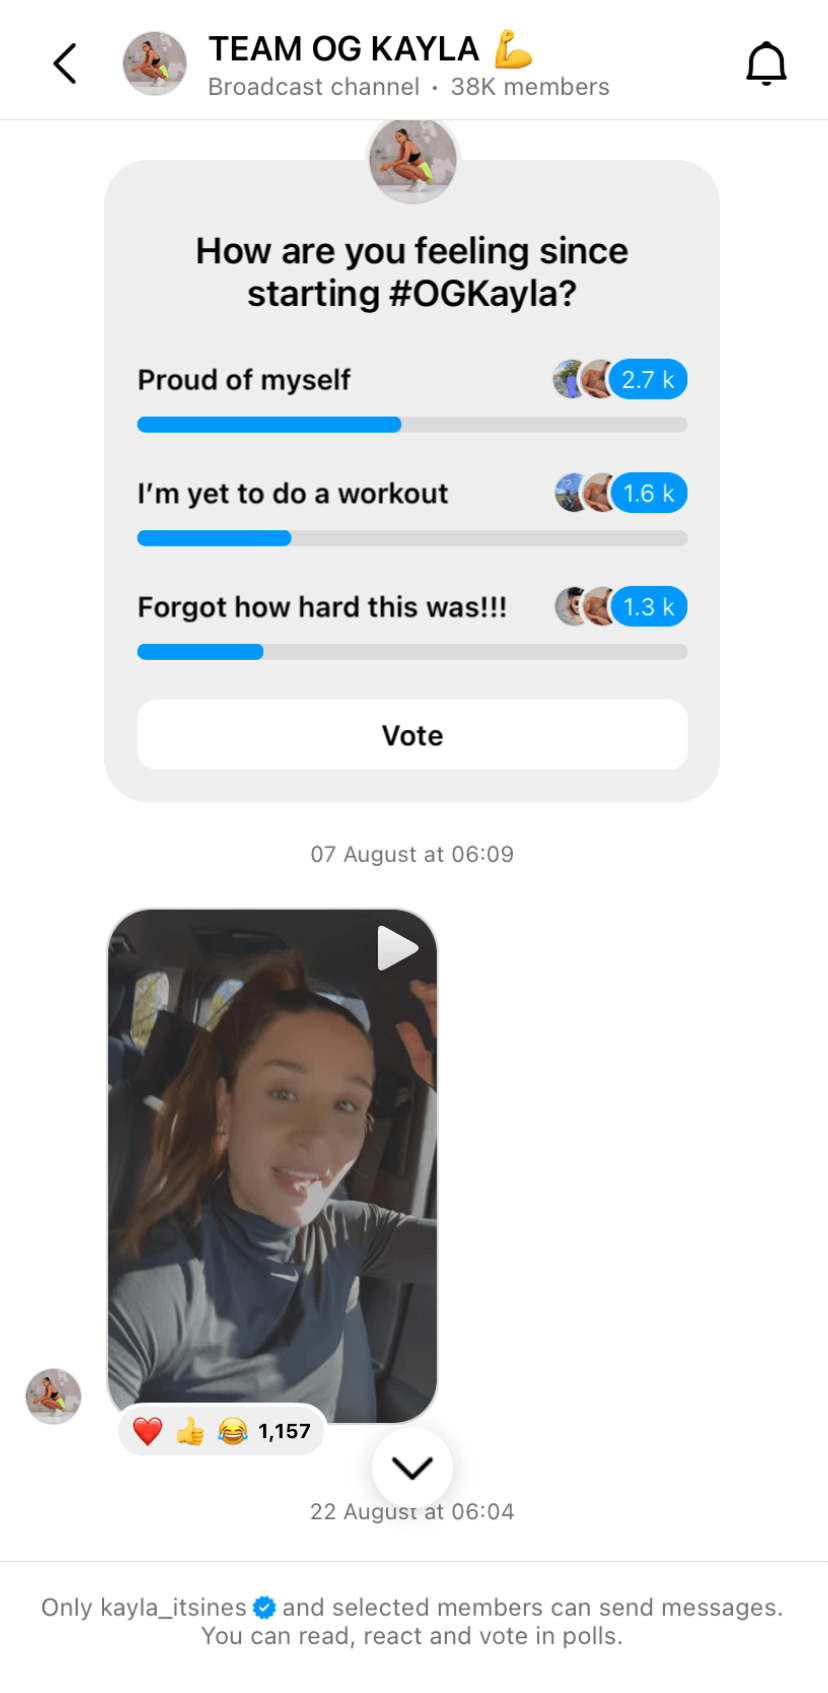
We have an in-depth guide to creating your own Instagram Broadcast Channel and how to use it (with screenshots), so do head over there if you’re going to take the plunge. Here’s a high-level overview of how to get set up:
How to create an Instagram Broadcast Channel
- Tap the message icon at the top right of your Instagram app.
- Tap the new message icon on the top right.
- Choose ‘Create broadcast channel’. From here, you’ll be able to enter a channel name, choose an audience, specify an end date, and choose whether or not to show your channel on your profile.
- Once you’ve chosen your settings, tap ‘Create broadcast channel’ at the bottom. Your chosen audience will get an invite and join the channel if they accept.
Collab posts with more friends
Collabing on posts is not a new feature — Instagram made it possible for two accounts to partner on a post back in 2021 — but now they’ve opened the feature up so you can invite up to three friends to co-author a feed post, carousel, or Reel.
What’s great about this feature is that it means your content will appear in the feeds of your collaborators’ followers, too. The post will also be visible on all the collaborators’ profile grids, and all the engagement on the post will be shared by the accounts.
Again, we’ve got an in-depth guide to Instagram collab posts here, but here’s another high-level how-to.
How to create an Instagram Collab post
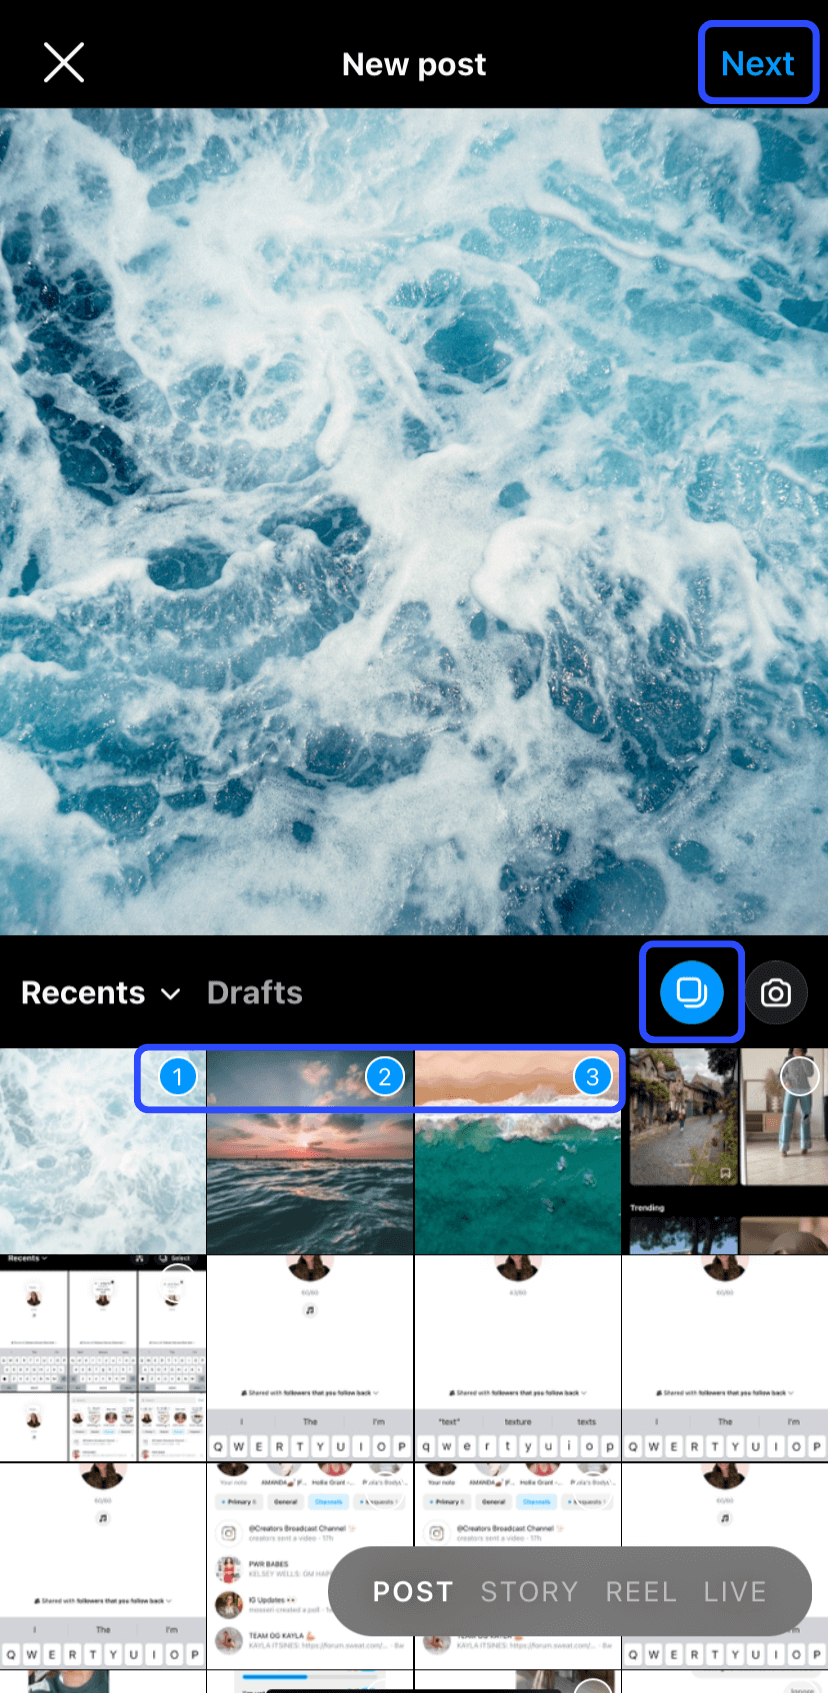
- Tap the Create (+) icon at the bottom of your Instagram app and choose the photo or Reel you want to upload.
- In your final editing screen before posting (where you enter your caption), tap ‘Tag people’ then ‘Invite collaborators’.
- Search for the users you want to partner with and tap their names to select. Tap ‘Done’ on the top right.
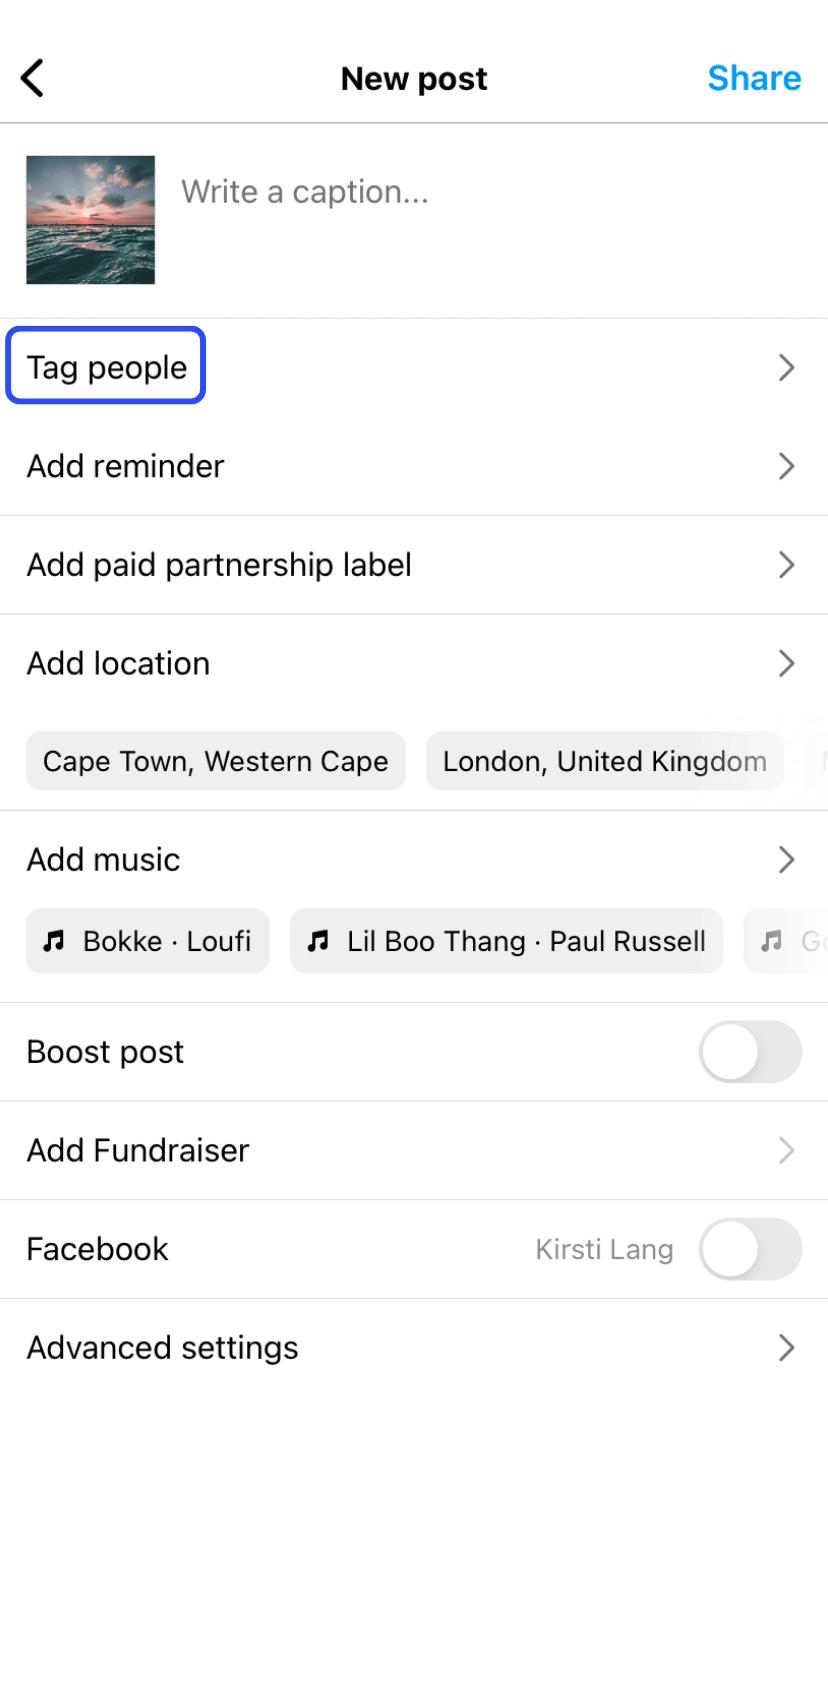
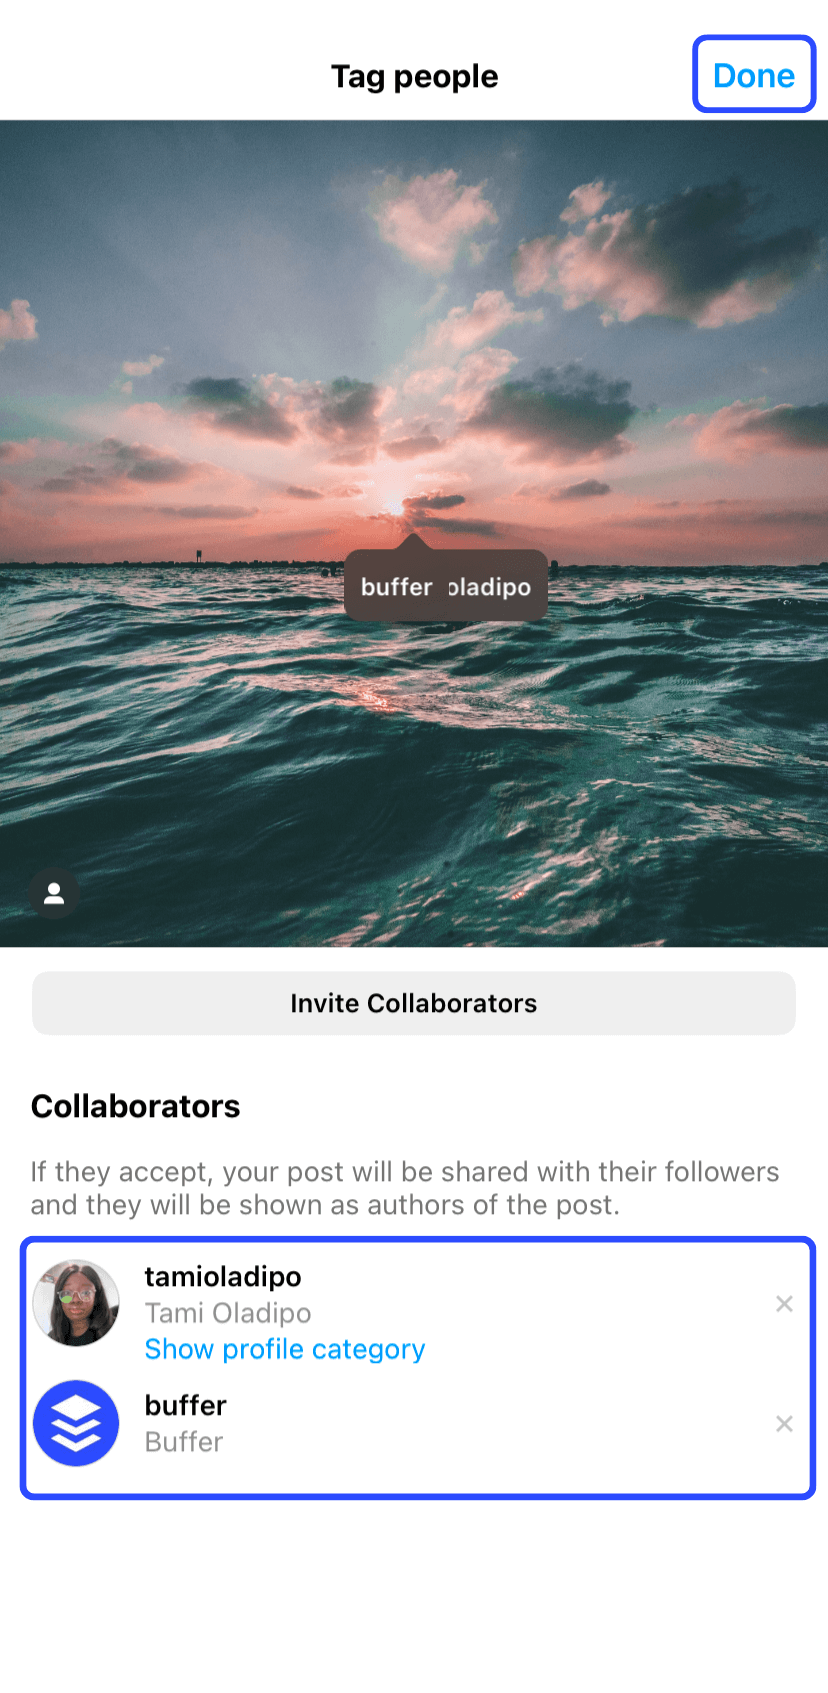
- Don’t forget to write your caption, add a location, and more before you post. When you’re ready, hit Share. Your collaborators will receive an invitation to join the post. Once they’ve accepted the invitation, the post will live on both of the accounts’ grids and feeds.
Insights on desktop
In a helpful move for social media managers everywhere, Instagram’s analytics, Instagram Insights, is now available on desktop, too.
How to access Instagram Insights on your computer:
- Head over to your Instagram profile on your desktop browser of choice. Underneath your bio, you’ll find a short summary of your recent reach. Click the ‘View Insights’ link next to it.
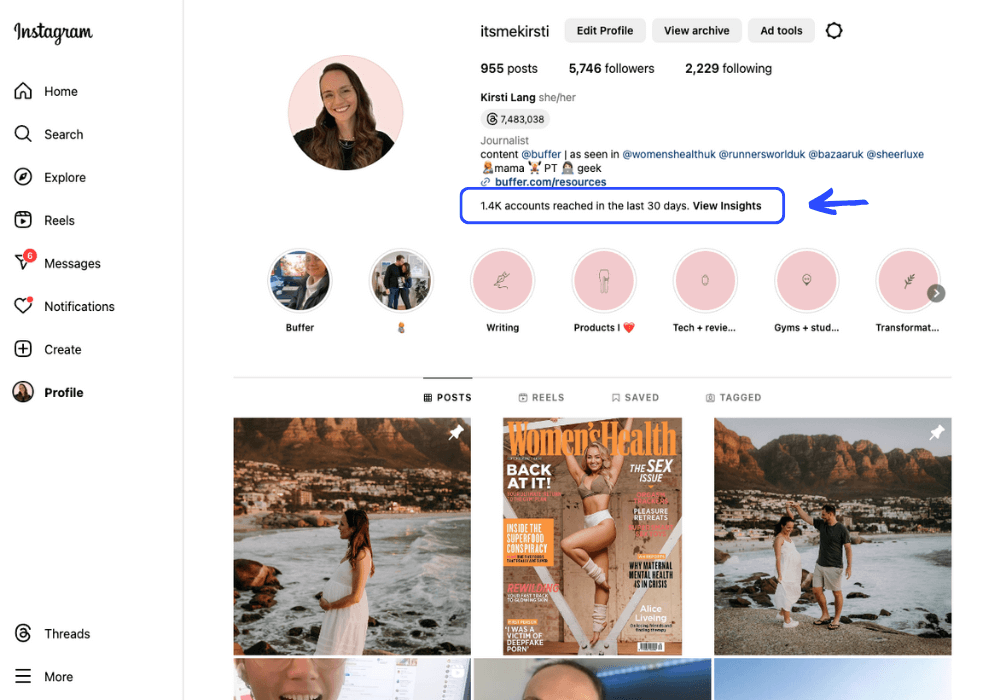
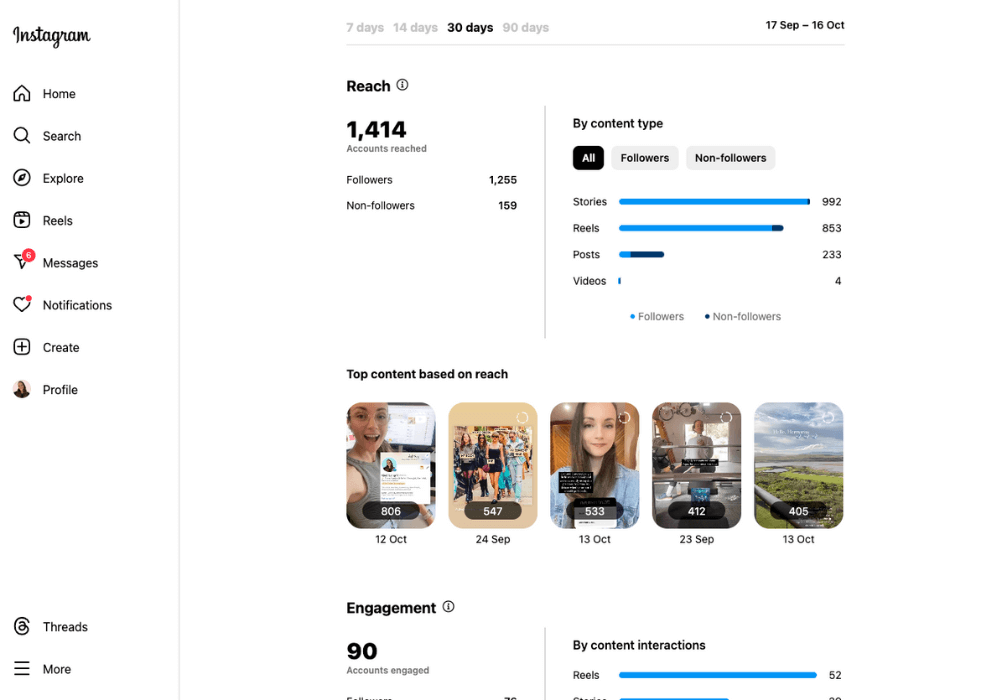
- You’re in! In the desktop version of Insights, you’ll find an overview of your Reach, Engagement, and more. At the top of the screen, you’ll be able to toggle between specific time frames, from seven to 90 days.
💡
Looking for deeper insights than what you’ll find on Instagram? Buffer’s analytics goe beyond just showing you the numbers and uses your reach and engagement data to recommend the best time to post, posting frequency, and content format, to help you level up your channel growth. Find out more
While this is not an Instagram-exclusive feature, it means a huge change for brands and creators using the platform, so I thought it was worthwhile including it here.
Getting verified on Instagram is certainly nothing new — that little blue tick has been around almost as long as my beloved Lo-Fi filter — but Meta has introduced a whole new way to get one.
With the introduction of Meta Verified in 2023, accounts no longer have to belong to a notable public figure to get the coveted checkmark. Subscribers can pay a monthly fee to be verified on Instagram (and big brother app Facebook). They’ll also get access to some premium features like increased access to support and account protection, and personalized stickers.
How to sign up for Meta Verified on Instagram
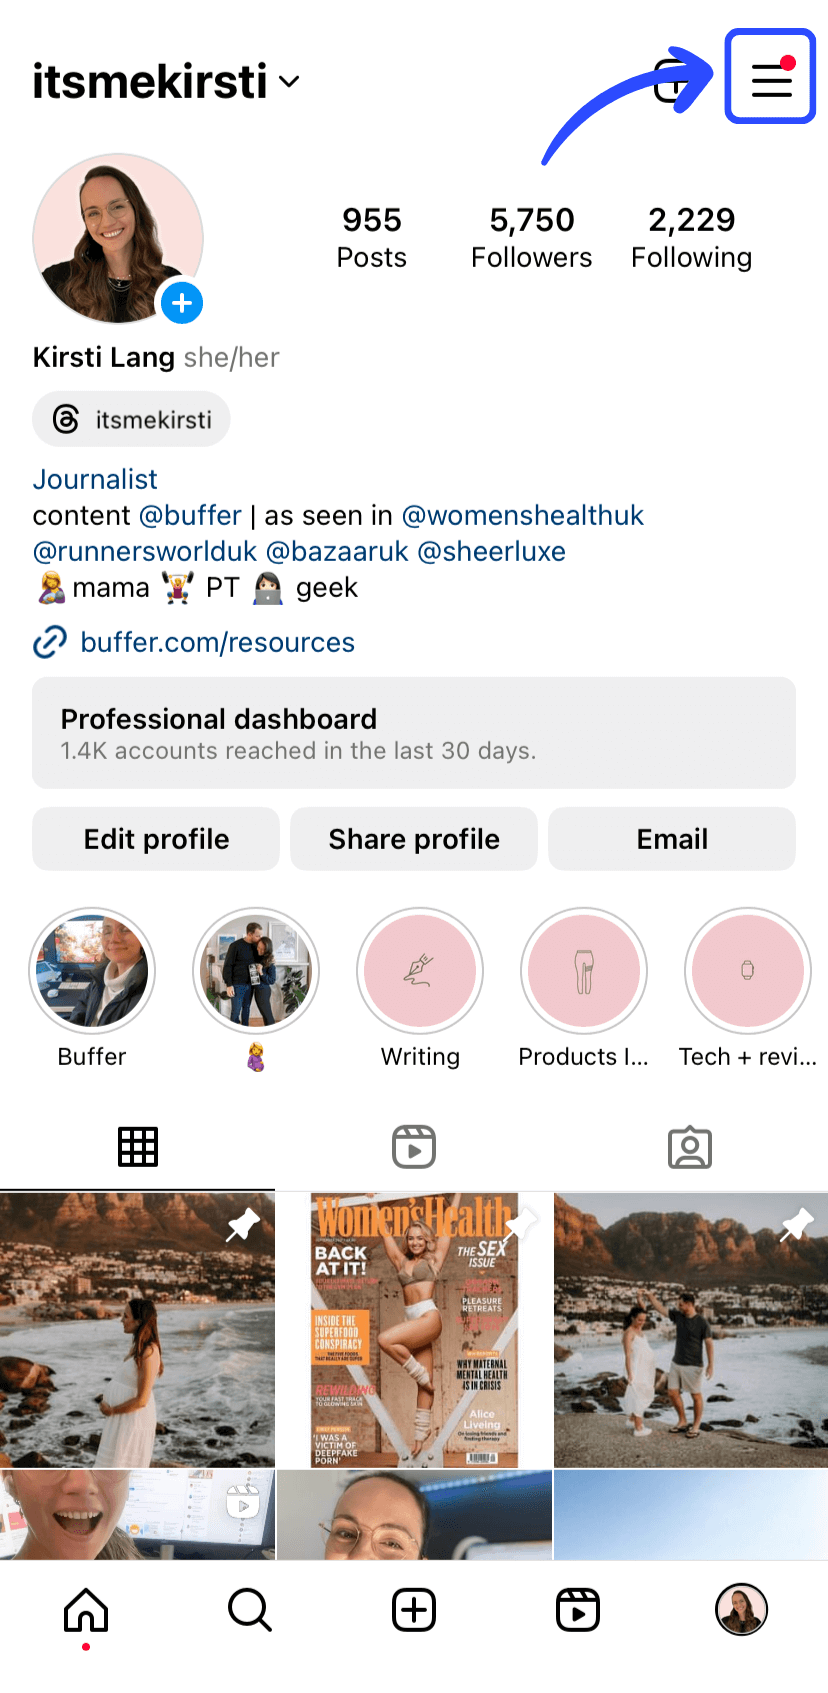
- Head over to your Instagram profile by tapping your profile picture on the bottom right of the app.
- Tap the hamburger menu (the three lines on the top right).
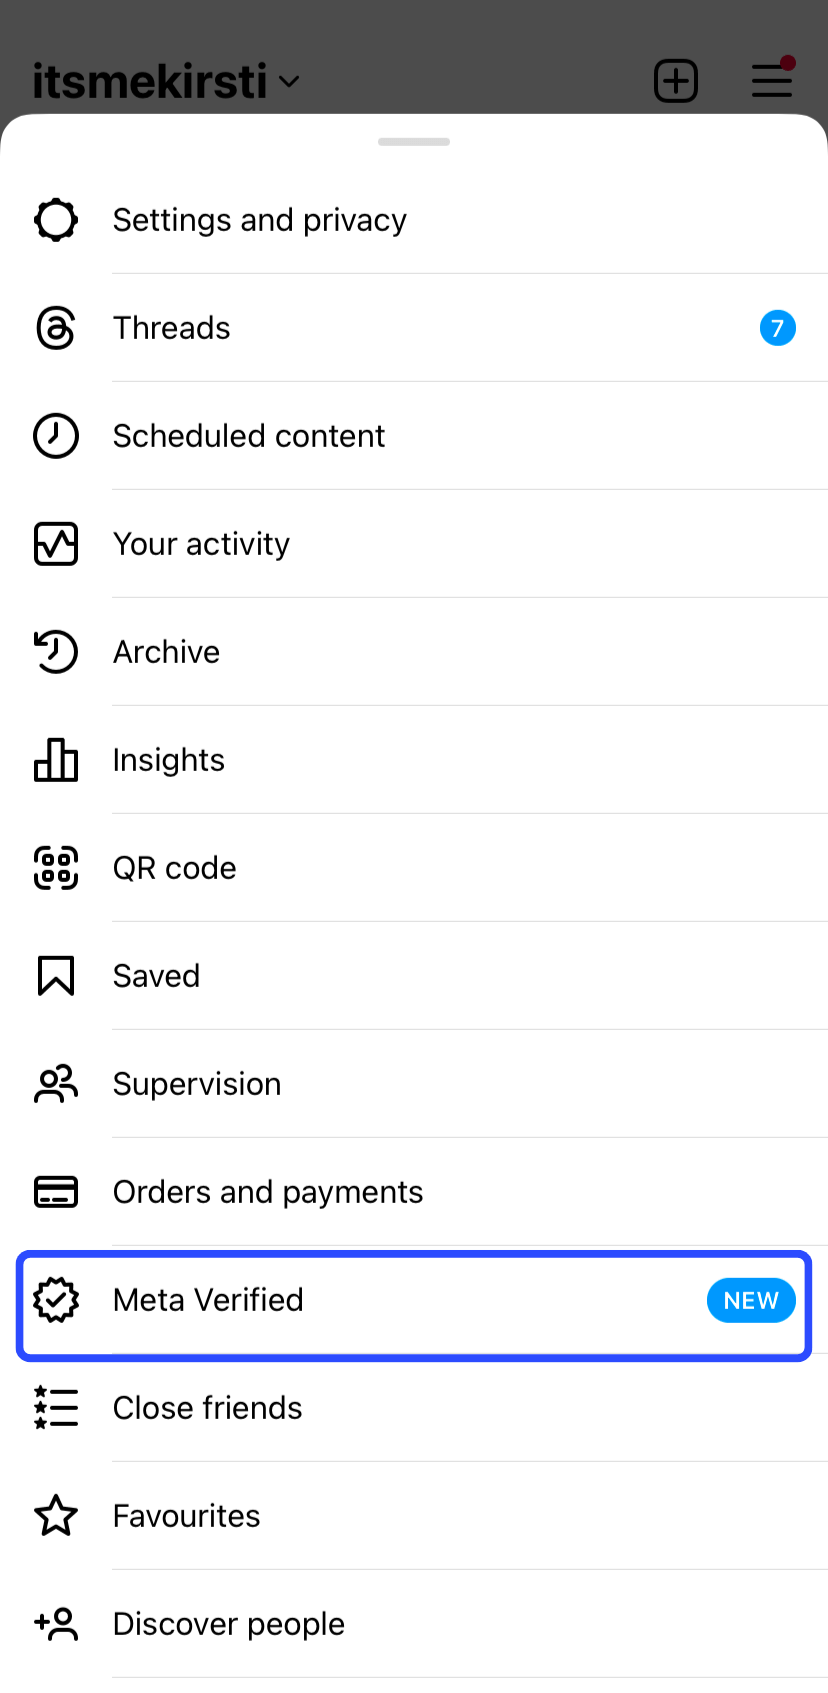
- Choose ‘Meta Verified’.
- Read through the explainer, then tap ‘Next’.
- Choose which Meta accounts you’d like verified.
- Confirm and pay. From here on out, you’ll be charged the monthly subscription fee* unless you cancel. It could take up to 48 hours for your blue tick (and all the benefits) to appear.
*Note that the cost of your subscription will differ depending on your region.
Music on carousels
The ability to add music to Instagram photo posts has been around for a few months, but Instagram recently rolled out the feature for carousel posts (those with multiple photos) as well.
How to add music to carousels
- Tap the Create (+) icon at the bottom of your Instagram app as you would with a regular post.
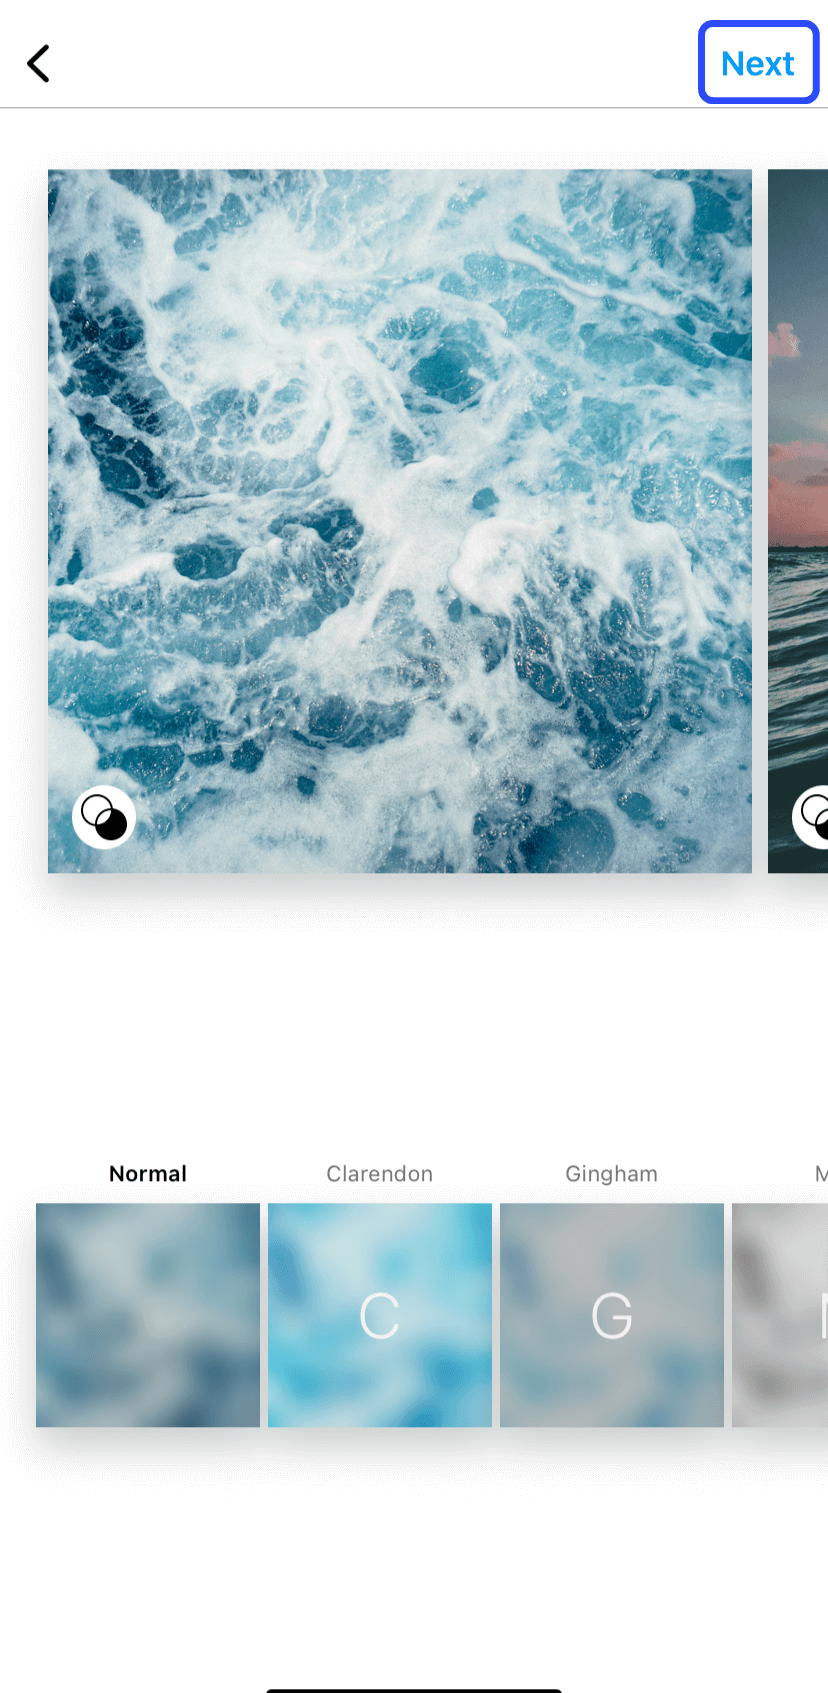
- Tap the carousel icon just underneath your photo preview, on the right. Select all the photos you’d like to include in the carousel, then tap ‘Next’ on the top right of the app.
- Choose your desired filters, then tap ‘Next’ again.
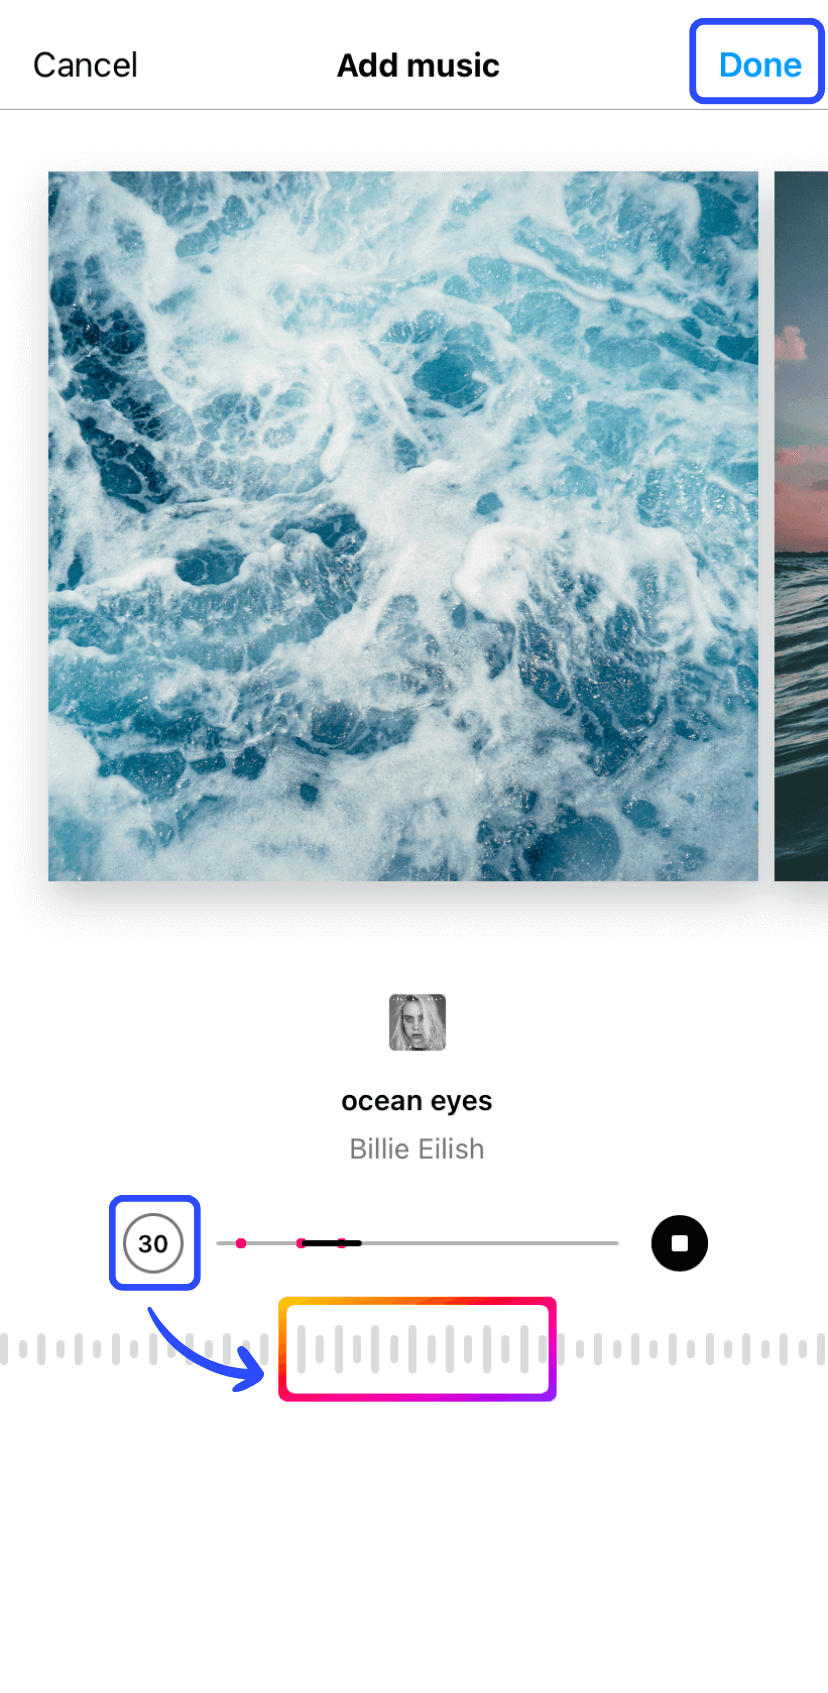
- Now you’re on the final editing screen, where you can add your song of choice by tapping ‘Add music’.
- Scroll through the list or search for the song you’re after, then tap on it to select.
- Tap the ‘30’ icon to set how long you want the song to play for. Swipe the audio bar at the bottom left or right to choose the segment of the song you want to play. When you’re happy, tap ‘Done’.
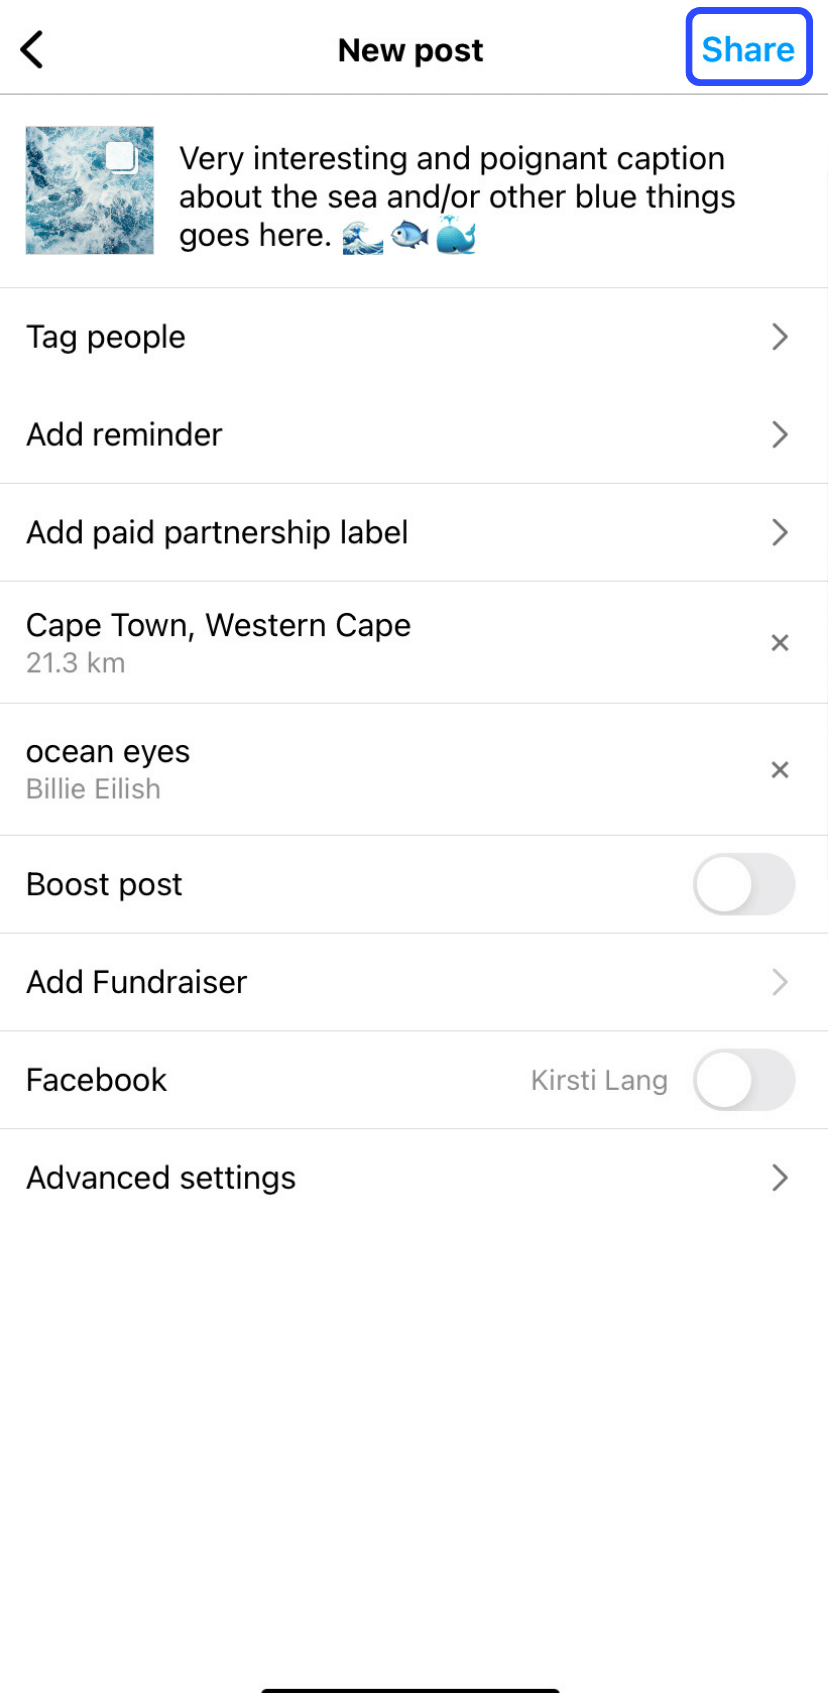
- Again, don’t forget to write your caption, add a location, tag friends, and more before you post. When you’re ready, hit Share.
Notes
Millennials — remember how you could include a song on your MySpace page? Well, Instagram’s Notes feature is kind of like that (just not quite as invasive for your followers). Regardless, the teens love it, The Verge reports.
Before we go too far down memory lane: with Notes, you can share a short text-based update with followers who also follow you. Notes dropped in December 2023 but was recently updated so that users could share a song as well as text.
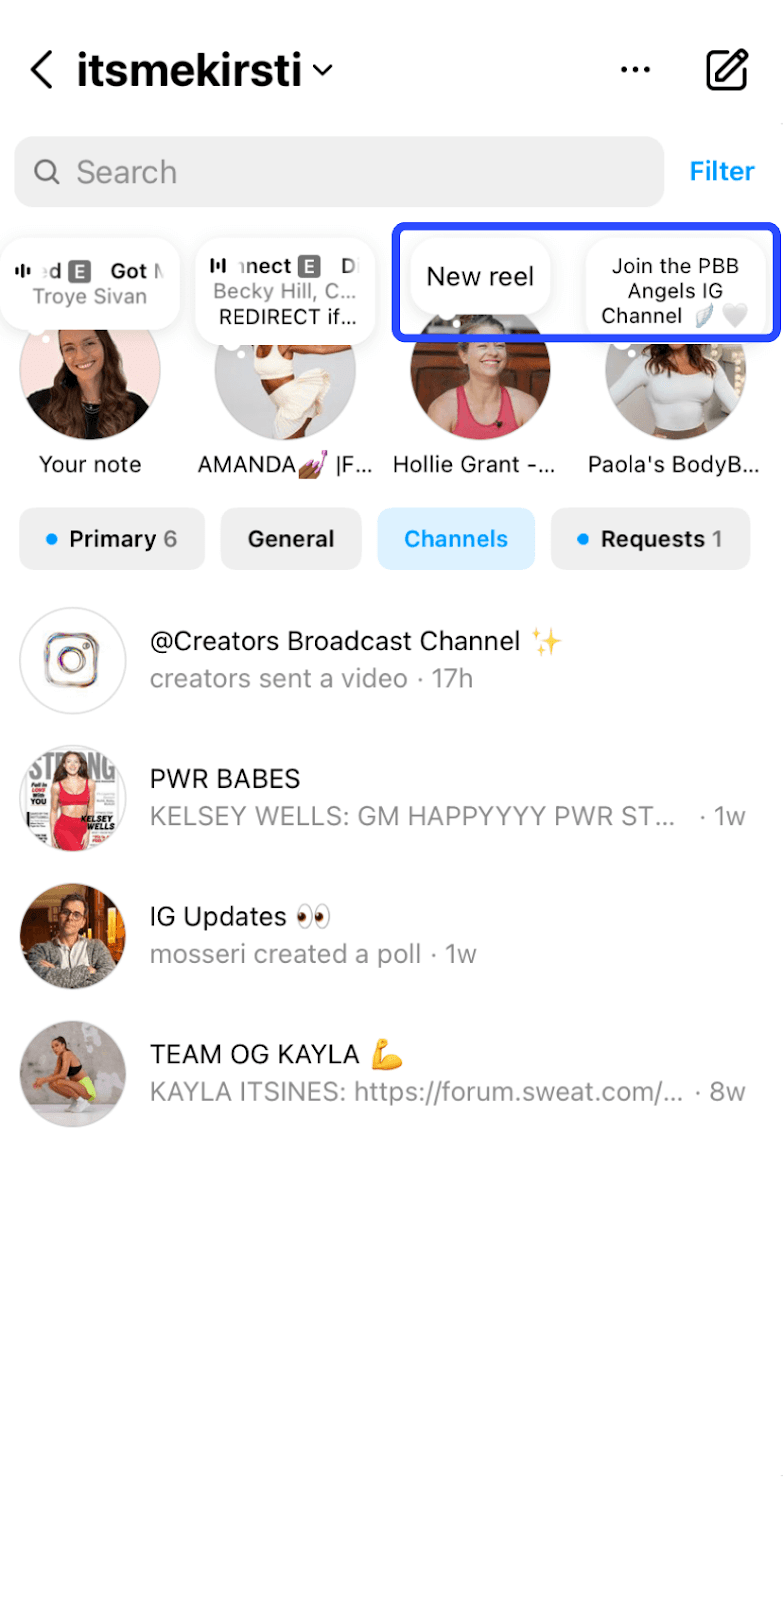
New Notes will appear in a bar atop your follower’s messages inbox, so the feature is a great way to keep your account top-of-mind for followers, even if your Reels and posts haven’t quite made it into their feed. It could also help you reach followers who may not have seen new content or announcements (just like @thepilatespt and @paolasbodybarre have done in the screenshot below).
How to share a Note on Instagram
- Tap the message icon at the top right of your Instagram app.
- Tap the speech bubble just above your profile picture.
- Add text by typing in the bubble, or tap the music icon below your photo and select your song of choice. You can have both text and music, if you choose.
- Hit ‘Share’ on the top right to publish.
Reels templates
Sure, video editing is a heck of a lot easier than it used to be, but the fiddliness of cropping and tweaking clips on your phone is still headache-inducing, no matter how often you do it.
Enter: Reels templates.
The feature has been around for a while, but Instagram recently updated the process to make templates so much easier to use.
This clever play from Instagram allows you to effectively steal another Instagrammer’s edit, using your own clips or photos in place of theirs. This is particularly handy for the clever Instagrammers who have managed to nail their video and music timings!
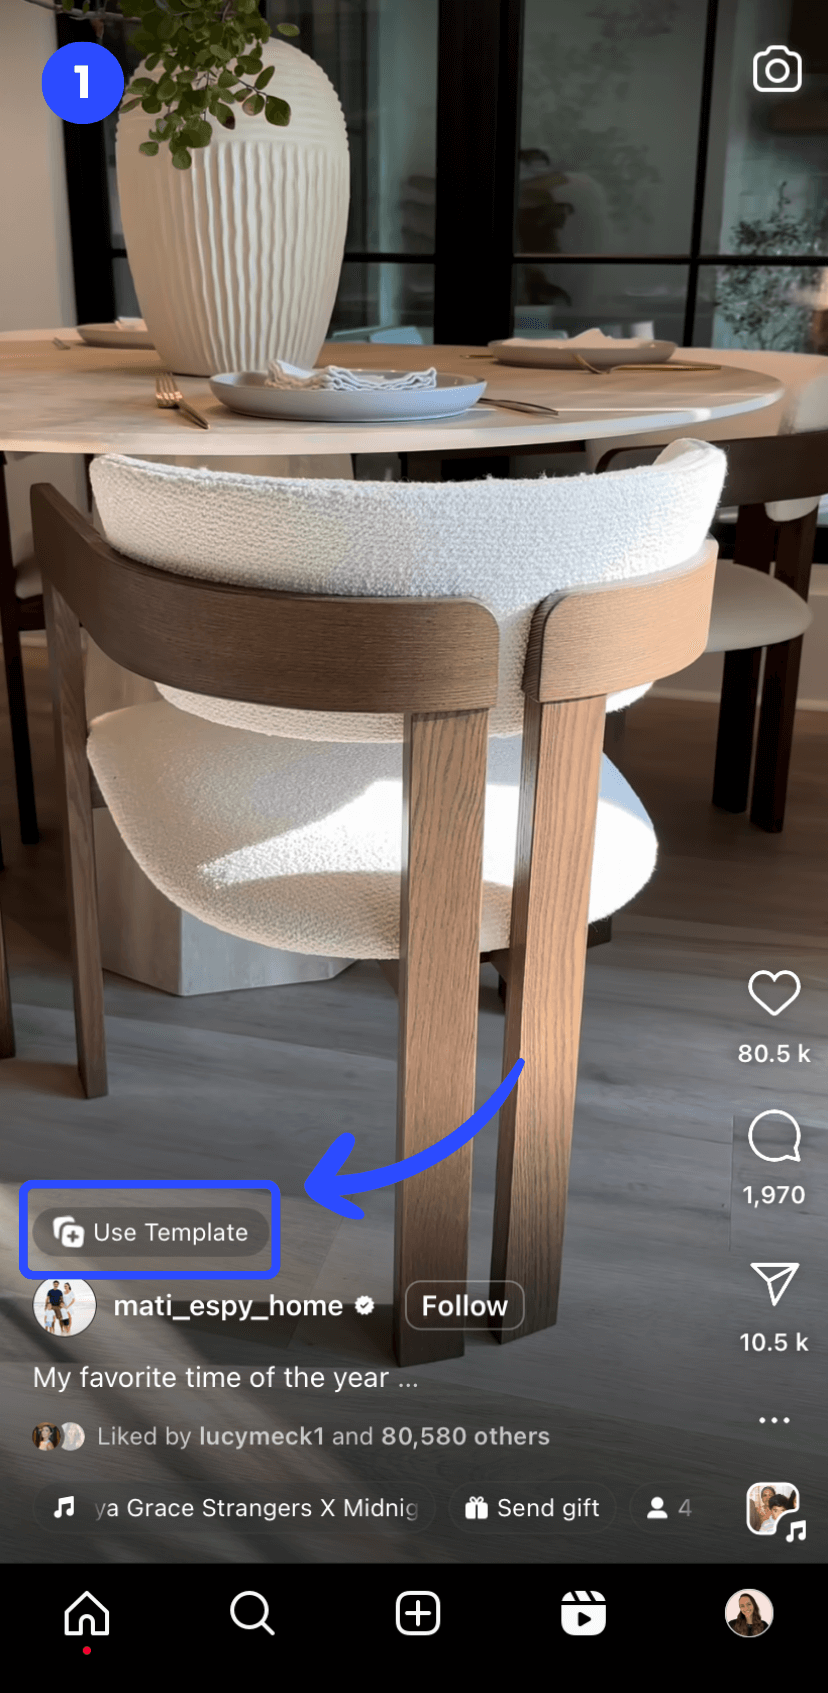
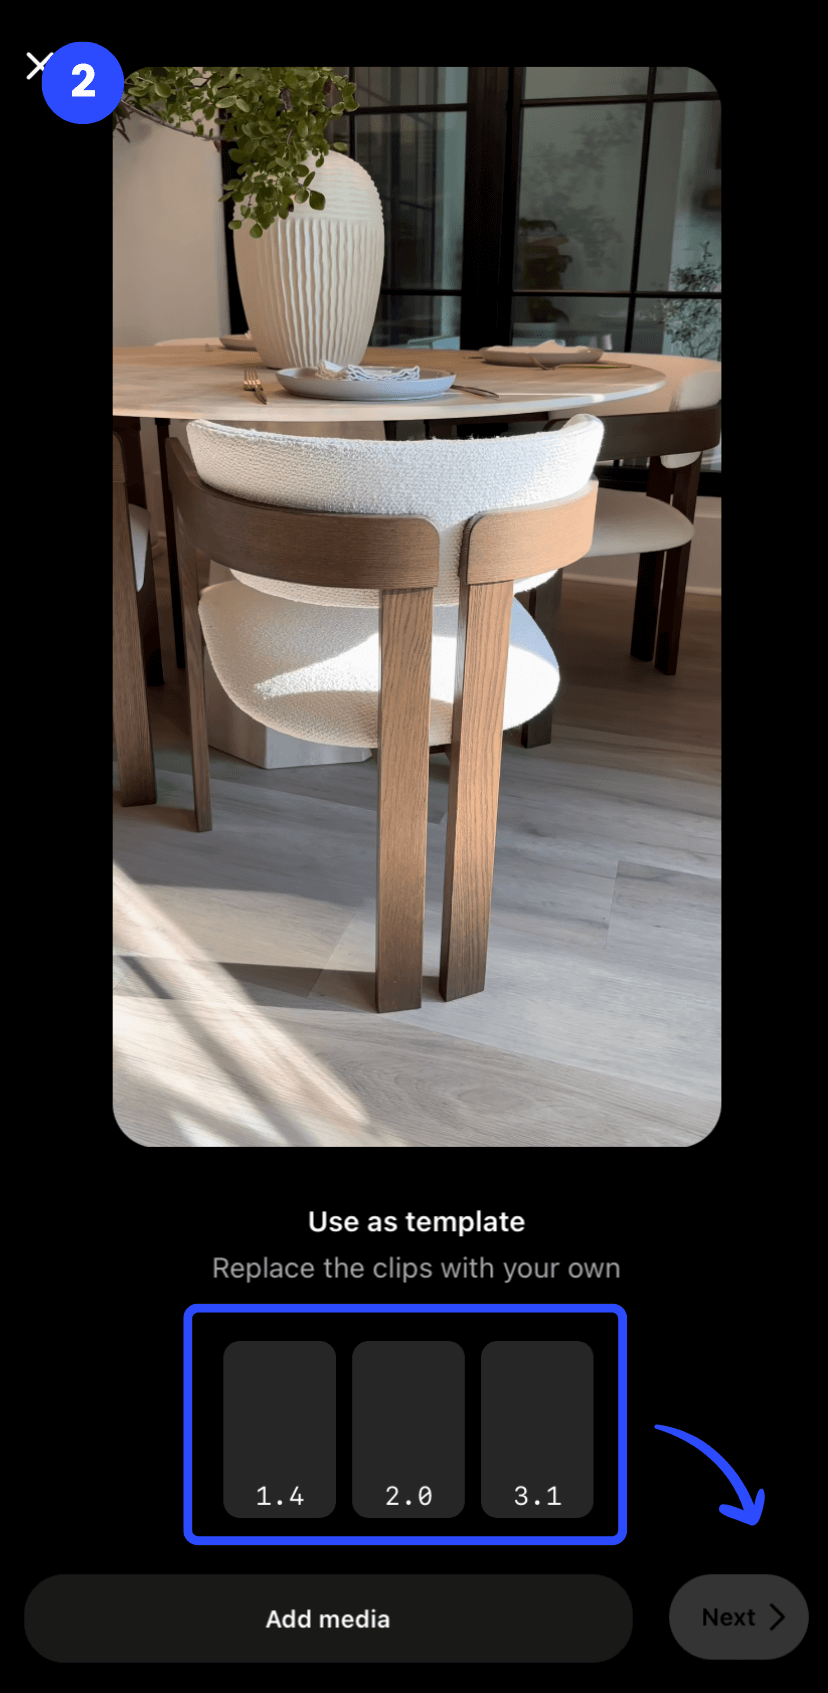
Not all the Reels on Instagram are available as templates (the creator will have had to toggle an advanced setting on, more on this below). On Reels that can be used as a template, you’ll see a little button that says ‘Use Template’ right above the original creator’s name on the left-hand side of the app (like the screenshot below of this Reel by @mati_espy_home).
How to find Reels you can use as a template
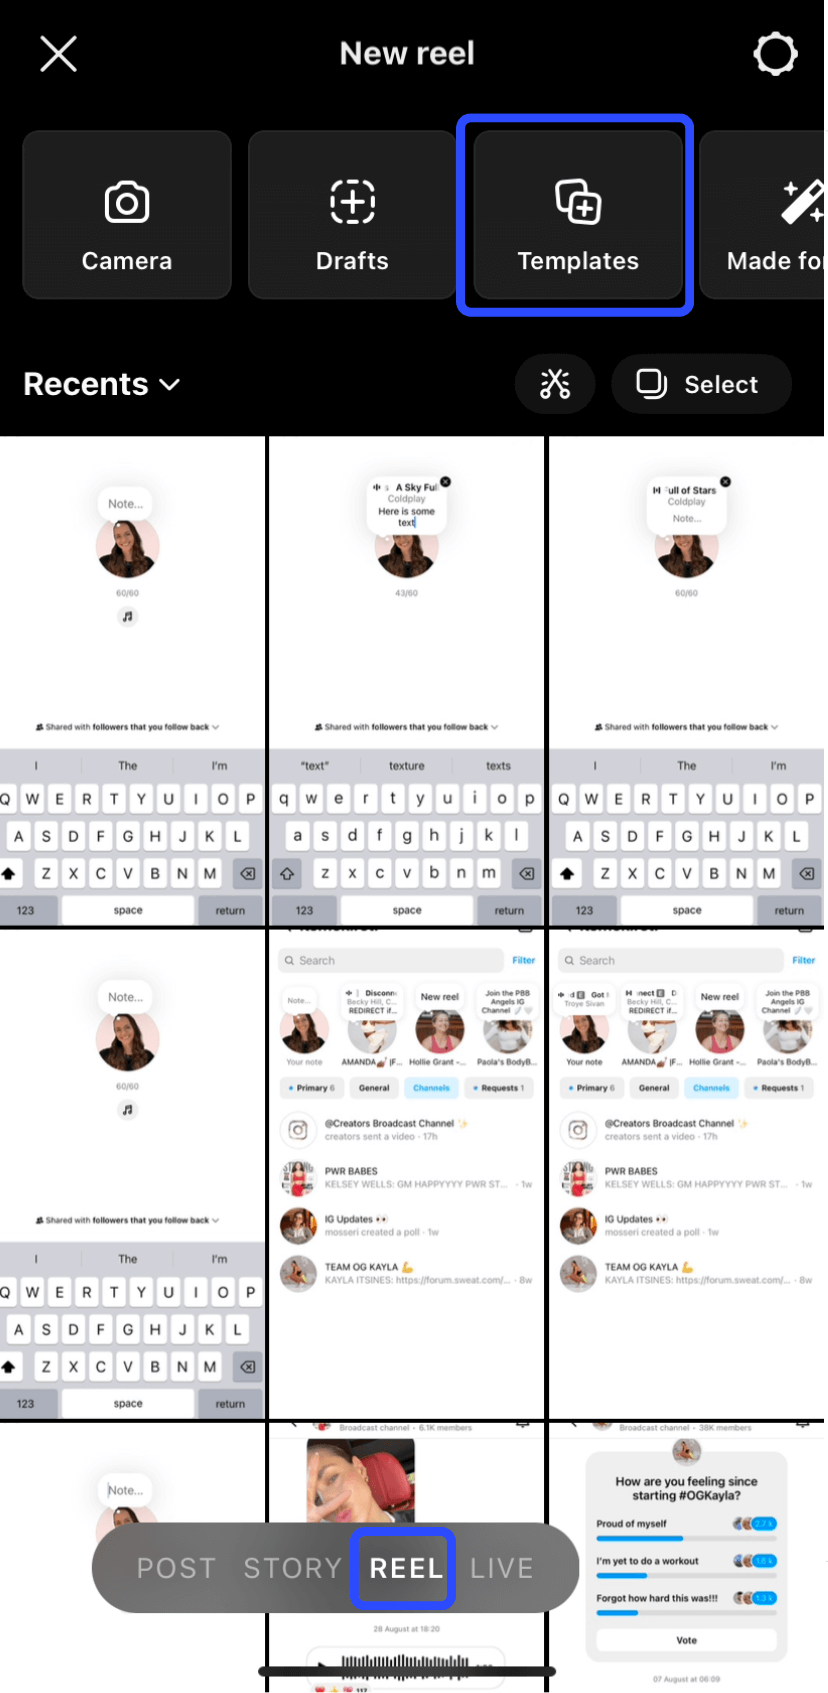
- Tap on the create (+) button in the Instagram app, then choose ‘REEL’ at the bottom of the screen.
- Choose ‘Templates’ at the top of the screen.
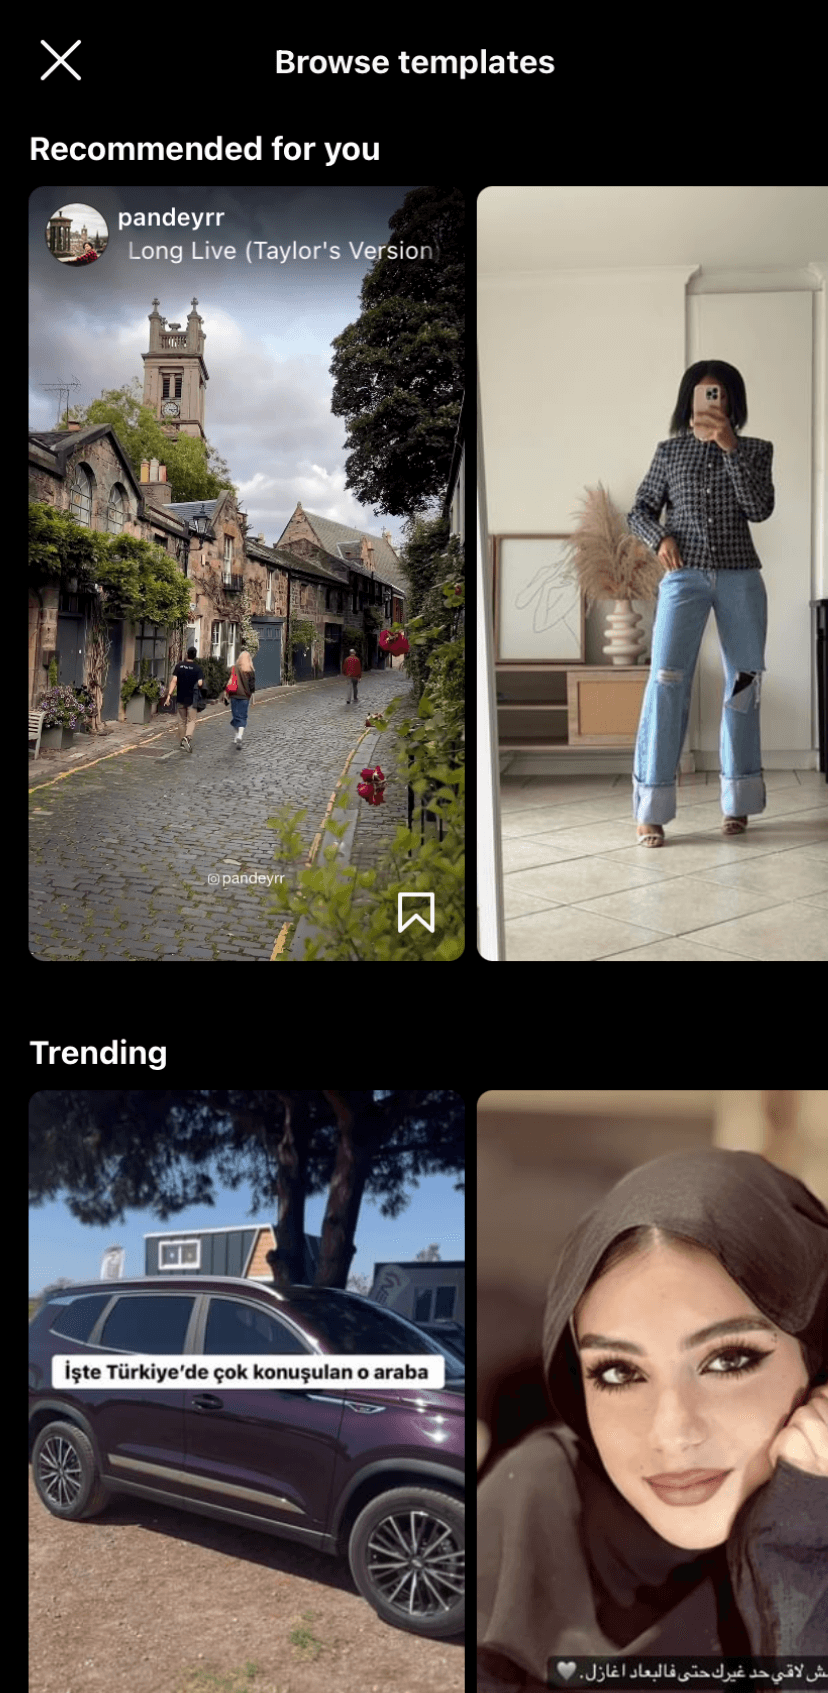
- Here, you’ll find a library of Reels you can use as a template for your next video, including a selection recommended for you and trending Reels. Tap on your chosen Reel, then follow the steps in the next section.
You might also find Reel templates you like on the Reels or Explore pages, so be on the lookout.
How to create a video with a Reel template
- Once you’ve found a Reel you like that is available as a template, tap the ‘Use as Template’ button.
- Tap on one of the clip placeholders to insert your own photos or videos, then ‘Next’.
- From there, you can either publish your new Reel as is (tap ‘Next’ again), or hit the ‘Edit video’ button on the bottom left to make tweaks.
- If you tap the Edit video button, you‘ll be taken to the regular Reels editing dashboard. Here, you can change the timings of the clips, the music, and the transitions that carried over from the template. You can also add more photos or videos, text, and stickers. When you’re happy with your version of the video, tap the blue arrow on the right-hand side of the screen.
- This is the final editing screen before posting. You can write your caption, change the cover of your video, tag people, add a button, location, or a paid partnership label, and more.
- It’s also where you can set whether or not your Reel can also be used as a template. Scroll to the bottom to find ‘Advanced settings’.
- Toggle ‘Don’t let others use this reel as a template’ on or off.
- Ready to send your Reel out into the world? Tap ‘Share’.
Stickers
Instagram is clearly leaning into stickers this year, with not one but two new ways to create your own unique stickers in Stories and messages.
AI Stickers
Whether you’re looking to find a sticker applicable to your niche situation or just something really silly, AI stickers can be a ton of fun.
Case in point for the latter: My request for a sticker that communicated to my husband that he needed to stop sending me distracting Reels while I was working on this article yielded the confusing, albeit adorable, sea monster below. (To be fair, it was a terrible prompt.)
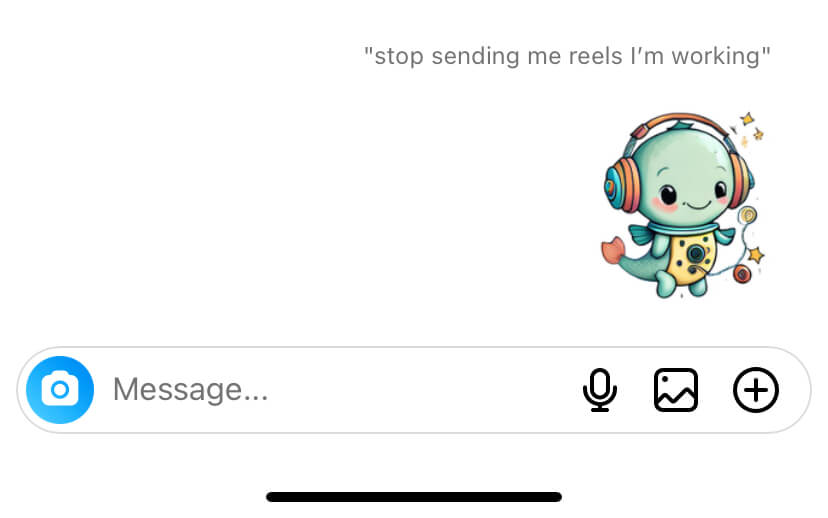
More straightforward prompts will definitely generate better results — Buffer Content Writer Tami Oladipo’s at the bottom of this section is a great example. These stickers offer a great way to keep the conversation going in your messages or add some personality to your Stories.
To send an AI sticker on Instagram via DMs:
- Tap the messages icon on the top right of the app to go to your inbox and find the person you want to send your sticker to. (You can also do this by replying to one of their Stories by tapping the ‘Message’ button when viewing their Instagram profile.)
- Tap the ‘+’ icon on the bottom right, then choose Stickers.
- Enter a text prompt in the search bar, and your AI stickers will appear below.
- Tap an AI sticker to send it to your chat.
- It’s worth noting that if you send an AI sticker, people in the chat will also see the text prompt that you entered.
To add an AI sticker to an Instagram Story:
- Tap the Create (+) icon at the bottom of your Instagram app (or tap on the blue + next to your profile in the Stories bar).
- Take a photo or video, or choose one from your camera roll.
- Tap on the stickers icon (the square with a smiley face), then tap ‘AI STICKERS’.
- Enter a text prompt, then tap ‘Generate’.
- Tap on an AI sticker to add it to your story.
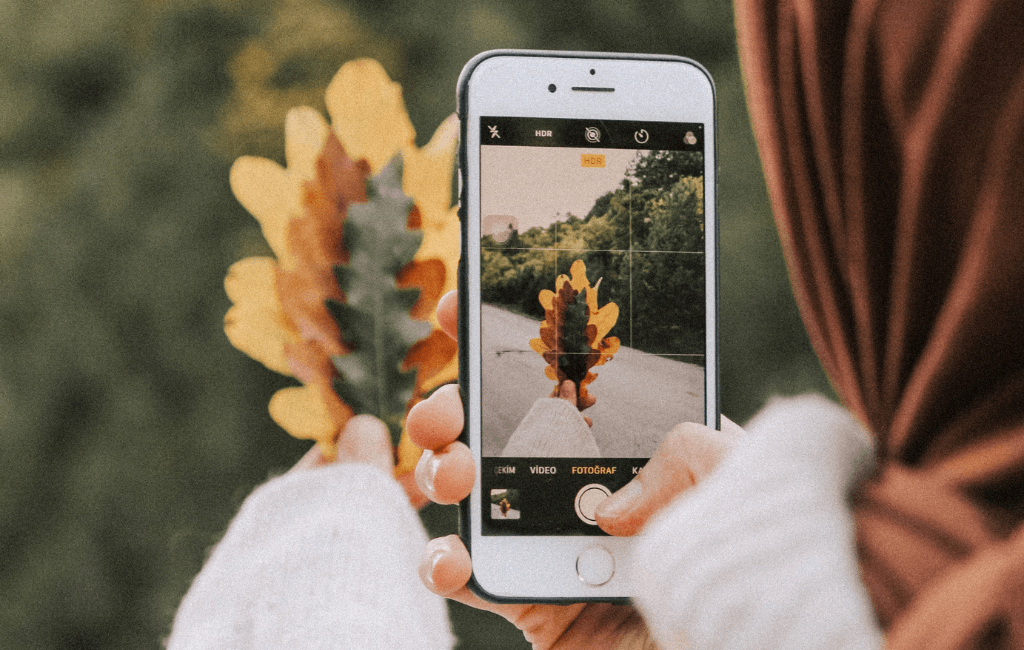
Photo stickers
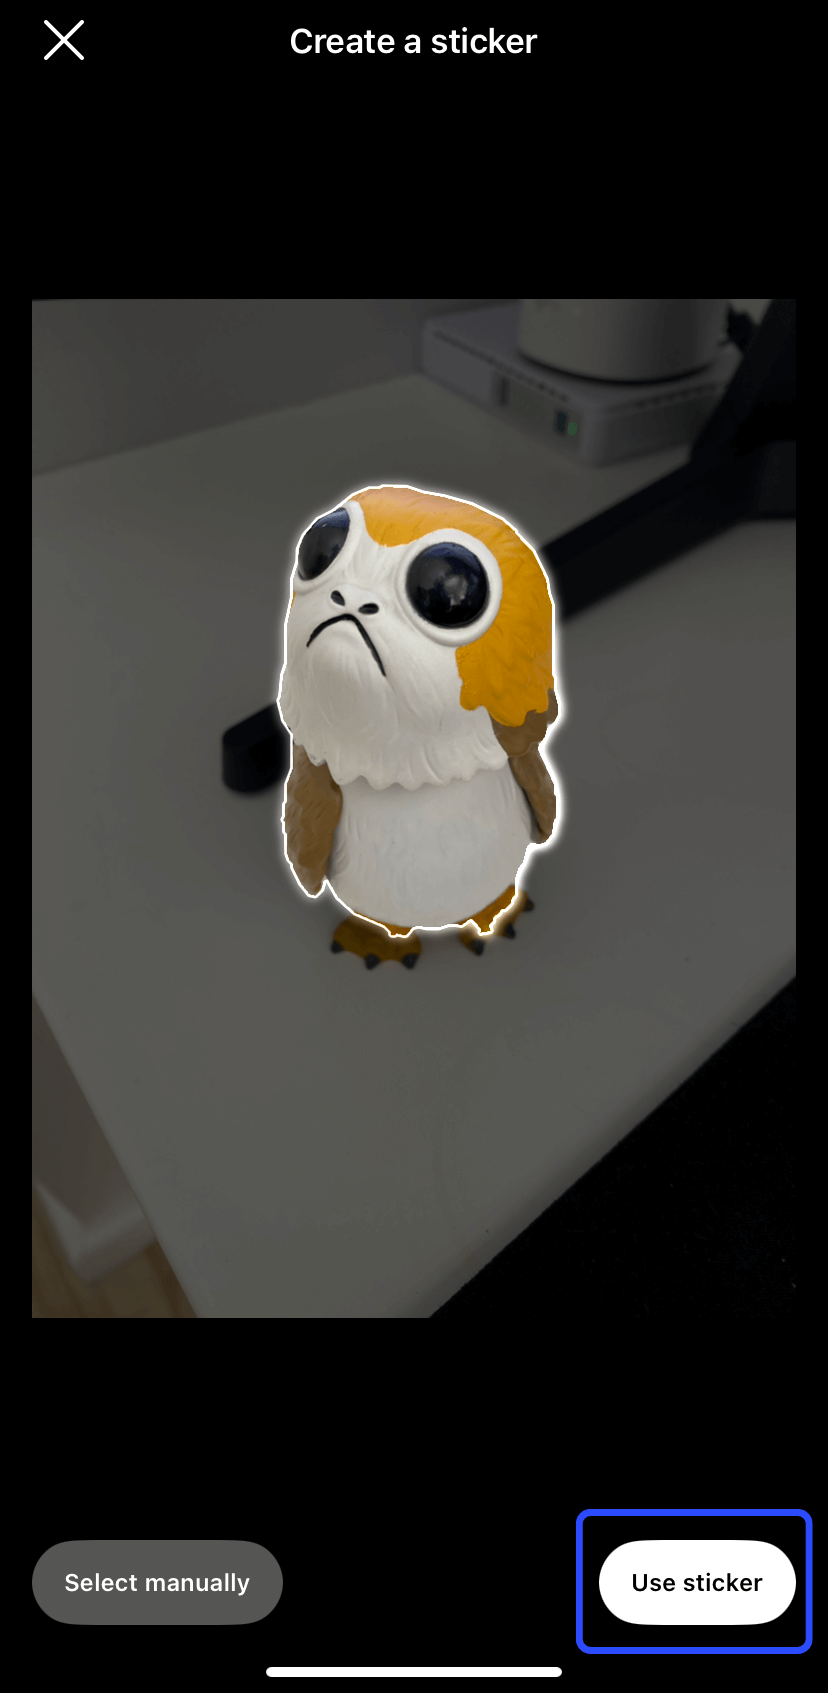
If you’re after something really unique for your Stories, Instagram now lets you turn your own photographs into stickers.
How to create a photo sticker in Instagram Stories
- Tap the Create (+) icon at the bottom of your Instagram app (or tap on the blue + next to your profile in the Stories bar).
- Take a photo or video, or choose one from your camera roll.
- Tap on the stickers icon (the square with a smiley face), then tap the ‘Create’ icon. (In the screenshot below, you’ll see all the stickers I’ve already created pop up in the menu, too.)
- Choose a photo from your camera roll you’d like to turn into a sticker.
- Instagram will automatically outline the best part of the photo to use, but you can choose your own by tapping the ‘Select manually’ button on the bottom left. When you’re happy, tap ‘Use sticker’.

Have we missed any new Instagram features you’re enjoying? Leave a comment below, or tag @buffer in your Instagram content — we’d love to see your work!