No products in the cart.
Affiliate Marketing
Totally Managed Ad Network (2022 Replace)

05
Sep
Sep
AdSpyGlass At a Glance
AdSpyGlass: Offers & Verticals
Ad Types: Popunders, display ads/banner ads, Native ads, Instant messages, Direct links, In-video (VAST) ads, Video Slider (VAST) ads, Classic push notification ads, In-page Push ads, Interstitial ads
Verticals: Adult and Mainstream
AdSpyGlass Payment & Investment
Cost Model: CPM
Minimum Withdrawal: $10
Payment Methods: Yandex Money, Capitalist, Qiwi, Bitcoin, Payoneer, Paxum, Paypal, WebMoney, and bank transfer.
AdSpyGlass Support
Personal Onboarding Manager: No
Knowledgebase: In-depth help center and FAQ section where you can find solutions to almost all questions
Support Response Speed: Ok, with one hour response time
Support Rating: Ok
Contact Methods: Live chat, Ticket
Email Contact: sevak@adspyglass.com or anton@adspyglass.com
Publishers are always looking for ways to earn more from their website traffic. We’ve heard that AdSpyGlass does that!
In this AdSpyGlass review, we’ll have a rundown of how it works and see if it is really as good as they say it is.
If you’re a webmaster, then you know that getting the highest CPMs is essential to maximizing your revenue.
But it’s a labor-intensive task — you have to manually set up placements, take note of the results, remove old codes and add new ones, then compare the results of network A to network B. In the middle of it all, you lose profit!
But there’s a way to make this task easier without causing you to suffer losses, and that’s where ad mediation comes in.
Ad mediation is a technology that helps publishers find the best available ad network to fill their ad slots.
Related content: How To Choose an Ad Network
By sending advertising requests to multiple networks, ad network mediation helps publishers increase competition and CPMs, while also improving operational efficiency and transparency. This is exactly what AdSpyGlass does.
What is AdSpyGlass and How Does it Work?
AdSpyGlass is the perfect solution for publishers and website owners who want to get the most out of their traffic.
Established in 2014, it is a revolutionary ad mediation and management platform that gives webmasters complete control over their ad inventory.
Furthermore, it connects publishers with multiple ad networks to help them get the best rates for their ad spots.
Here’s how it works:
- Someone visits your website. The system sends advertising requests to multiple ad networks you have an account in, providing them with relevant information such as ad spot, type of ad, and user demographic/click details.
- The ad networks respond with their offers. AdSpyGlass’s program then compares these offers and selects the network with the highest CPM offer.
- The ad from the chosen ad network at that instance is then displayed to the user.
All of this happens automatically and in a flash. Essentially, what takes you several days to set up codes, monitor ads, and compare earnings takes the platform a split second!
How can exactly can AdSpyGlass increase your revenue when you already have accounts in the same networks?
According to AdSpyGlass, each network only ever cares for 10 to 50% of your traffic. The rest of it, they buy at a really low price. But what if a different network considers “the rest of your traffic” as valuable and is willing to pay a premium?
That’s where AdSpyGlass comes in.
Essentially, you can’t manually figure out which of your traffic is valuable to a specific network the moment it comes in, right? But AdSpyGlass’s platform can.
So if you let this platform manage your ad accounts and evaluate the ad offers, then you can surely reach your website’s maximum earning potential.
AdSpyGlass Main Features
AdSpyGlass is an ad mediation and management platform that enables publishers to effectively monetize their ad inventory while providing transparency and control over the ads that are served to their audience.
The platform provides a host of features that streamline the process of managing ad campaigns, which include the following:
100% Fill Rate and Auto-Selection of Ads with Highest eCPM
AdSpyGlass is the surefire way to make the most out of your ad space. By automatically selecting ads with the highest eCPM, AdSpyglass guarantees that you’ll be earning top dollar for every ad view.
And with a 100% fill rate, you can rest assured that your ad space will never go unused.
So if you’re looking to maximize your earnings, there’s no better solution than AdSpyglass.
Connect with and Manage 35 Advertising Networks
First and foremost, AdSpyGlass is an ad network aggregator, which means it helps publishers connect with and manage 35 of the top ad networks available today.
When a publisher signs up for AdSpyGlass, they will be able to select which ad networks they want to connect with. AdSpyGlass will then send advertising requests to those ad networks.
By using AdSpyGlass, publishers can easily view all of the statistics for each advertising network in one place, as well as track the performance of their campaigns and make adjustments accordingly.
The ad platforms integrated with AdSpyGlass are a combination of adult and non-adult ad networks.
Some of its most popular CPM-based ad networks include PropellerAds, TrafficStars, Clickadu, Adsterra, TwinRed, ZeroPark, and Exoclick, but you can find a fit for any of your traffic by checking this list.
If the network you like working with is not included in AdSpyGlass’s list, you can send the latter a request to add it, and their team will do their best to do so.

Numerous Ad Types
Publishers have the flexibility to choose which ad types they want to display on their websites. This means AdSpyGlass can provide publishers with a truly unique and customized experience that will help them increase their ad revenue.
Among the ad types you can manage on the platform are:
- Popunders
- Display banners
- Native banners
- Push notifications
- In-page Push
- Instant messages
- Direct links
- In-video (VAST)
- Slider (VAST)
- Interstitial
Consolidate Earnings from Multiple Platforms
One of the main problems of a typical publisher working with multiple ad networks is the varying payment frequency and regulations.
Imagine waiting to receive multiple payments at different times of the month!
Sometimes, you may not even be allowed to withdraw your monthly earnings if you don’t reach the minimum earnings required.
If only you could consolidate your earnings, right?
AdSpyGlass allows you to do just that — receive a single payout for all your accounts on ad networks integrated with the platform. Moreover, you can withdraw your earnings twice a month (on the 10th and the 25th) without any further holds.
This means no more waiting around for individual payments from each ad network and no more worrying about whether or not you’ll get paid on time.
Low Withdrawal Threshold with Multiple Payout Options
No one likes waiting to get paid. You work hard to generate traffic and clicks, so you should be able to cash out as soon as possible.
However, many ad networks have high withdrawal thresholds, often between $50 and $100.
This can be frustrating, especially if you’re close to hitting the threshold but not quite there.
But with AdSpyglass, you can withdraw as little as $10 from your account.
So if you’ve earned $10 from all networks put together, you can get it right away — no waiting required.
It’s like getting paid by multiple ad networks simultaneously.
Advertisement

That’s a big benefit for publishers who need their payments quickly.
Plus, AdSpyglass has numerous payout options, including Yandex Money, Capitalist, Qiwi, Bitcoin, Payoneer, Paxum, PayPal, WebMoney, and bank transfer.
Robust Analytics Dashboard
AdSpyGlass is the best thing to happen to publishers since, well, ad networks!
This powerful analytics dashboard provides publishers with reliable statistics based on 100% of their traffic. That’s right, 100%!
You can see all of your traffic, including bot and proxy clicks.
Not only does it provide accurate traffic statistics, but it also offers a powerful dashboard with customizable reports.
AdSpyGlass offers an impressive 13 filters and 14 groupings for the flexible customization of reports.
With this, you can get the more detailed information you need to make informed decisions about your traffic.
This is totally unlike ad networks that provide only three filters, namely date, country, and device.
AdSpyGlass also provides publishers with performance charts.
These trends allow publishers to quickly see which are the most profitable ad networks at a glance!
AdSpyGlass Referral Program
AdSpyGlass‘s referral program is an easy way to generate additional revenue.
You can refer both new publishers and new advertisers to the platform.
If you refer publishers like yourself, you’ll get 5% of their earnings.
The user you referred will also be able to use the platform for free for the first month.
If you have a direct relationship with advertisers, you can refer them to AdSpyGlass’s traffic marketplace Traforama.
They will then be added to your profile as direct advertisers, and you can work with them through the platform with no additional fees.
You will get 100% revenue; AdSpyGlass will not get a share of the revenue from your direct advertisers.
8 Benefits of Working with AdSpyGlass
Based on the features mentioned above, you may have already glimpsed the many benefits of using AdSpyGlass. If not, here’s a rundown:
1. You Can Maximize Your Revenue
By working with several top ad networks, AdSpyGlass helps you get the highest CPMs for your ad spots. This means you’ll receive an instant income boost, so you’ll have more money in your pocket!
What’s more, the platform does this with minimal intervention on your part.
2. It’s Easy to Use
The platform is very user-friendly and easy to set up. You don’t need too many technical skills or knowledge to get started, except for skills that you already possess as a webmaster who sells ad placements on his online property.
3. Manage All your Ads in One Dashboard
With AdSpyGlass, you can manage all your advertising networks from one central dashboard. This saves you time and hassle, as you don’t need to log in to each ad network separately.
4. Work Directly with Advertisers
Following up on the previous benefit, AdSpyGlass also allows you to work with direct advertisers from within the platform.
5. You Get Detailed Reports
AdSpyGlass provides you with detailed reports on your ad impressions, earnings, and traffic sources so that you can see how your ads are performing. This transparency is essential for making informed decisions about your ad strategy.
And because you can track the results, you can also optimize your ads and placements with ease.
6. It’s Transparent
AdSpyGlass provides publishers with complete transparency over their earnings. You’ll always know how much money you’re making and where it’s coming from.
7. It Saves You Time
With AdSpyGlass, you don’t need to spend time manually setting up codes and replacing them.
You don’t need to open multiple ad network dashboards and compare performance.
The platform does all the work for you so that you can focus on other aspects of your business.
This is especially helpful if you own and manage more than one website.
8. You can Avoid Coding Mistakes
When you set up your ad codes manually, it’s easy to make mistakes.
But with AdSpyGlass, there’s no need to worry about coding errors as you only have to input one code per ad spot once.
Even if you want to change some of your ad settings, you only need to do that in AdSpyGlass’s dashboard and not on your website’s code.
AdSpyGlass Plans and Pricing
When it comes to online advertising, there’s no one-size-fits-all solution.
That’s why AdSpyGlass offers a variety of plans and pricing options to meet the needs of all kinds of businesses.
Mind you, these are not fixed-priced plans: you pay AdSpyGlass based on how much traffic you get and how much you earn.
These unique payment plans are:
- RevShare – You pay AdSpyGlass not with money but with 10% of your traffic. This means whatever the earnings you get for these randomly selected hits or impressions will be for AdSpyGlass.
- Pay as You Go – This plan is the most popular — you pay based on the number and type of ads served on your website on a CPM basis. For instance, if you receive 1,000 popunder ad impressions, you’ll pay the platform $0.07. The rate depends on the ad type.
- Post Paid – This plan is open to selected clients only. It requires account holders to give AdSpyGlass 10% of their monthly profit paid in advance.
- Enterprise – This plan is a customized one and is reserved for traffic whales only.
If you are unsure about what plan to use, you can first test the platform for 14 days.
After that, you can decide on what payment agreement you want to choose.
How To Use AdSpyGlass
Now that you know all about AdSpyGlass and what it can do for your business, it’s time to learn how to use it.
First, create an account on AdSpyGlass. You can sign up using your Facebook, Google, or email account.

Adding a Website
Once you’re logged in, add your website by clicking on the “Add Website” button.

On the next page, you will have to select your website’s stream, which means the type of content you have.
This is necessary for AdSpyGlass to be able to match your website with the right ad category.
If you have several websites with different streams, add one website at a time.
If they’re all in the same stream, you can add them all at once.
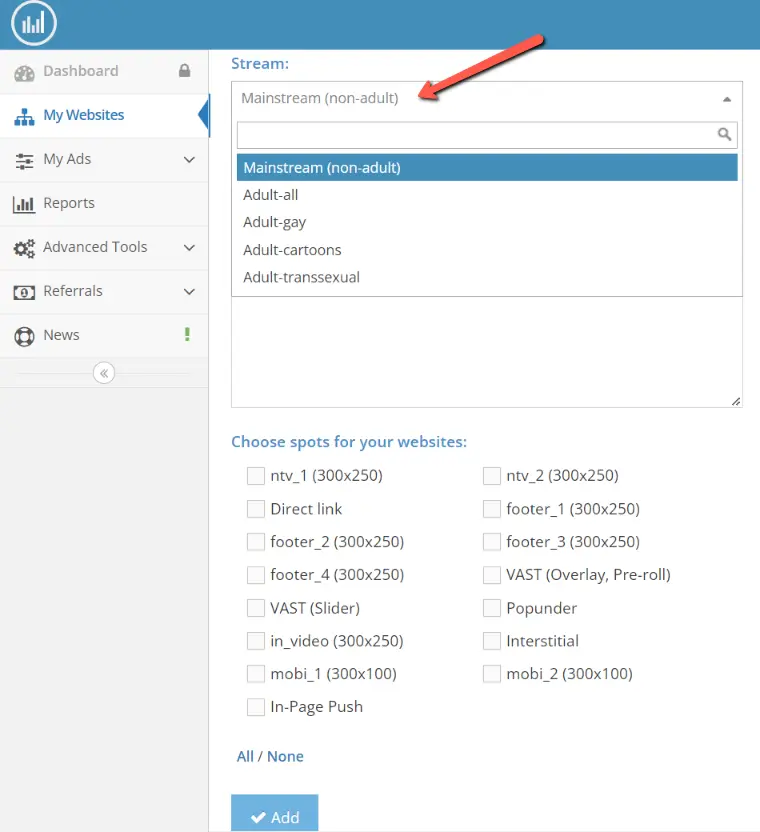
The Stream types you can choose from are:
- Mainstream (non-adult)
- Adult – All
- Adult – Gay
- Adult – Cartoons
- Adult – Transexual
Next, add the website’s URL. If you’re adding more than one website, place one domain name per line.

Finally, select the ad spots or the types of ads you want to display on your website. Check all that you apply.
After that, click on the Add button.

You will then be taken back to the dashboard, where you will find your website and all your pre-selected Ad Spots.

Repeat this process for adding new websites.
Verifying your Website
The next step is to verify your website. This is a necessary security measure to ensure that only the owner of the website can make changes to it.
As you may notice, there is an “Unverified” notice right next to your domain name. Click on the Verify button right across from it.

There are three ways you can verify your website:
1. Through file – This is the quickest method to validate your site. This is done by uploading a file to your website’s root directory. You can download the file provided, as shown in the image below.

Then upload this file to your website’s root directory. Alternatively, you can simply create a file there, name it as indicated in AdSpyGlass, and add the content mentioned.
2. Through meta tag – If you don’t have access to the root directory, choose this option so you can add a meta-tag to your website template instead.
Copy the code as shown below, and add it to the head section of your website. You can place the code right above the closing head tag and then save.

3. Through TXT record of your DNS – If your website uses CloudFlare or if you can modify your website’s DNS records, use this option. Copy the text record provided as shown below (remember that codes differ per website, so use only what’s indicated for your domain name):

Once you’ve done any of the options above, click on the Verify button. If you choose the first option, verification is instantaneous. The second and third options can take anywhere from a few minutes to several hours.
I tried the first option (file upload), and my website was immediately verified.

Now it’s showing as verified in the My Websites dashboard.

Adding Creatives per Ad Spot
Before you can run campaigns or ad tests on your website, you must first add all individual creatives per ad spot, per website. Do this for all ad spots you want to maximize.
Note: Select ad networks allow auto import, which you can do via the My Campaigns tab. If the ad network that you work with allows this, its name will appear on the table. If not, you have no choice but to manually create creatives by following the steps below.
To get started, first, you must go to My Websites page again, then click on the Show Spots icon (>>).

From the list of Ad Spots, choose where you want to add the creative, then click on the Add Creative button.

Keep in mind that the creative is a piece of code that you get from your ad network — it is not something you create.
On the new page, you will find all the information that you need to fill out. For this example, I will select “Add to existing campaign”, which is for “Mainstream for In-Page Push”.
I am simply adding to it because that is the campaign created when I added my website and selected ad spots.
So from the dropdown on Campaign Name, I chose what’s available. If you’re creating a new campaign, you can just type the name of your ad campaign on this space.
Add the name of your creative in the Creative Name section.
I placed “ClickAdilla In-Page” to help me identify it easily.
Next, choose the ad network.
If you’ve already linked a network in AdSpyGlass, you will see a checkmark next to it on the list (just like mine shows, I’ll show you how to do that later).

For the Zone ID, you can either place the actual zone ID provided by the ad network or if none, check for the site ID or the ad tags/Tag ID.
Then copy and paste the ad script for this placement or spot as provided by your ad network.

To verify if the code works, I clicked on the Show Preview button. A small pop-up window appeared for me with the ad on display.
It works!

The next section shows the filters that you may want to add to your ads. I kept mine on default.
However, I encourage you to click on the Show/hide advanced settings button to view other creative options.

Under the Advanced settings, you can adjust the ad frequency, which is how often the ad spot will show for each user that visits your website.
The frequency capping field is the gap between each time an ad is shown in seconds.
For instance, if you place 60 here, it means you want the user to see this ad spot once every 60 seconds or once every minute.
Now to provide better value for the ad networks and advertisers, you should limit how often an ad is shown to the same user.
The recommended values are shown next to the field, in the form of hours:
- 1:24 (which means once every 24 hours)
- 1:12 (one every 12 hours)
- 1:8 (one every 8 hours)
- 1:6 (one every 6 hours)
If you click on any of these values, the frequency capping field will automatically be filled in with the right number of seconds.
I have chosen 1:6, so it’s showing up as 21,600 seconds.

You can also set the minimum rate you are willing to accept for this ad spot.
You can opt for a flat rate for all countries or a varying rate per country.

Remember, these advanced settings are optional.
I suggest you go back and edit this section when you have enough data on your ad spots.
Once everything is set, click on Save.
Continue this process for ad networks you want to add per placement/spot so that AdSpyGlass will have a choice about which network to display.
Getting the Ad Code
For ads to actually be displayed on your website, it is imperative that you add the code for each ad spot.
Let me give you a quick rundown on how to do that in this AdSpyGlass review.
Continuing with my example above, I went back to the My Websites page and scrolled down to the Ad Spot I wanted to get the code for.
On your desired ad spot, click on the Get Code button.

Copy the code provided and paste it within the body tag of your website or of specific web pages where you want this ad spot to appear in.
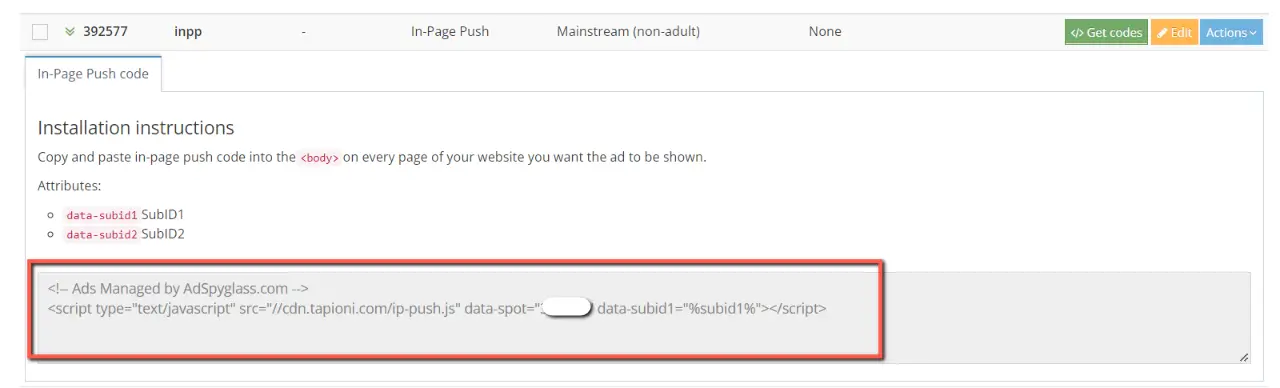
That’s it! Your optimized ads will start appearing on your website!
Adding a Spot
Let’s say you missed an ad placement when adding your website. You can easily add more by adding a spot.
First, go back to “My Websites” page, then click on the “Add Spot” button.

On the next page, fill out all the pertinent details of the ad spot, such as:
- Website (you must have already added the website for this ad spot)
- Spot name
- Stream (Mainstream, Adult, etc.)
- Ad Type (popunder, banner, instant message, slider, etc.)

- Execution page (where the add will show up in)

You can click on Save at this point, but you can also edit some advanced settings. To do so, click on “Show/hide advanced settings.”
You can adjust the following settings here:
- Test percentage – indicate the percentage of your traffic meant for untargeted consumers;
- Onloop – show appropriate creatives on an endless loop;
- Aggressive feeds – uncheck to avoid aggressive feeds but will reduce both income and CPM;
- Min CPM – indicate a minimum CPM offer for ads to show up.
After editing these, click on Save. This new ad spot will now be available under the website you chose.
How To Connect an Ad Network Account to AdSpyGlass
Now that you’ve added your website and ad spot(s), it’s time to add your advertising network’s account.
Alternatively, this can be the very first thing you do after creating your AdSpyGlass account.
Click on “My Ads” on the left menu pane, then click on “My Ad Networks” in its submenu.

You will be taken to the ad networks page, and this is what it looks like:

The page lists down all integrated ad networks in alphabetical order.
You will see each network’s average rating according to publishers’ evaluation.
In the third column, you’ll find the Stream types, which are useful if you want to work with new networks based on their ad categories.
Then there are the ad types, minimum payout, payment frequency, referral program, and average eCPM.
You can click on the icon next to eCPM to rearrange the list and view in descending order high CPM ad networks.
The two buttons on the far left are the most important to us since you’ll be using these to connect your ad account.
If you already have an account with a specific advertising network, click on the Link button.
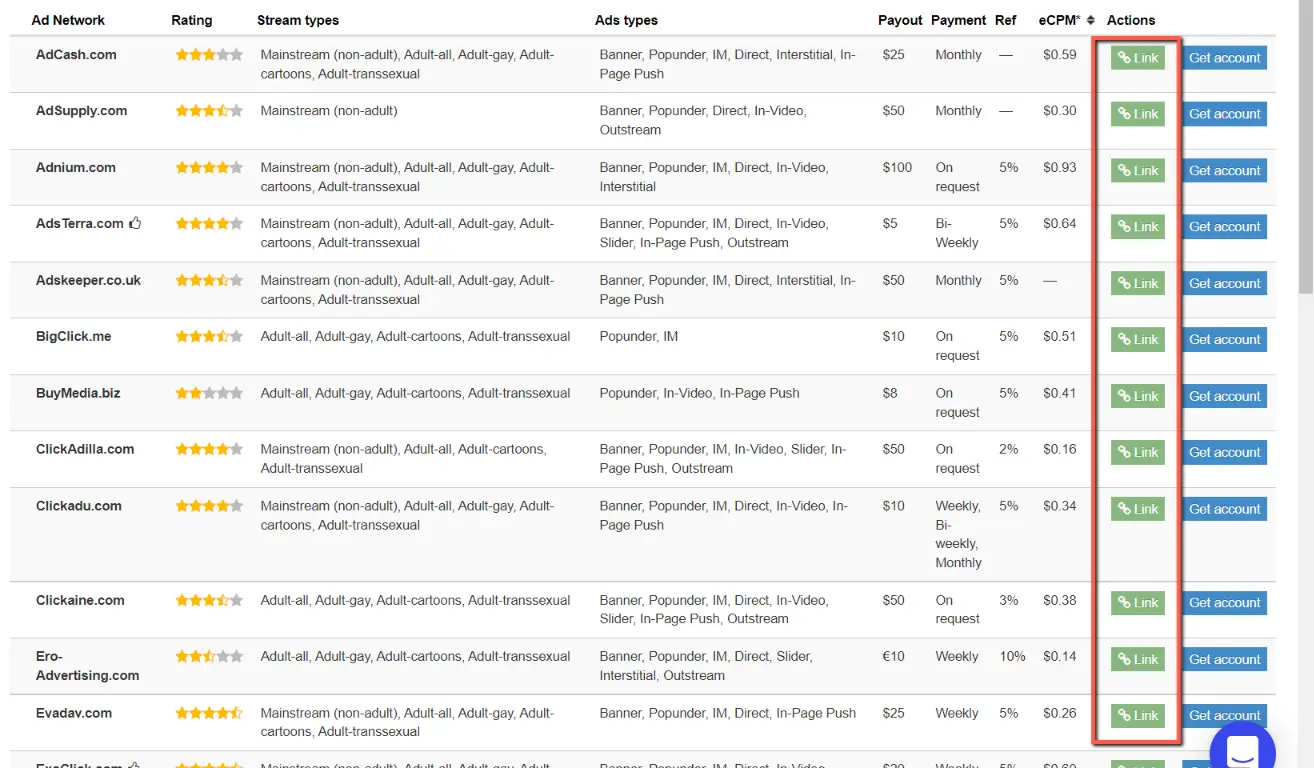
Simply add your login credentials to the next page.
For some ad networks, you may even be asked for your API credentials, like with ClickAdilla.

Once your credentials are accepted and validated, your Ad Networks page will show a notification.
Also, a checkmark will appear next to the Ad Network you linked with.

If you want to work with an integrated advertising network but don’t have an account there yet, you can simply click on the Get Account button, and you will be taken to the network’s sign-up page.
Checking Ad Performance
Once you’ve completed all the steps above and your website has started to display ads, you have to sit back and wait for a couple of days to review the performance.
AdSpyGlass’s reports dashboard does not show traffic and earnings in real-time.
The dashboard will update and show data on the next day at 8 am UTM time.

Nevertheless, once data is available, you will see a chart of the performance for the previous day and other pertinent data to help you evaluate your website’s performance.
You can analyze data based on the following filters:
- Ad Type
- Ad network Type
- Ad network
- Spot
- Browser
- Platform
- Device
- Connection Type
- Campaign
- Stream
- Creative
- Country
- Proxy Type
You can likewise group data based on:
- Date
- Ad Type
- Ad network
- Ad network type
- Browser
- Connection Type
- Spot
- Stream
- Creative
- Country
- Device
- Proxy Type
- IP
- UTM
Once you’ve found the combination of statistics that helps you better evaluate your websites, you can save it as a preset so you’ll be able to view the same next time with just a click of a button.
AdSpyGlass Review: Pros and Cons
This ad mediation service promises to make website monetization easy and efficient. But is AdSpyGlass really the best tool for the job? Let’s take a closer look at the pros and cons of this popular service.
Pros
- 100% Fill Rate
- Automatically selects ads with the highest eCPM
- View all your ad networks from a single dashboard
- Customizable and in-depth reports
- Consolidated earnings
- Easy payouts with a low withdrawal threshold
- Lets you work with and display direct advertisers’ ads by referring them to Traforama
Cons:
- Works with CPM ad networks only
- More focused on adult ad networks
- Setting up can be tedious, especially if the ad networks you work with don’t allow auto-import of creatives
- Reports are not in real-time
The Bottom Line
AdSpyGlass was created to make webmasters’ and publishers’ lives easier by optimizing and managing their advertising in one place.
By integrating with major ad networks and letting you customize your settings, AdSpyGlass ensures that you are getting the most out of your advertising efforts.
And best of all, they take a performance-based approach, so you only pay them a portion based on your traffic and ad earnings.
My only wish is that they get more ad networks into the platform, and that they show stats quicker than waiting for the next day.
Apart from that, they’re golden. For this AdSpyGlass Review, we can say that this company definitely delivers on its promise!
So whether you are focusing on desktop or mobile advertising, if you are looking for an easy way to optimize and manage your website’s advertising, AdSpyGlass is a great option.
Advertisement
